在这篇博文中,你将学到:
- 什么是 Apify
- 为什么在 Apify 上使用 Scraping Browser 能实现双赢
- 如何在 Apify 的 Python 脚本中集成 Bright Data 的 Scraping Browser
- 如何在 Apify 上使用 Bright Data 的代理
让我们开始吧!
什么是 Apify?
Apify 是一个完整的网页抓取和数据提取平台。它允许你在云端创建并运行自定义的网络抓取工具——也就是 Actors。这些 Actors 会自动化与数据收集、处理及自动化相关的任务。
在 Apify 上,你可以通过将脚本公开给其他用户来为你的抓取脚本变现。无论你是私下使用还是对外公开,Bright Data 的抓取解决方案都能帮助让你的抓取器更加可靠且更有效。
为什么要在 Apify 上使用 Bright Data 的 Scraping Browser
要理解 Bright Data 的 Scraping Browser 的价值,首先必须了解这款工具是什么以及它所提供的功能。
传统浏览器自动化工具最大的限制往往不是它们的 API,而是它们所控制的浏览器本身。而 Scraping Browser 是专为网页抓取设计的下一代浏览器。它特别具备以下关键功能:
- 可靠的 TLS 指纹来避免被检测
- 可以无限扩展的大规模数据提取能力
- 由 7200 万 IP 代理网络支持的内置 IP 轮换
- 自动重试以处理失败的请求
- 能够处理 CAPTCHA
Scraping Browser 兼容所有主流的浏览器自动化框架——包括 Playwright、Puppeteer 和 Selenium。因此,你无需学习新的 API 或安装第三方依赖,只需直接把它集成到现有的浏览器自动化抓取脚本中即可。
现在,在 Apify 上使用 Scraping Browser 可以带来更多好处,包括:
- 降低云端成本:浏览器会消耗大量资源,导致更高的 CPU 和内存使用率。Scraping Browser 在云端托管并保证无限扩展,可在 Apify 的 Actor 运行时降低云端成本。由于Apify 按服务器使用情况收费,即使将 Scraping Browser 的费用考虑在内,这种设置也可能节省整体成本。
- 一体化的反爬工具:Scraping Browser 能应对 IP 封锁、CAPTCHA 验证、浏览器指纹问题以及其他反抓取障碍。这让你的抓取流程更加高效,并且不易中断。
- 内置代理集成:Scraping Browser 内置了代理管理,因此你无需再关心维护和手动轮换代理。
- Apify 的优势:在 Apify 的云端 Actor(而非通用脚本)上使用 Scraping Browser,还能提供额外好处,比如:
- 轻松部署
- 通过 API 以编程方式访问数据
- 简单的数据导出
- 轻松配置输入参数
- 可为大型项目扩展
Bright Data + Apify 的集成不仅能简化你的抓取流程,还能提升可靠性,同时降低让抓取机器人上线所需的时间和精力。
如何在 Apify 上集成 Bright Data 的 Scraping Browser:分步指南
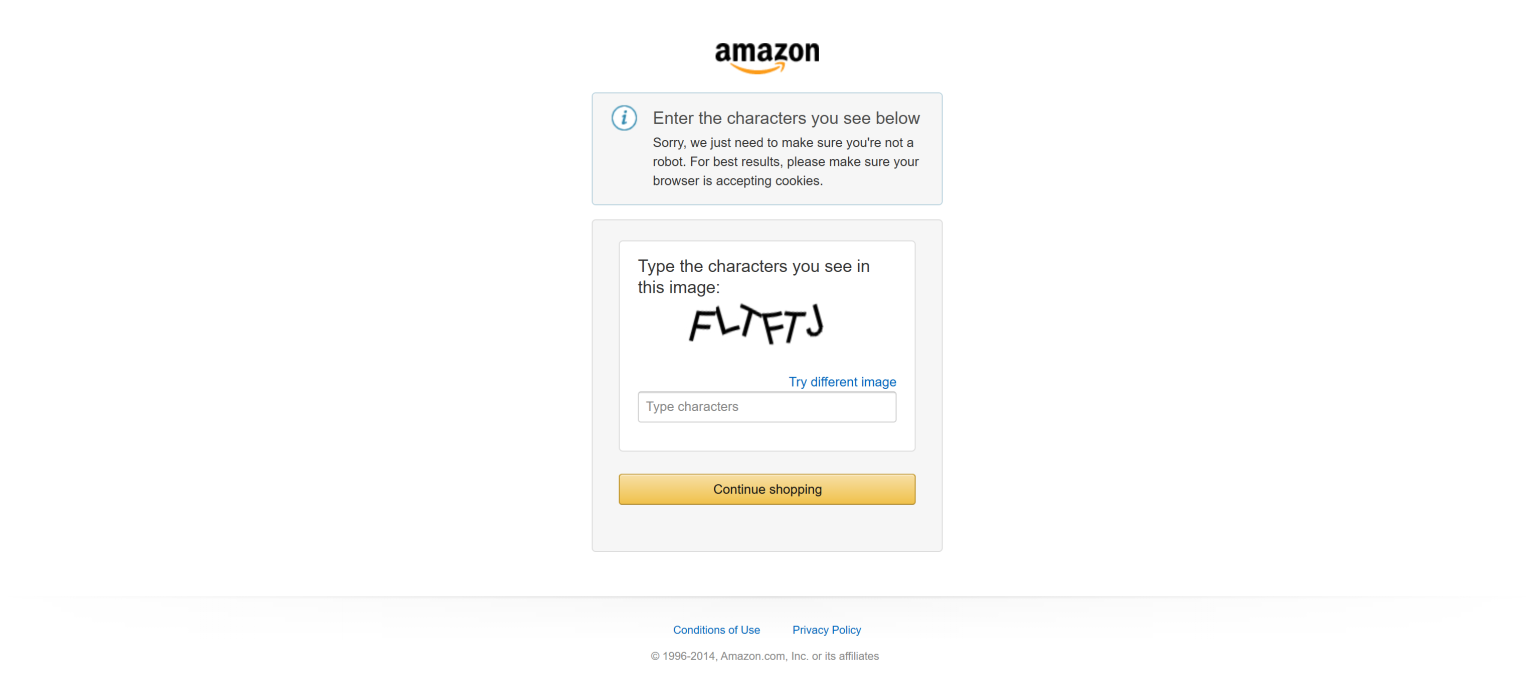
在本节中,我们将以 Amazon 为目标站点。该平台信息丰富,但对机器人有严格的限制措施。如果没有合适的工具,你极有可能遇到Amazon CAPTCHA,从而阻止你的抓取:
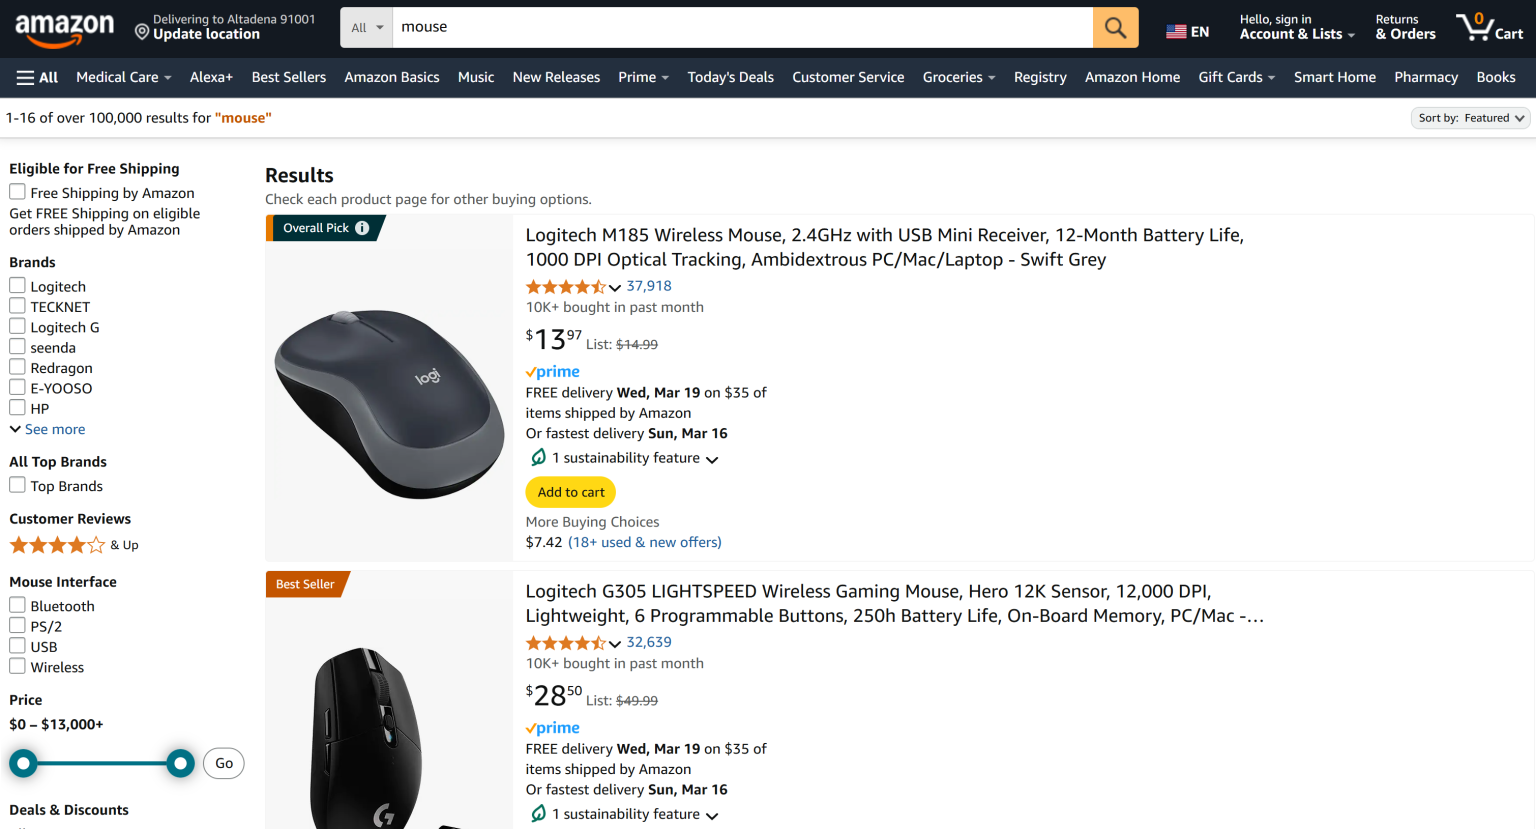
这里,我们将构建一个利用 Bright Data 的 Scraping Browser 来抓取 Amazon 通用产品搜索结果页面的 Actor:
注意:本文示例使用 Python 编写 Actor,但Apify 也支持 JavaScript。
按照以下步骤,学习如何在 Apify 中集成 Bright Data 的抓取工具!
准备工作
要完成本教程,你需要满足以下前提:
- 本地安装了 Python 3.8+:用于开发和构建本地 Actor 脚本。
- 本地安装了 Node.js:用于安装 Apify CLI。
- 一个 Apify 账户:以便将本地 Actor 部署到 Apify 平台。
- 一个 Bright Data 账户:用于访问 Scraping Browser。
步骤 #1:项目设置
使用 Apify CLI 是最简单的新建 Apify Actor 项目方式。首先,在 Node.js 环境下全局安装它:
npm install -g apify-cli然后,执行以下命令创建一个新的 Apify 项目:
npx apify-cli create接下来,你会被要求回答几个问题。请按如下方式回答:
✔ Name of your new Actor: amazon-scraper
✔ Choose the programming language of your new Actor: Python
✔ Choose a template for your new Actor. Detailed information about the template will be shown in the next step.
Playwright + Chrome
这样,Apify CLI 就会在名为 amazon-scraper 的文件夹里创建一个 Python Actor,并使用 “Playwright + Chrome” 模板。如果你不熟悉这些工具,可以阅读我们关于 Playwright 网页抓取的指南。
注意:Selenium 或 Puppeteer 模板也同样支持,因为 Bright Data 的 Scraping Browser 能与任何浏览器自动化工具集成。
你的 Apify Actor 项目结构大致如下:
amazon-scraper
│── .dockerignore
│── .gitignore
│── README.md
│── requirements.txt
│
├── .venv/
│   └── ...
│
├── .actor/
│   │── actor.json
│   │── Dockerfile
│   └── input_schema.json
│
├── src/
│   │── main.py
│   │── __init__.py
│   │── __main__.py
│   └── py.typed
│
└── storage/
    └── ...
将 amazon-scraper 文件夹用你喜欢的 Python IDE 打开,比如 Visual Studio Code(安装 Python 插件) 或 PyCharm Community Edition。
现在,记得要在本地运行 Actor,需要安装 Playwright 的浏览器。首先在项目文件夹中激活虚拟环境(.venv)。如果你使用的是 Windows,执行:
.venv/Scripts/activate若使用 Linux/macOS,执行:
source .venv/bin/activate然后,安装 Playwright 所需的依赖:
playwright install --with-deps太好了!现在你可以通过以下命令本地运行你的 Actor:
apify run至此,你的 Apify 项目已完成初步设置,可以开始集成 Bright Data 的 Scraping Browser!
步骤 #2:连接到目标页面
如果你查看亚马逊搜索结果页面的 URL,会发现如下格式:
https://www.amazon.com/search/s?k=<keyword>例如:
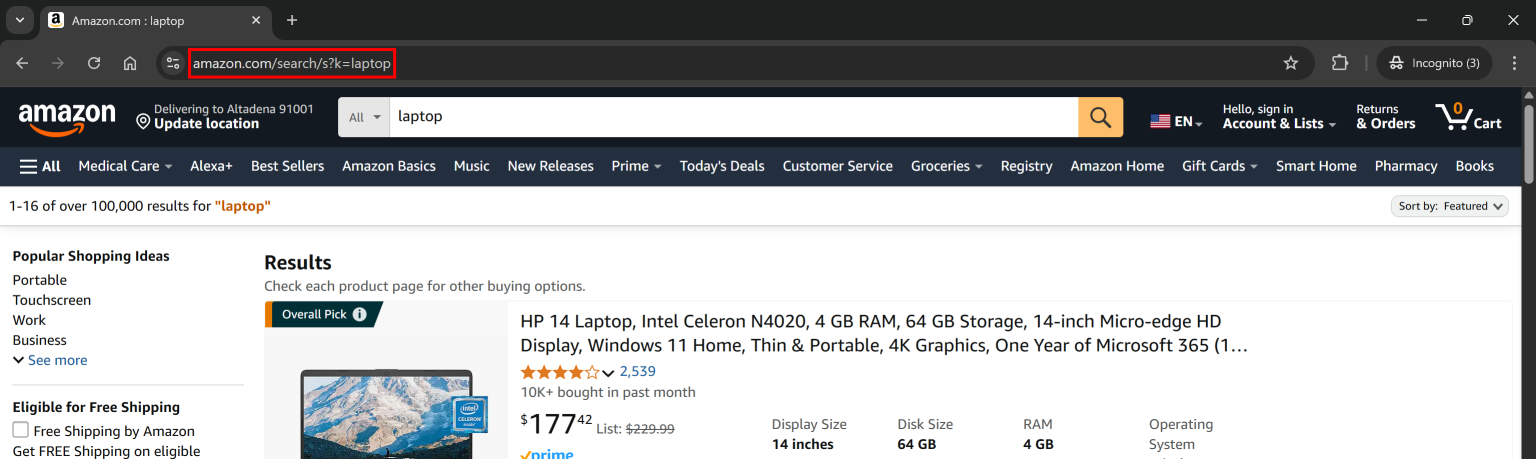
你的脚本目标 URL 需要使用这个格式,其中 <keyword> 可以用 Apify 的输入参数 动态替换。定义 Actor 能接收的输入参数需要在 .actor 目录下的 input_schema.json 文件中进行。
定义 keyword 参数使脚本更具灵活性,便于用户自定义搜索词。要定义这个参数,可以将 input_schema.json 的内容替换为:
{
    "title": "Amazon Scraper",
    "type": "object",
    "schemaVersion": 1,
    "properties": {
        "keyword": {
            "title": "Search keyword",
            "type": "string",
            "description": "The keyword used to search products on Amazon",
            "editor": "textfield"
        }
    },
    "required": ["keyword"]
}
这个配置定义了一个必需的字符串类型 keyword 参数。
为了在本地运行 Actor 时设置搜索词,修改 storage/key_value_stores/default 目录下的 INPUT.json 文件:
{
    "keyword": "laptop"
}
这样,Actor 会读取 keyword 作为输入参数,并将其赋值为 "laptop"。
当你将 Actor 部署到 Apify 平台后,会在启动时看到一个可供自定义此参数的输入字段:

请注意,Actor 的入口文件为 src 文件夹下的 main.py。打开该文件并进行以下修改:
- 从输入参数中读取
keyword - 构建目标的亚马逊搜索页面 URL
- 使用 Playwright 访问该页面
完成这个步骤后,你的 main.py 可能如下所示:
from apify import Actor
from playwright.async_api import async_playwright


async def main() -> None:
    # Enter the context of the Actor
    async with Actor:
        # Retrieve the Actor input, and use default values if not provided
        actor_input = await Actor.get_input() or {}
        # Reading the "keyword" argument from the input data, assigning it the
        # value "laptop" as a default value
        keyword = actor_input.get("keyword")

        # Building the target url
        target_url = f"https://www.amazon.com/search/s?k={keyword}"

        # Launch Playwright and open a new browser context
        async with async_playwright() as playwright:
            # Configure the browser to launch in headless mode as per Actor configuration
            browser = await playwright.chromium.launch(
                headless=Actor.config.headless,
                args=["--disable-gpu"],
            )
            context = await browser.new_context()

            try:
                # Open a new page in the browser context and navigate to the URL
                page = await context.new_page()
                await page.goto(target_url)

                # Scraping logic...

            except Exception:
                Actor.log.exception(f"Cannot extract data from {target_url}")

            finally:
                await page.close()
上面的代码:
- 初始化一个 Apify
Actor来管理脚本生命周期 - 通过
Actor.get_input()获取输入参数 - 从输入数据中提取
keyword参数 - 使用 Python 的 f-string 构建目标 URL
- 启动 Playwright,开启无头模式的 Chromium,并禁用 GPU
- 创建一个新的浏览器上下文,打开页面,并通过
page.goto()跳转到目标 URL - 用
Actor.log.exception()记录任何错误 - 确保执行结束后关闭 Playwright 页面
很好!你的 Apify Actor 已经准备好利用 Bright Data 的 Scraping Browser 进行高效的网页抓取。
步骤 #3:集成 Bright Data 的 Scraping Browser
现在,你可以先用 Playwright 的 API 在连接到目标页面后截图:
await page.screenshot(path="screenshot.png")
运行本地 Actor 后,会在项目文件夹中生成名为 screenshot.png 的文件。打开后,你可能会看到:

或者出现下面的亚马逊错误页面:
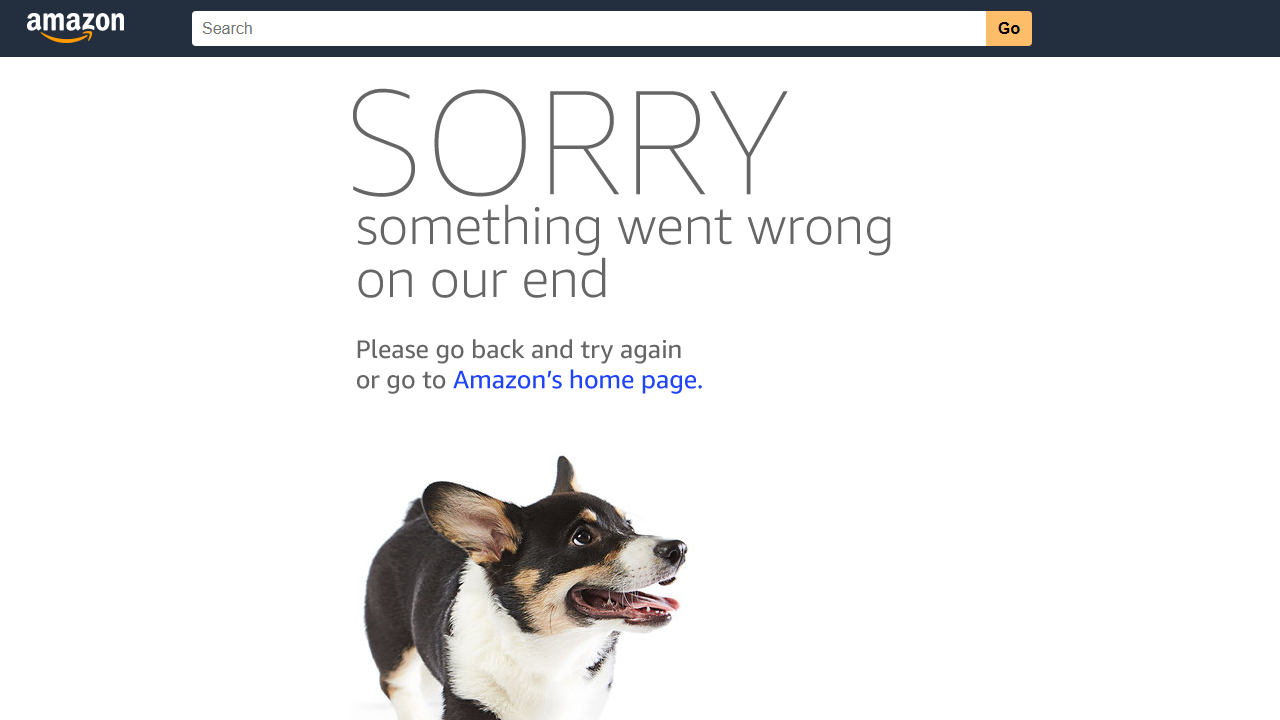
如你所见,你的脚本已被亚马逊的反爬机制所阻拦。这只是对抗流行网站时可能遇到的诸多挑战中的一个。
使用 Bright Data 的 Scraping Browser,就无需再担心这些挑战——它是一个云端抓取解决方案,提供无限扩展、自动 IP 轮换、CAPTCHA 解决和反爬绕过等功能。
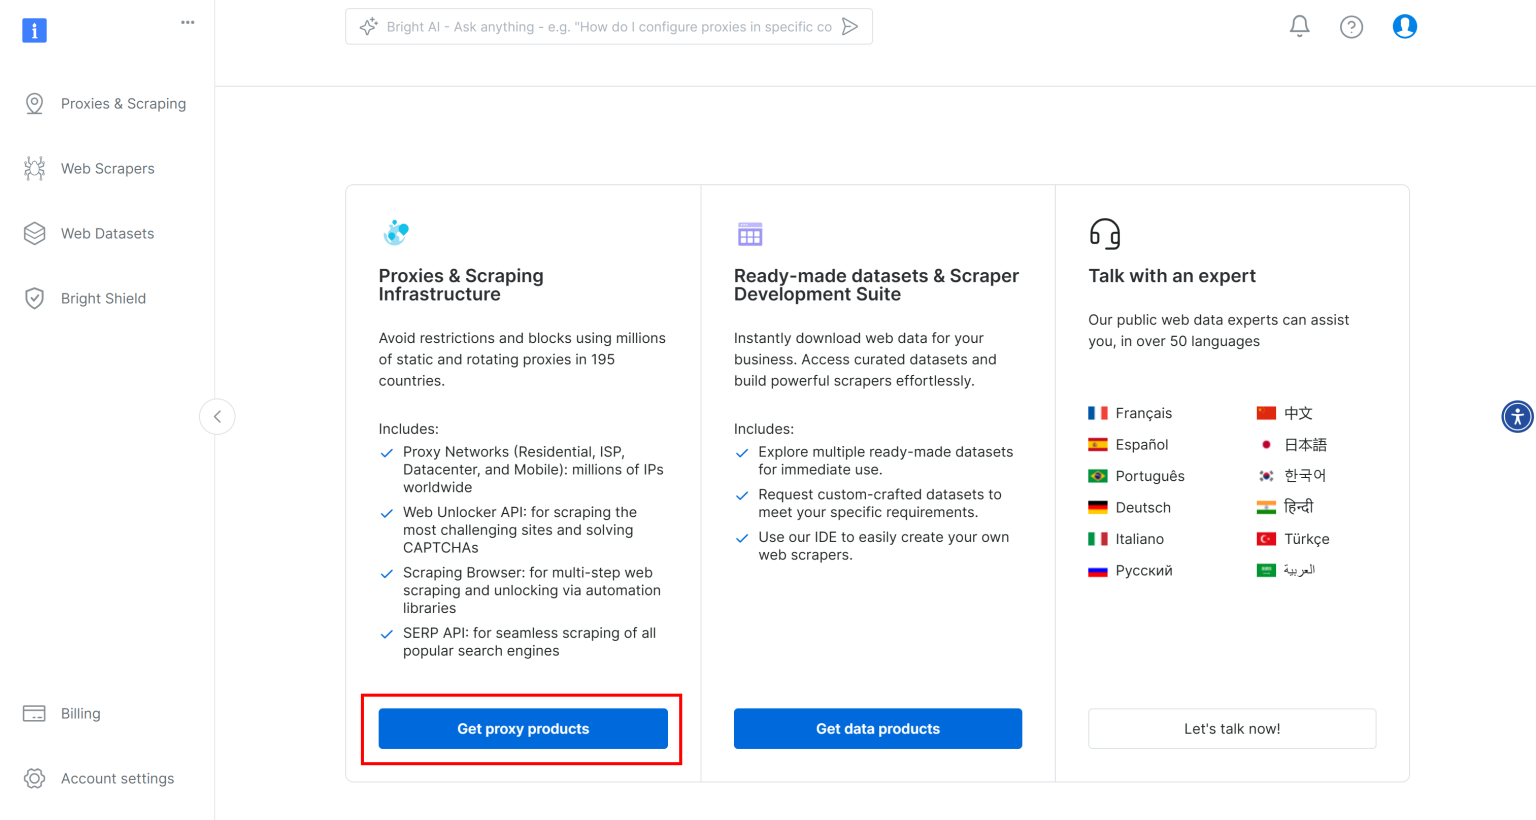
首先,如果你还没有账户,请注册 Bright Data。然后登录平台。在 “User Dashboard” 部分,点击 “Get proxy products” 按钮:
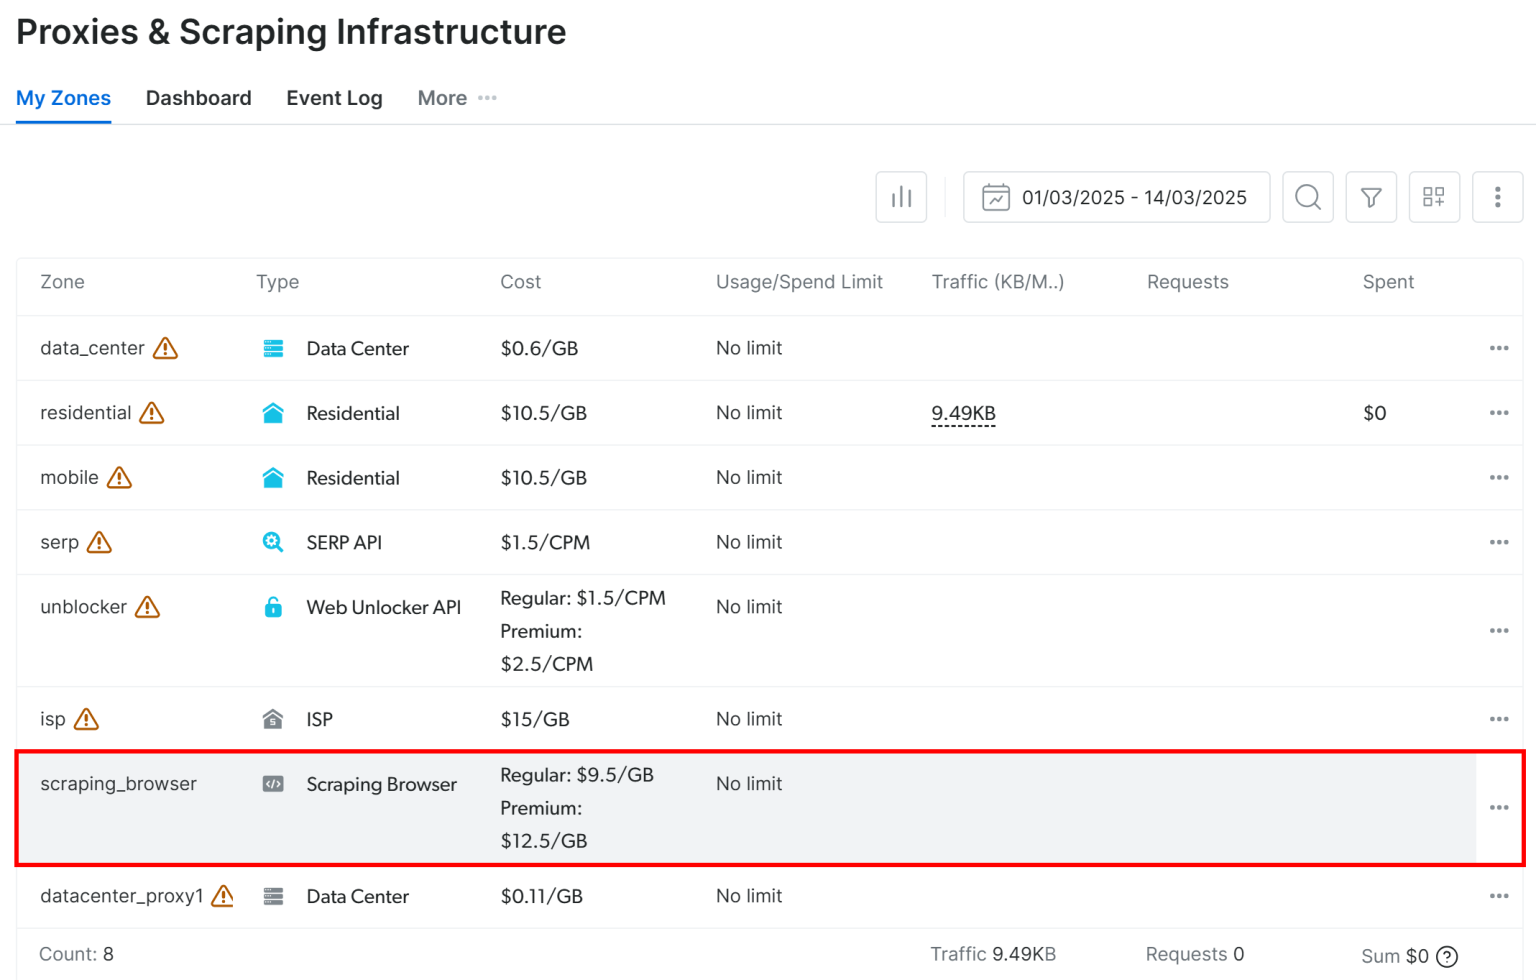
在 “Proxies & Scraping Infrastructure” 页面下的 “My Zones” 表格中,选择 “scraping_browser” 这一行:
通过切换开关启用该产品:

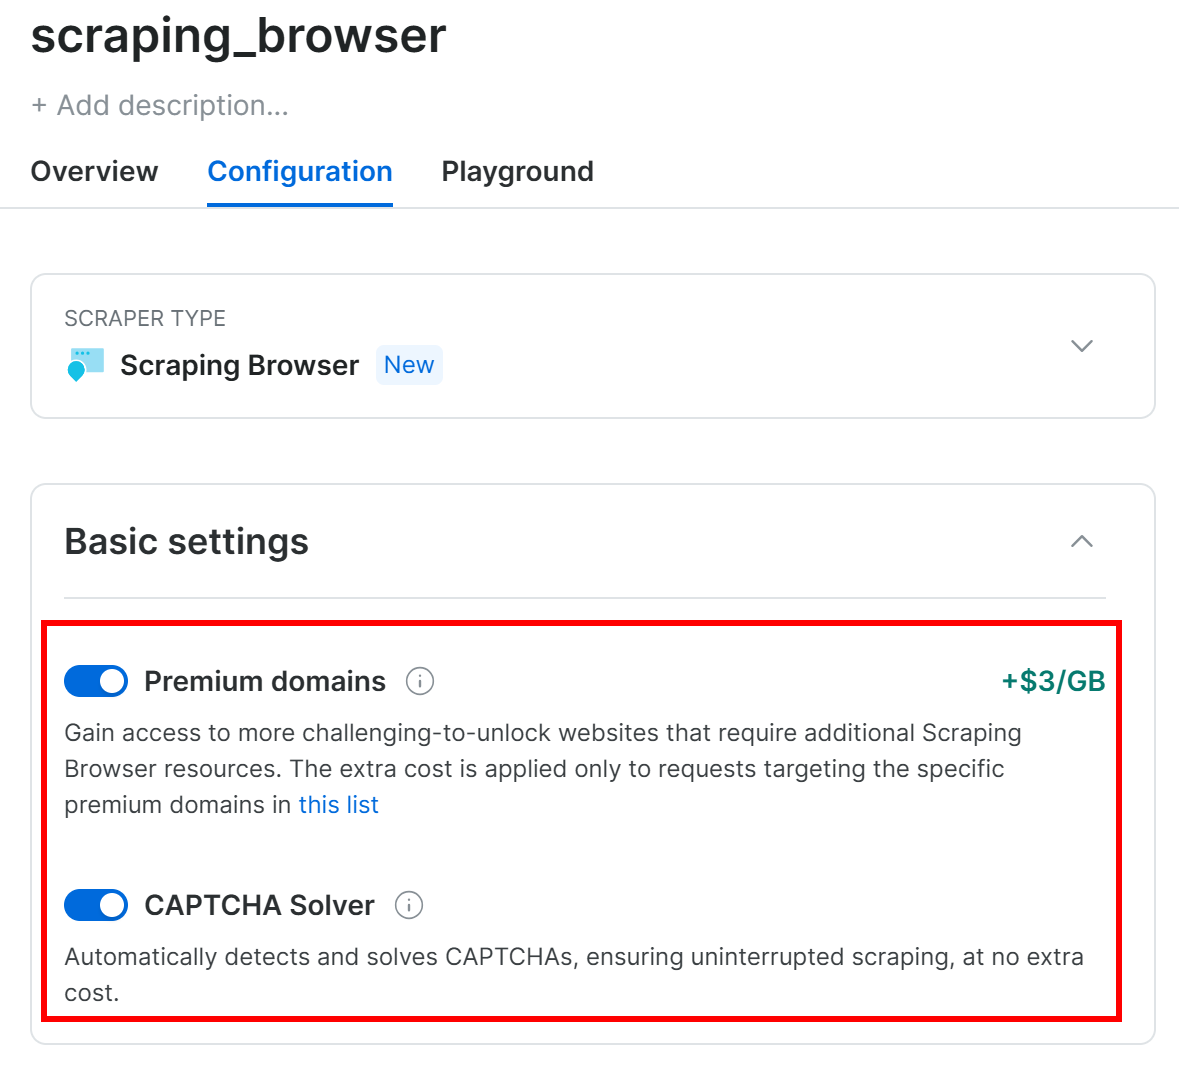
然后,在 “Configuration” 选项卡下,确保 “Premium domains” 和 “CAPTCHA Solver” 功能被启用,以便达到最佳效果:
接着,在 “Overview” 选项卡下,复制 Playwright Scraping Browser 的连接字符串:
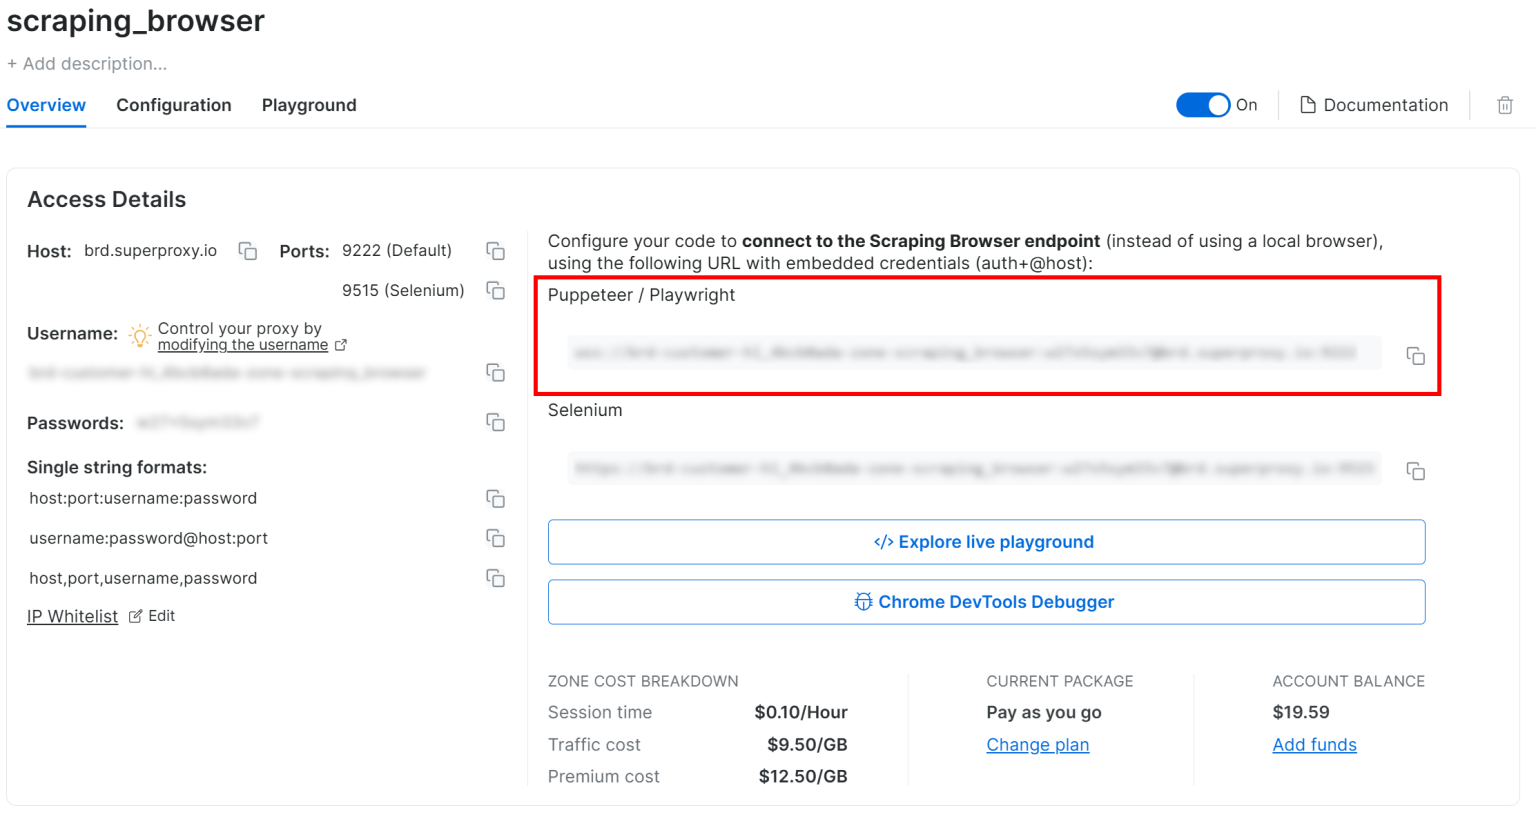
将该连接字符串添加到 main.py 文件里并作为常量使用:
SBR_WS_CDP = "<YOUR_PLAYWRIGHT_SCRAPING_BROWSER_CONNECTION_STRING>"请用你刚才复制的实际连接字符串来替换 <YOUR_PLAYWRIGHT_SCRAPING_BROWSER_CONNECTION_STRING>。
注意:如果你计划将 Actor 公之于众,你应该将 SBR_WS_CDP 定义为一个 Apify Actor 输入参数,以便使用你 Actor 的其他人也能集成他们自己的 Scraping Browser 连接字符串。
最后,修改 main.py 中 browser 的定义,让它在 Playwright 中使用 Scraping Browser:
browser = await playwright.chromium.connect_over_cdp(SBR_WS_CDP, timeout=120000)请注意,这里连接的超时时间应设得比平时更高,因为代理 IP 轮换和 CAPTCHA 解决都需要一定时间。
完成!你已经在 Apify 的 Playwright 环境里成功集成了 Scraping Browser。
步骤 #4:准备抓取所有商品列表
要抓取亚马逊的商品列表,需要先查看页面的 HTML 结构。右击其中一个商品元素,选择 “检查 (Inspect)”。下面是开发者工具的示例:
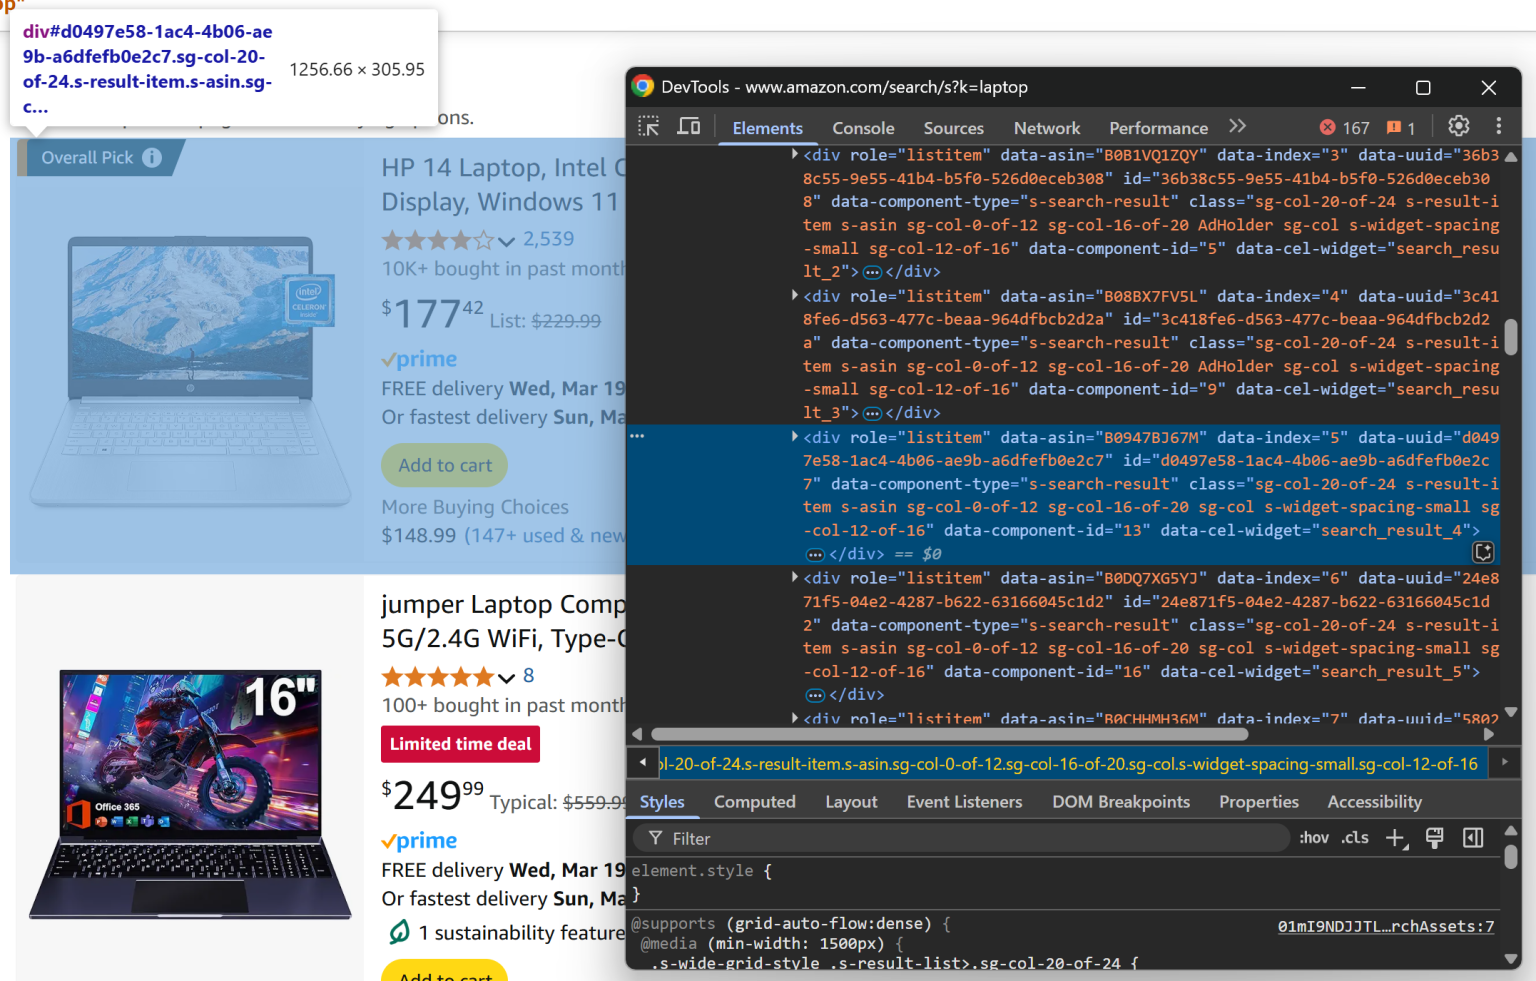
你会看到,每个商品元素都可以用这个 CSS 选择器进行选择:
[data-component-type="s-search-result"]利用自定义的 data-* 属性来定位元素通常很好,因为这些属性往往用于测试或监控,通常比较稳定。
在 Playwright 中,你可以通过定位器 (locator)找到所有商品元素:
product_elements = page.locator("[data-component-type="s-search-result"]")然后遍历这些就绪的商品元素,为后续数据提取做准备:
for product_element in await product_elements.all():
    # Data extraction logic...
很好!接下来我们来实现从 Amazon 抓取数据的逻辑。
步骤 #5:实现抓取逻辑
先来检查单个商品元素:
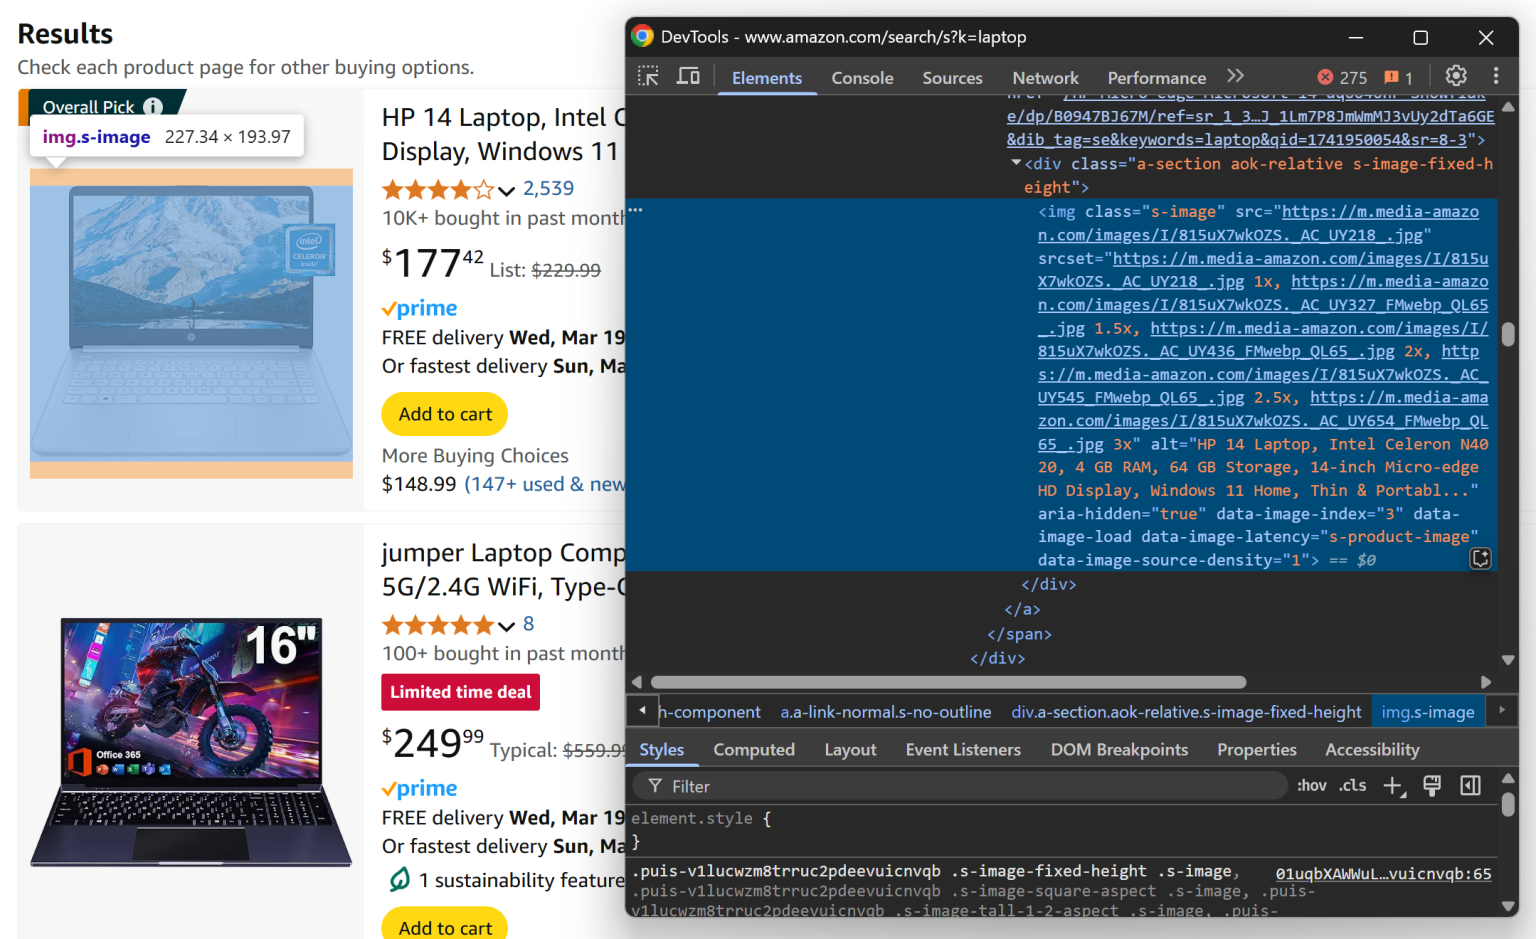
从这一部分,你可以从 .s-image 元素的 src 属性获取商品图片:
image_element = product_element.locator(".s-image").nth(0)
image = await image_element.get_attribute("src")
注意,这里用了 nth(0) 来获取第一个匹配该定位器的元素。
接下来查看商品标题:
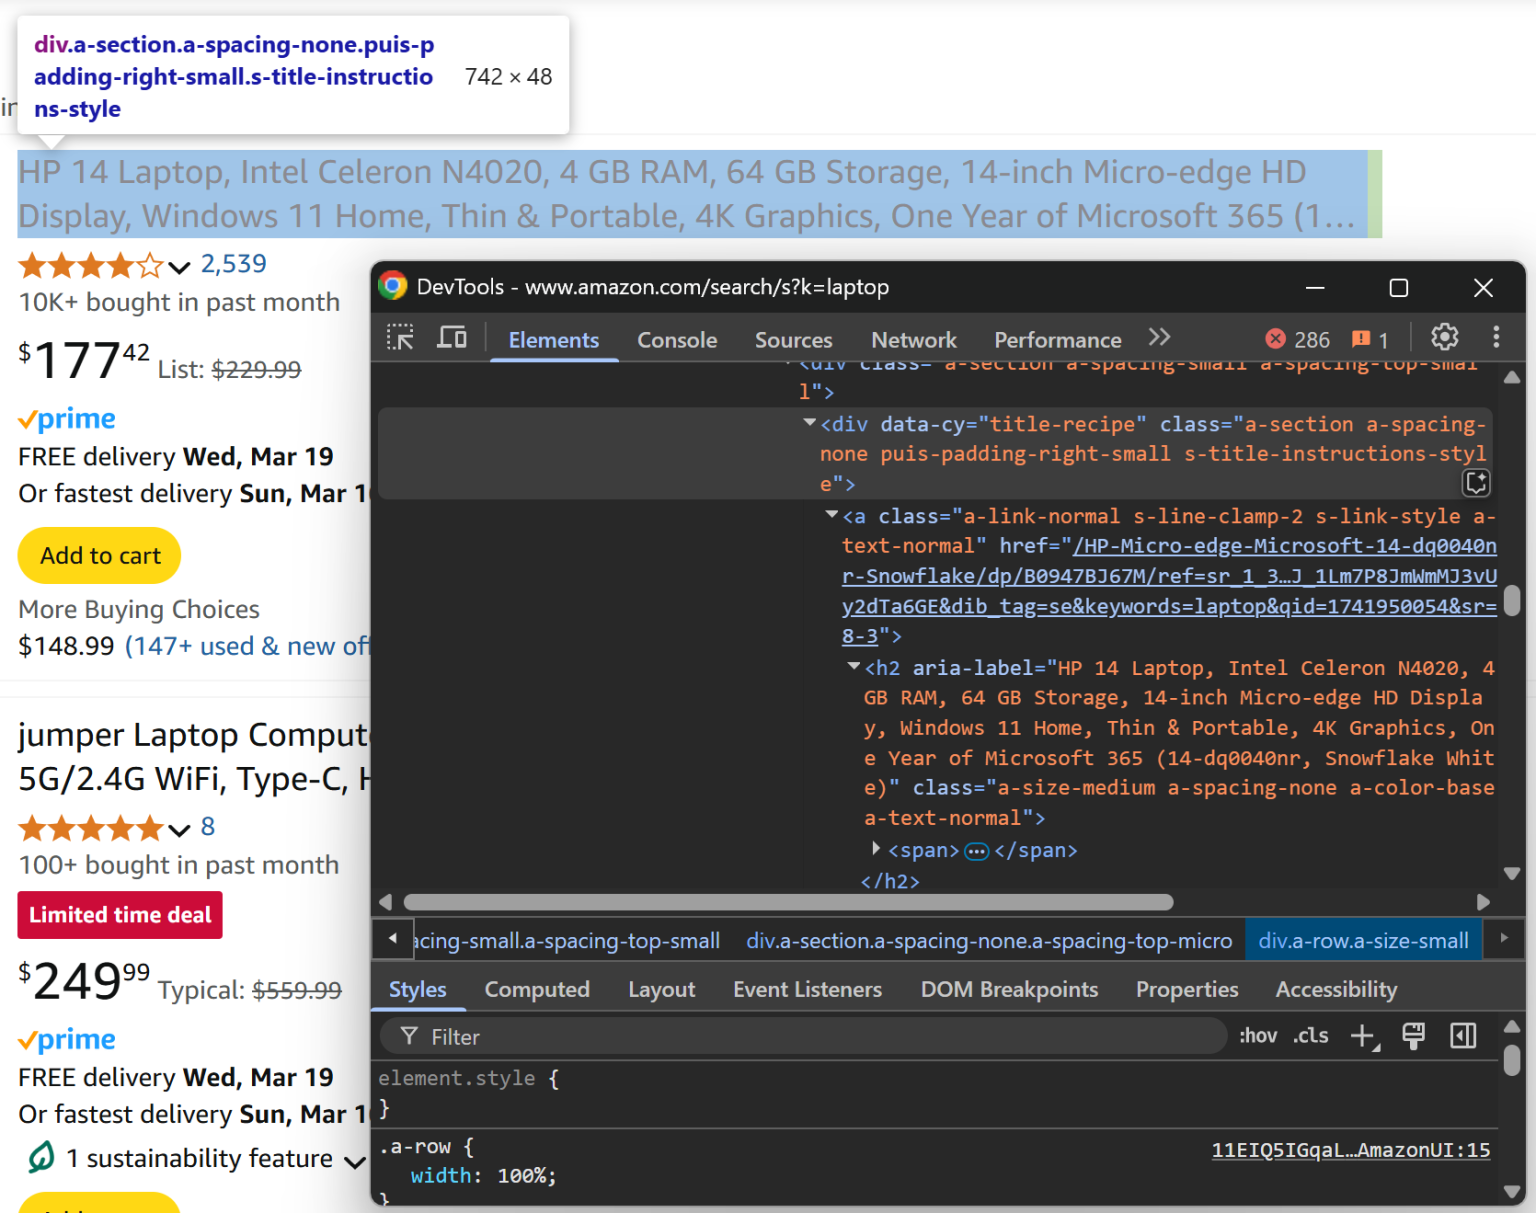
你可以在 [data-cy="title-recipe"] 元素的 <a> 和 <h2> 标签内,分别获取商品 URL 和标题:
title_header_element = product_element.locator("[data-cy="title-recipe"]").nth(0)

link_element = title_header_element.locator("a").nth(0)
url = None if url_text == "javascript:void(0)" else "https://amazon.com" + url_text

title_element = title_header_element.locator("h2").nth(0)
title = await title_element.get_attribute("aria-label")
这里的逻辑用于忽略一些 “javascript:void(0)”(例如广告位)链接,并把相对链接转为绝对地址。
然后查看评论部分:
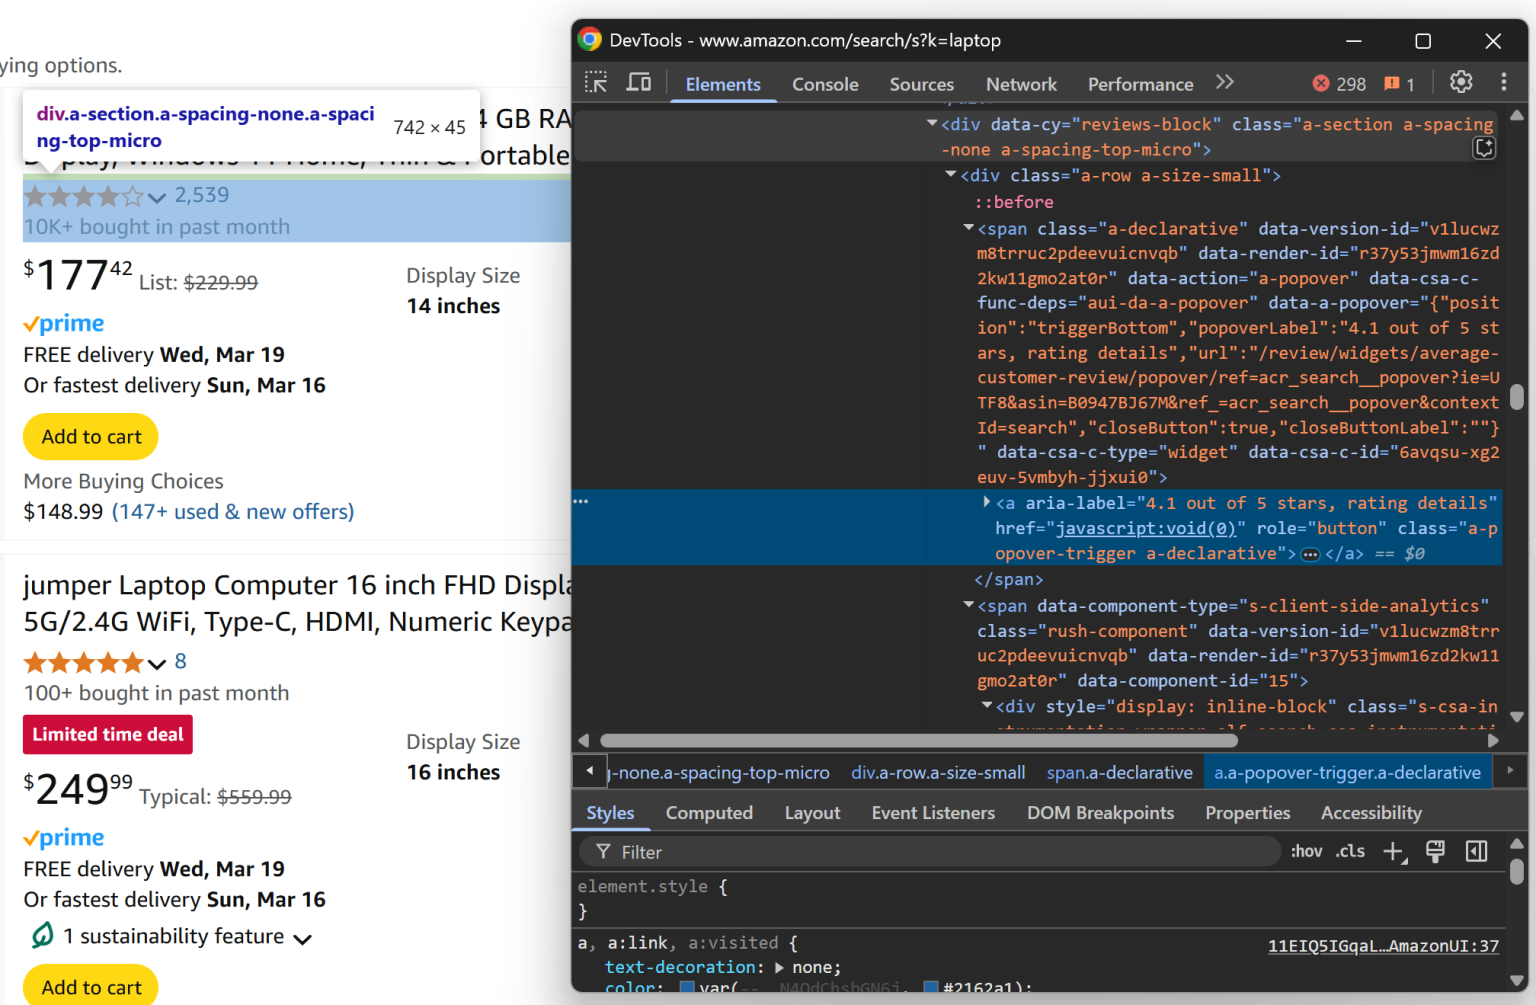
从 [data-cy="reviews-block"] 找到的 <a> 元素里,你可以从 aria-label 获取评论星级:
rating_element =  product_element.locator("[data-cy="reviews-block"] a").nth(0)
rating_text = await rating_element.get_attribute("aria-label")
rating_match = re.search(r"(d+(.d+)?) out of 5 stars", rating_text)
if rating_match:
    rating = rating_match.group(1)
else:
    rating = None
因为 aria-label 中的文本是类似 “X out of 5 stars” 的格式,所以可以用正则直接提取评分值 X。查看 如何使用正则进行网页抓取。
别忘了先导入 re 标准库:
import re然后查看评论数:
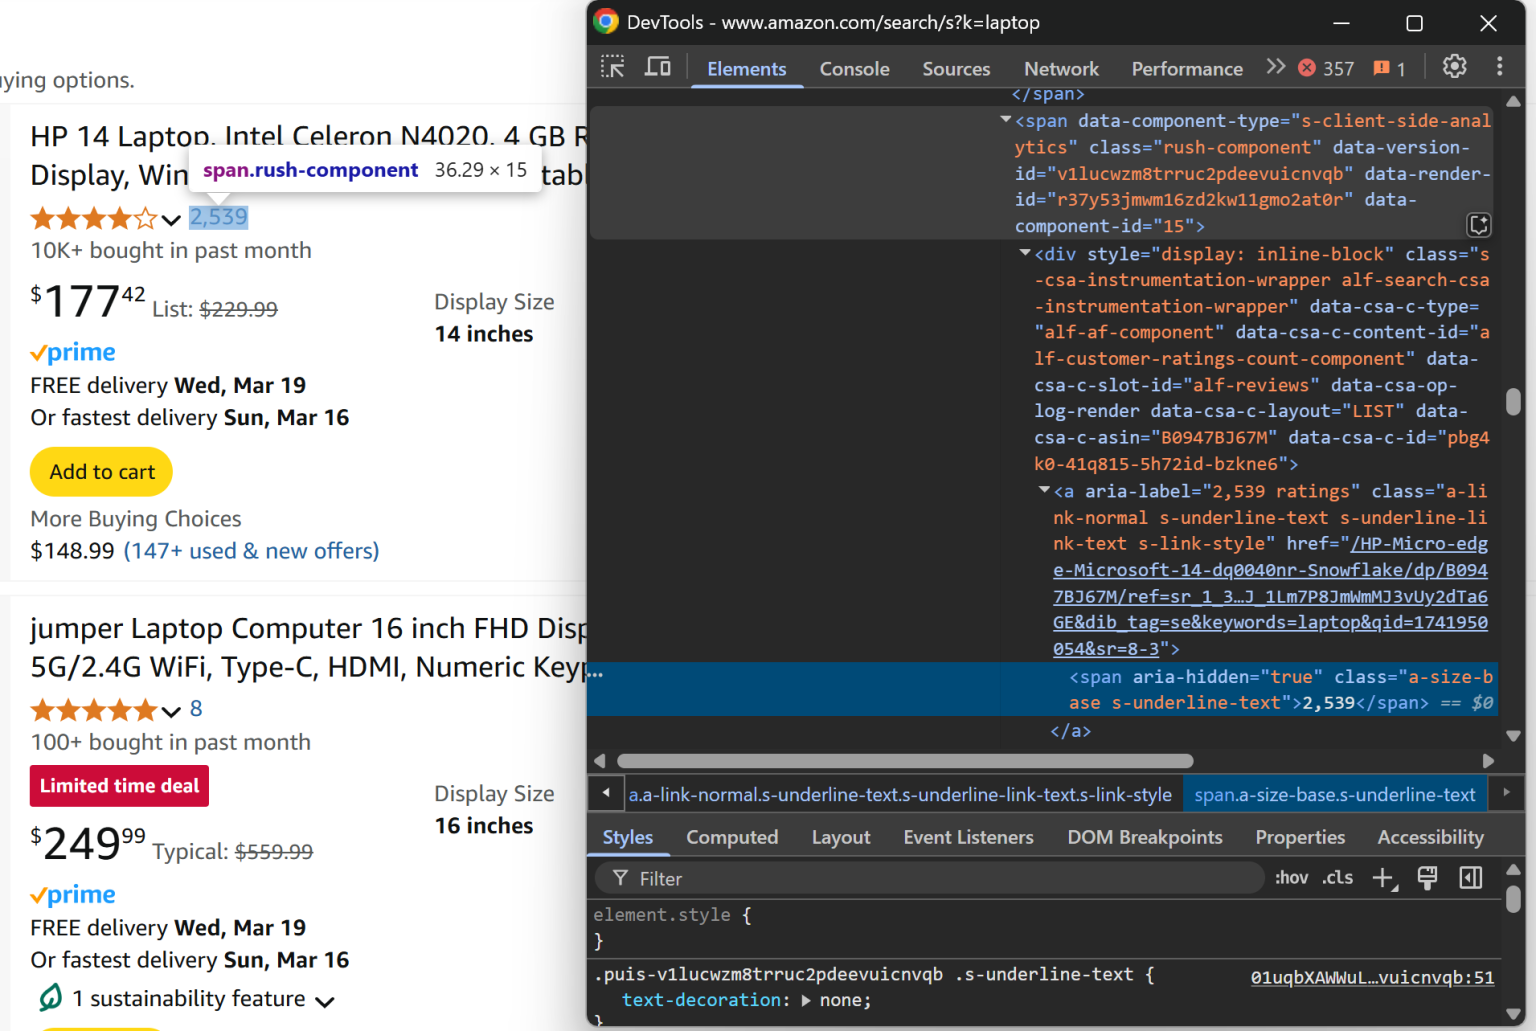
从 [data-component-type="s-client-side-analytics"] 的 <a> 元素里即可获取评论总数:
review_count_element = product_element.locator("[data-component-type="s-client-side-analytics"] a").nth(0)
review_count_text = await review_count_element.text_content()
review_count = int(review_count_text.replace(",", ""))
注意这里通过替换逗号,把诸如 “2,539” 形式的字符串转换成数字。
最后查看商品价格:
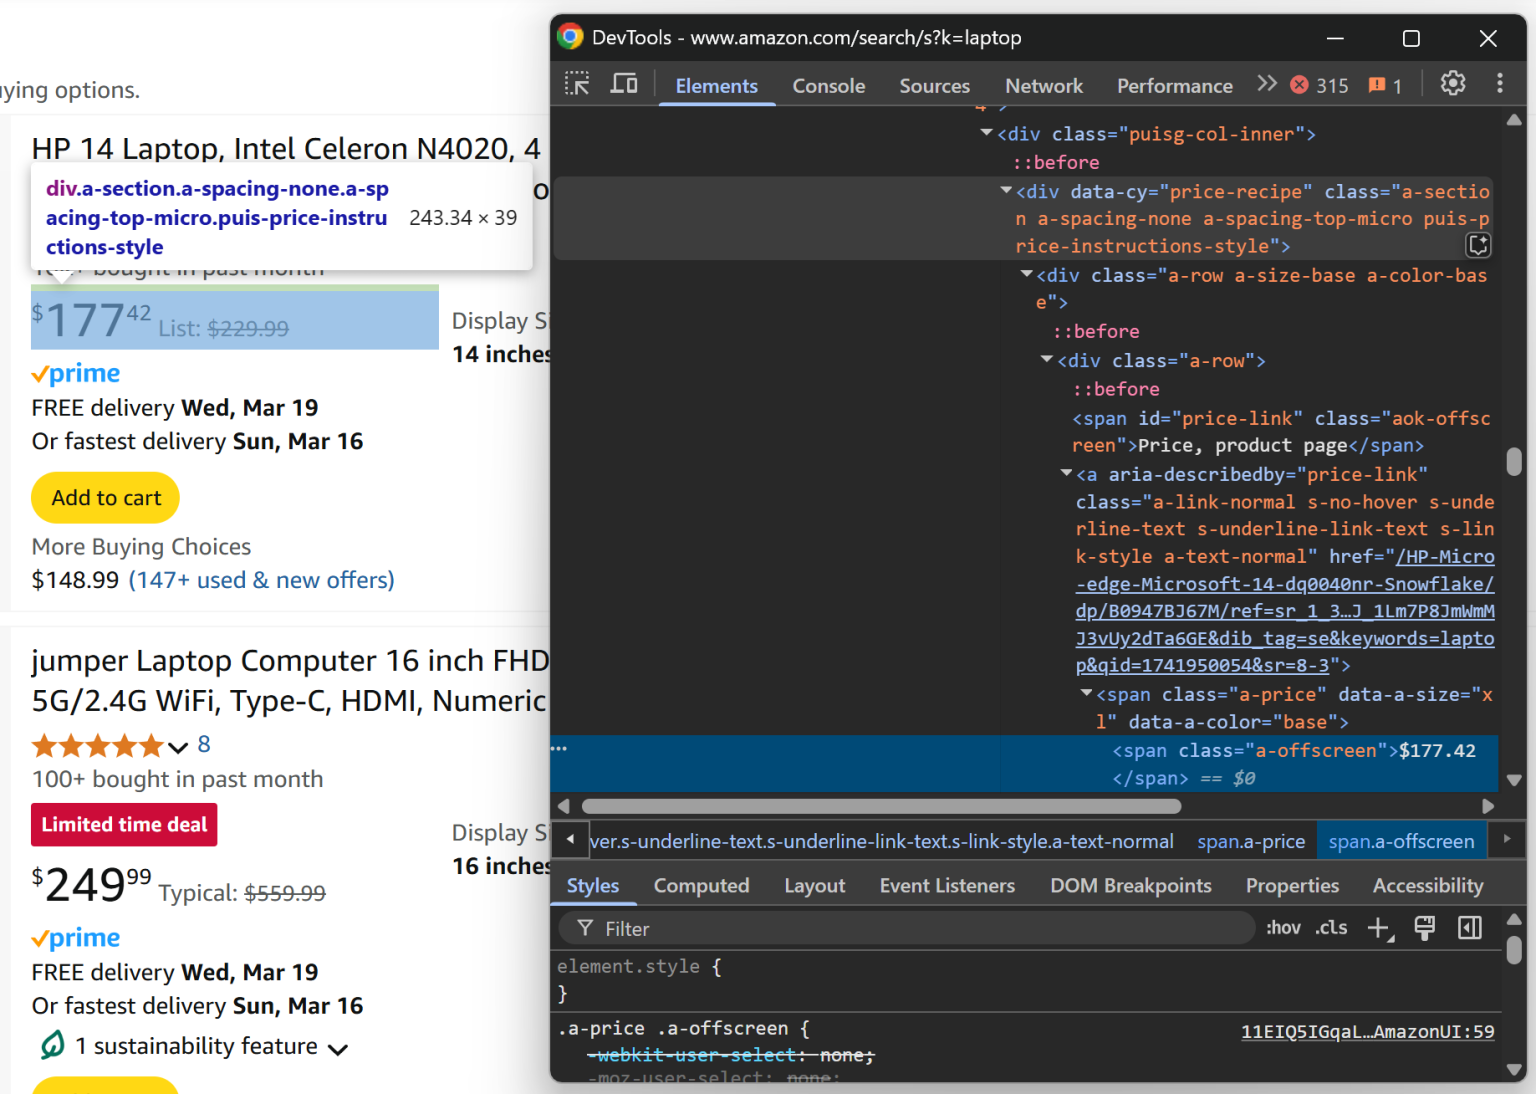
在 [data-cy="price-recipe"] 下的 .a-offscreen 元素可以获取到对应数字:
price_element_locator = product_element.locator("[data-cy="price-recipe"] .a-offscreen")
# If the price element is on the product element
if await price_element_locator.count() > 0:
    price = await price_element_locator.nth(0).text_content()
else:
    price = None
不是所有商品都有价格元素,因此要先检查是否存在价格节点再获取。
为了让脚本正常工作,你需要在代码里更新对 Playwright 的导入:
from playwright.async_api import async_playwright, TimeoutError好了!这样我们就完成了亚马逊产品数据的抓取逻辑。
需要注意的是,本文的重点不在深入探讨如何抓取亚马逊,因此更详细的可参见如何用 Python 抓取亚马逊产品数据的教程。
步骤 #6:收集抓取到的数据
在 for 循环的末尾,通过一个 product 字典收集已抓取的信息:
product = {
    "image": image,
    "url": url,
    "title": title,
    "rating": rating,
    "review_count": review_count,
    "price": price
}
然后把它推送到 Apify dataset 中:
await Actor.push_data(product)push_data() 会确保这些抓取到的数据被记录到 Apify 上,让你可以通过 API 访问,或以 CSV、JSON、Excel、JSONL 等多种格式导出。
步骤 #7:汇总所有步骤
最终,在 Apify + Bright Data 环境中,你的 Actor main.py 可能如下所示:
from apify import Actor
from playwright.async_api import async_playwright, TimeoutError
import re

async def main() -> None:
    # Enter the context of the Actor
    async with Actor:
        # Retrieve the Actor input, and use default values if not provided
        actor_input = await Actor.get_input() or {}
        # Reading the "keyword" argument from the input data, assigning it the
        # value "laptop" as a default value
        keyword = actor_input.get("keyword")

        # Building the target url
        target_url = f"https://www.amazon.com/search/s?k={keyword}"

        # Launch Playwright and open a new browser context
        async with async_playwright() as playwright:
            # Your Bright Data Scraping API connection string
            SBR_WS_CDP = "wss://brd-customer-username-zone-scraping_browser:[email protected]:9222"

            # Configure Playwright to connect to Scraping Browser and open a new context
            browser = await playwright.chromium.connect_over_cdp(SBR_WS_CDP, timeout=120000)
            context = await browser.new_context()

            try:
                # Open a new page in the browser context and navigate to the URL
                page = await context.new_page()
                await page.goto(target_url)

                # Use a locator to select all product elements
                product_elements = page.locator("[data-component-type="s-search-result"]")

                # Iterate over all product elements and scrape data from them
                for product_element in await product_elements.all():
                    # Product scraping logic
                    image_element = product_element.locator(".s-image").nth(0)
                    image = await image_element.get_attribute("src")

                    title_header_element = product_element.locator("[data-cy="title-recipe"]").nth(0)

                    link_element = title_header_element.locator("a").nth(0)
                    url_text = await link_element.get_attribute("href")
                    url = None if url_text == "javascript:void(0)" else "https://amazon.com" + url_text

                    title_element = title_header_element.locator("h2").nth(0)
                    title = await title_element.get_attribute("aria-label")

                    rating_element =  product_element.locator("[data-cy="reviews-block"] a").nth(0)
                    rating_text = await rating_element.get_attribute("aria-label")
                    rating_match = re.search(r"(d+(.d+)?) out of 5 stars", rating_text)
                    if rating_match:
                        rating = rating_match.group(1)
                    else:
                        rating = None

                    review_count_element = product_element.locator("[data-component-type="s-client-side-analytics"] a").nth(0)
                    review_count_text = await review_count_element.text_content()
                    review_count = int(review_count_text.replace(",", ""))

                    price_element_locator = product_element.locator("[data-cy="price-recipe"] .a-offscreen")
                    # If the price element is on the product element
                    if await price_element_locator.count() > 0:
                        price = await price_element_locator.nth(0).text_content()
                    else:
                        price = None

                    # Populate a new dictionary with the scraped data
                    product = {
                        "image": image,
                        "url": url,
                        "title": title,
                        "rating": rating,
                        "review_count": review_count,
                        "price": price
                    }
                    # Add it to the Actor dataset
                    await Actor.push_data(product)
            except Exception:
                Actor.log.exception(f"Cannot extract data from {target_url}")

            finally:
                await page.close()
可以看出,在 Apify “Playwright + Chrome” 模板下集成 Bright Data 的 Scraping Browser 只需少量代码改动。
步骤 #8:部署到 Apify 并运行 Actor
如果要将本地 Actor 部署到 Apify,请在项目文件夹下执行:
apify push如果尚未登录,就会提示你通过 Apify CLI 验证身份。
部署完成后,你会看到类似:
✔ Do you want to open the Actor detail in your browser?输入 “Y” 或 “yes”,就会在浏览器中打开你在 Apify 控制台的 Actor 详情页面:
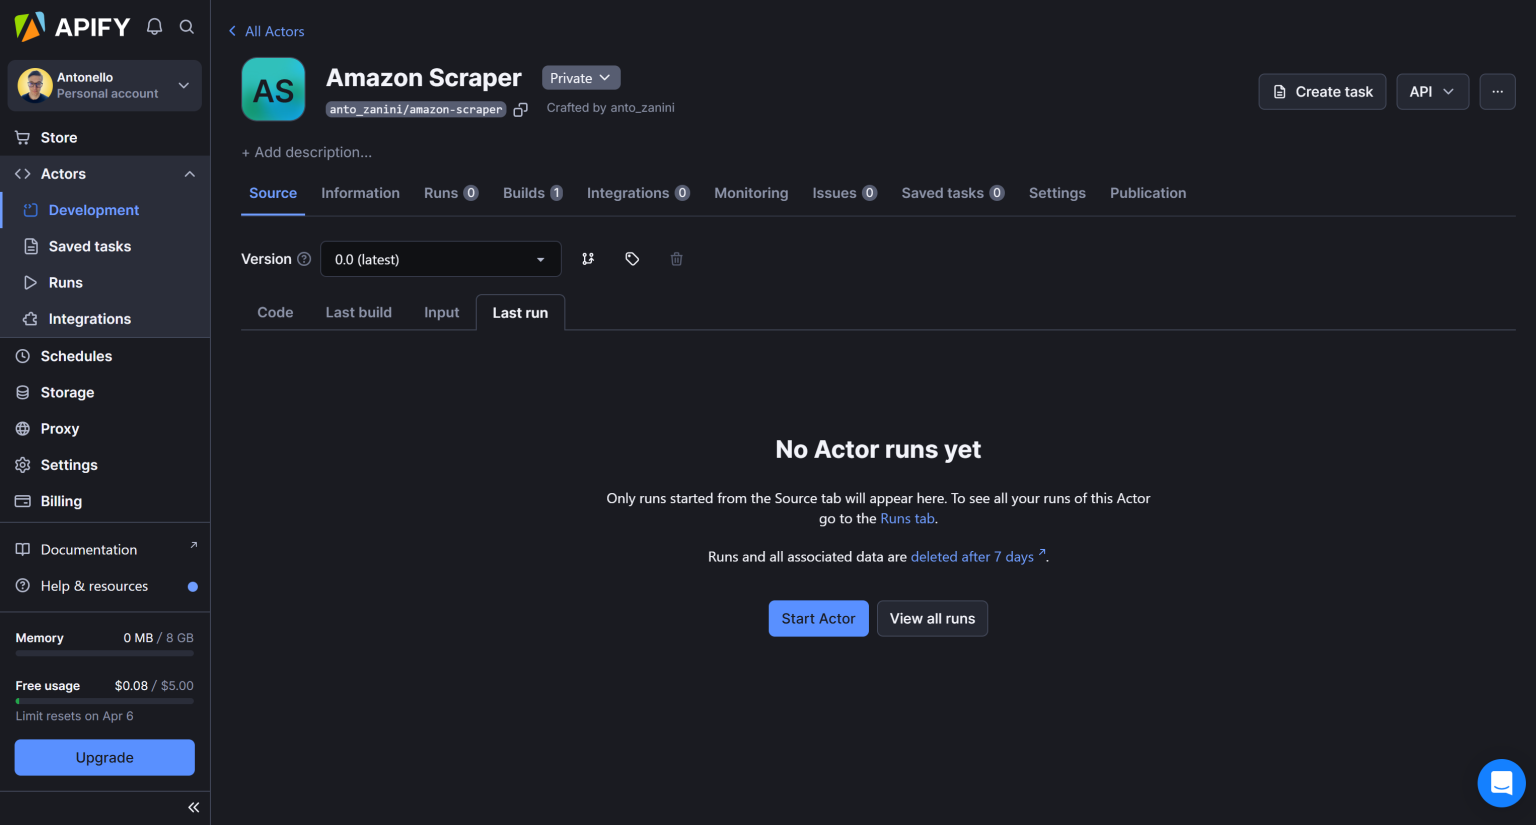
如果你愿意,可以手动登录 Apify 后:
- 进入控制台
- 打开 “Actor” 页面
点击 “Start Actor” 按钮来启动你的亚马逊抓取 Actor。届时,系统会要求你输入关键词。可以试试 “gaming chair”:
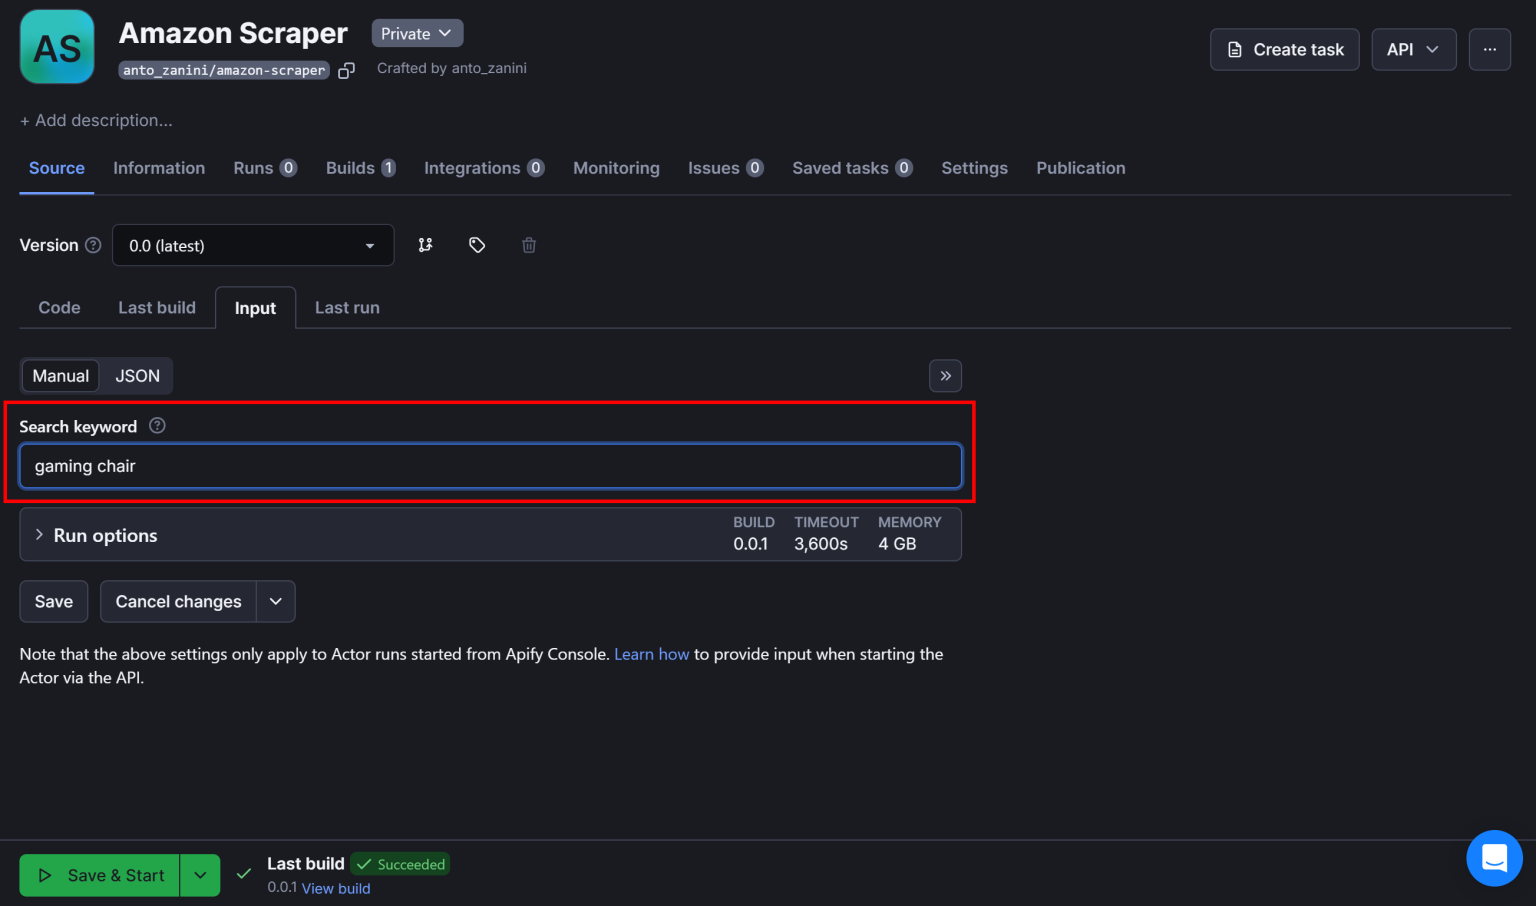
然后点击 “Save & Start” 以抓取 “gaming chair” 相关的亚马逊产品列表。
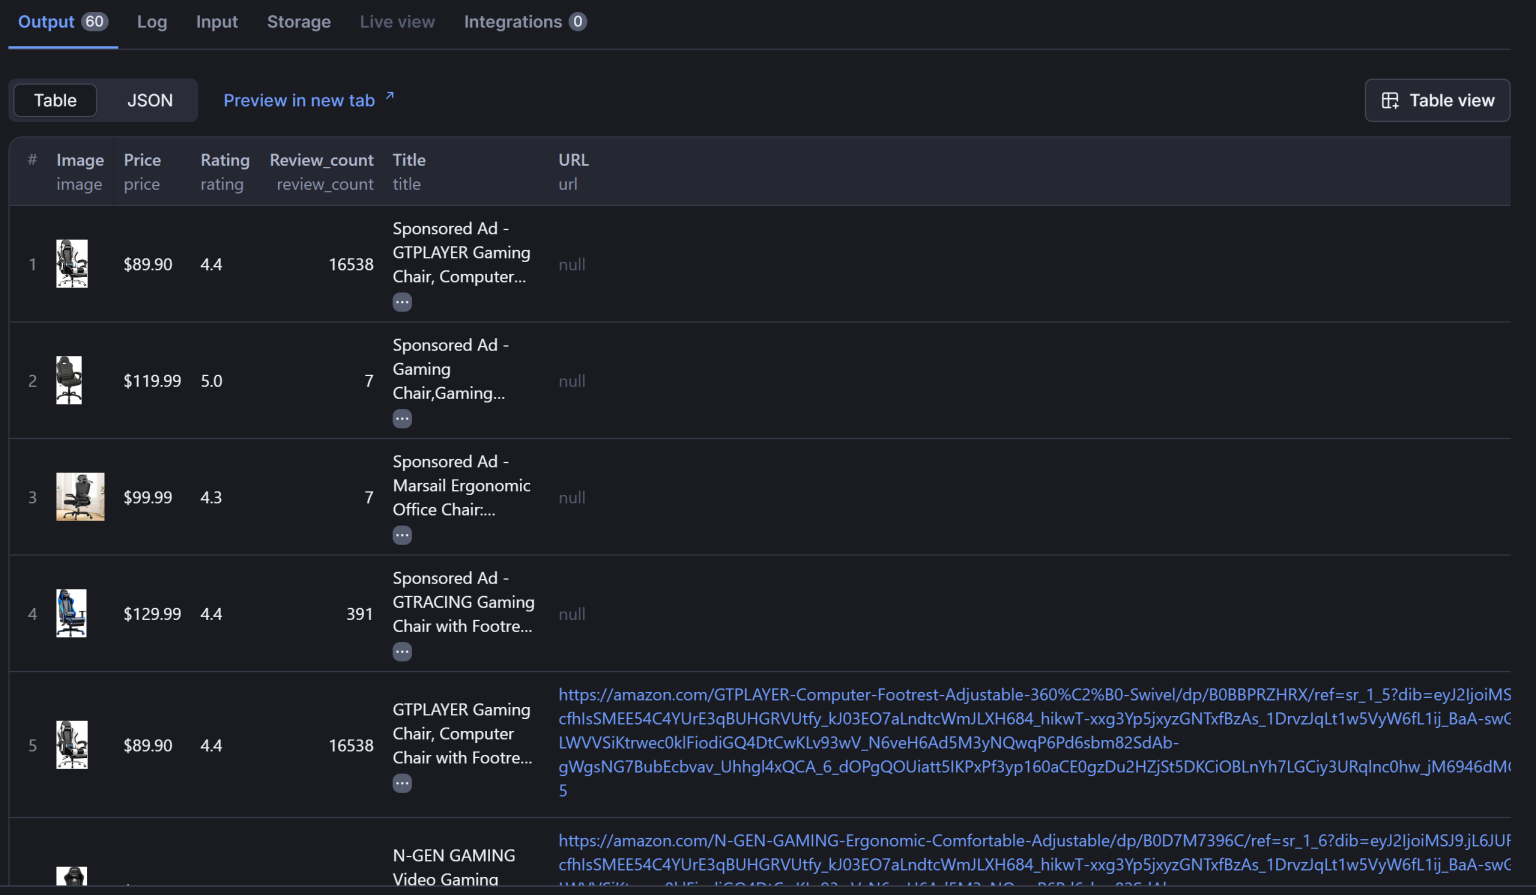
当抓取完成后,你能在 “Output” 栏里看到成功获取的数据:
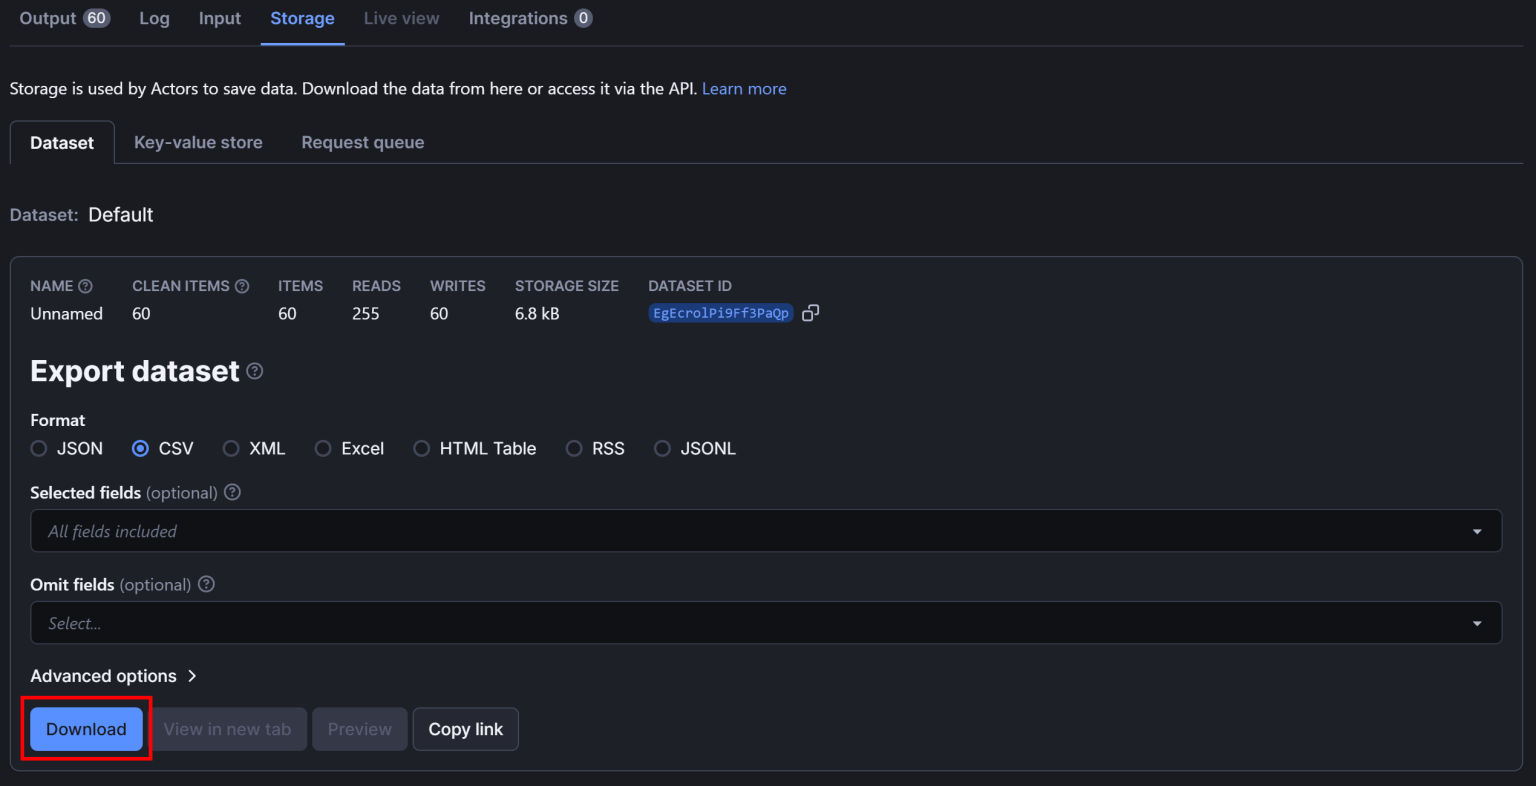
如果想导出数据,请前往 “Storage” 标签页,选择 “CSV” 并点击 “Download” 按钮:
下载后的 CSV 文件会如下所示:
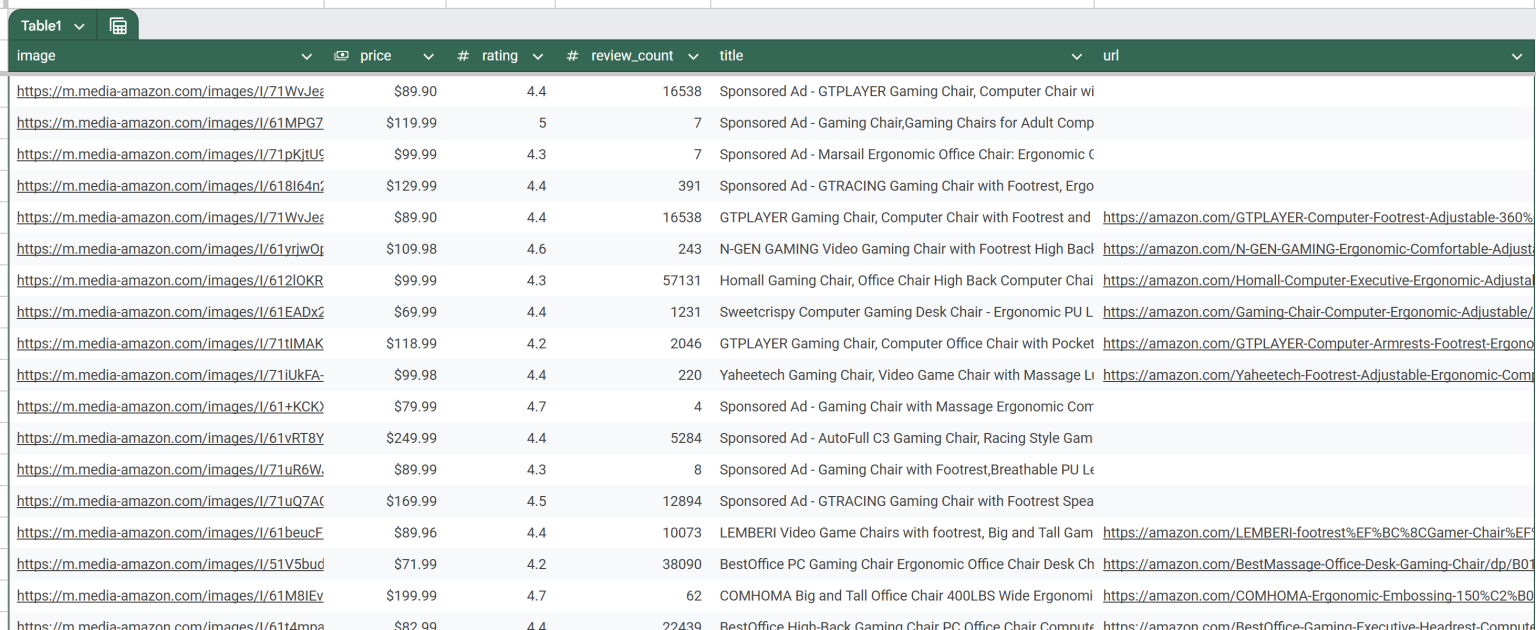
瞧!Bright Data 的 Scraping Browser + Apify 的集成非常顺畅,无需再为 Amazon 或任何其他网站的验证码或封禁而发愁。
[额外补充] 在 Apify 上使用 Bright Data 代理
在 Apify 上直接使用 Scraping Browser 或 Web Unlocker 等抓取产品非常简单。
与此同时,如果你已经有一个在 Apify 上运行的 Actor,而只想为它增强代理功能(例如避免 IP 封禁),也可以直接将 Bright Data 代理集成到 Apify Actor 中。具体可参见 官方文档或 集成指南。
结论
通过本教程,你学习了如何构建一个结合 Scraping Browser 与 Playwright 来抓取亚马逊数据的 Apify Actor。我们从零开始,演示了如何用本地抓取脚本一步步部署到 Apify。
现在,你就能理解在 Apify 云端抓取时,使用 Scraping Browser 这样专业抓取工具的优势。采用类似方法,Apify 同样支持 Bright Data 的其他产品:
- 代理服务:4 种不同类型的代理网络,包含 7200 万+ 住宅 IP,助你突破地理限制
- 网络抓取 API:针对 100 多个常见网站提供专门的端点,实现持续获取结构化数据
- 搜索引擎结果页 API:自动处理各类 SERP 解锁与解析,轻松获取搜索结果页面
立即注册 Bright Data,免费试用这些高度可组合的代理和抓取产品吧!


技术写作
 5.5 years experience
Antonello是一名软件工程师,但他更喜欢称自己为技术传教士。通过写作传播知识是他的使命。