

在这篇关于在 Python 中使用 Parsel 进行网络爬虫的指南中,你将学习:
- Parsel 是什么
- 为什么将它用于网络爬虫
- 用于网络爬虫的 Parsel 分步教程
- Python 中 Parsel 的高级爬虫场景
让我们开始吧!
Parsel 是什么?
Parsel 是一个 Python 库,用于从 HTML、XML 和 JSON 文档中解析并提取数据。它基于 lxml 之上,提供了更高层次且更易用的界面来进行网络爬虫。具体来说,它提供了一个直观的 API,大大简化了从 HTML 和 XML 文档中提取数据的过程。
为什么在网络爬虫中使用 Parsel
Parsel 在网络爬虫方面有许多有趣的特性,例如:
- 支持 XPath 和 CSS 选择器:可使用 XPath 或 CSS 选择器来定位 HTML 或 XML 文档中的元素。想了解更多,可查看我们关于XPath 与 CSS 选择器进行网络爬虫的指南。
- 数据提取:可以从所选元素中获取文本、属性或其它内容。
- 级联选择器:可串联多个选择器以细化数据提取。
- 可扩展性:无论是小型还是大型爬虫项目,该库都能很好地工作。
需要注意的是,该库与 Scrapy 深度集成,Scrapy 使用它来解析和提取网页中的数据。不过,Parsel 同样可以作为独立库单独使用。
如何在 Python 中使用 Parsel 进行网络爬虫:分步教程
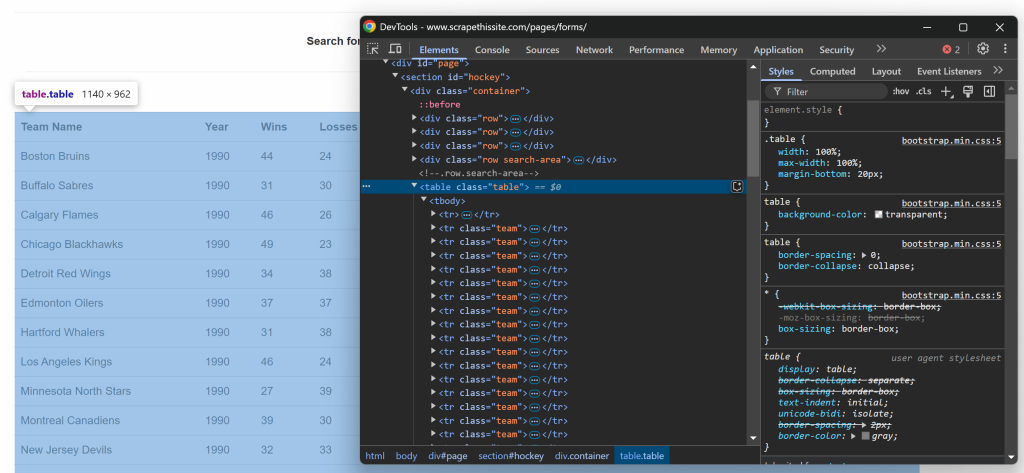
本节将指导你使用 Python 中的 Parsel 来进行网络爬虫。目标网站是“Hockey Teams: Forms, Searching and Pagination”:

Parsel 爬虫将提取上表中的所有数据。按照以下步骤来创建你的爬虫吧!
先决条件与依赖项
若要复现本教程,你需要在本地机器上安装 Python 3.10.1 或更高版本。值得注意的是,Parsel 最近已经停止了对 Python 3.8 的支持。
假设你将项目的主文件夹命名为 parsel_scraping/。在本步骤结束后,该文件夹将具有如下结构:
parsel_scraping/
    ├── parsel_scraper.py
    └── venv/
其中:
parsel_scraper.py是包含爬虫逻辑的 Python 文件。venv/包含虚拟环境。
你可以使用如下命令创建 venv/ 虚拟环境目录:
python -m venv venv若要在 Windows 上激活它,可运行:
venv\Scripts\activate在 macOS 和 Linux 上则执行:
source venv/bin/activate在激活的虚拟环境中,通过以下命令安装依赖:
pip install parsel requests这两个依赖分别是:
parsel:用于解析 HTML 并提取数据的库。requests:由于parsel只是一个 HTML 解析器,要进行网络爬虫,你还需要一个如 Requests 这样的 HTTP 客户端来获取要爬取页面的 HTML 文档。
太好了!现在你已经拥有了使用 Parsel 在 Python 中进行网络爬虫所需的所有条件。
步骤 1:定义目标 URL 并解析内容
教程的第一步,你需要导入相关的库:
import requests
from parsel import Selector
然后,定义目标网页,用 Requests 获取页面内容,并用 Parsel 进行解析:
url = "https://www.scrapethissite.com/pages/forms/"
response = requests.get(url)
selector = Selector(text=response.text)
上面的代码会实例化 Parsel 中的 Selector() 类,该类会解析通过 get() 方法发送的 HTTP 请求返回的 HTML 内容。
步骤 2:提取表格中的所有行
如果你在浏览器中查看目标网页中表格的代码,会看到如下的 HTML:
由于表格包含多行数据,先初始化一个用于存储爬取数据的数组:
data = []接下来,你可以注意到这个 HTML 表格拥有一个 .table 类。若要选取表格中的所有行,可用下面的代码:
rows = selector.css("table.table tr.team")这使用了 css() 方法,在解析后的 HTML 结构中应用 CSS 选择器。
现在就该遍历所选的行,并从中提取数据了!
步骤 3:遍历所有行
和之前一样,可以在浏览器中查看表格中的某一行:
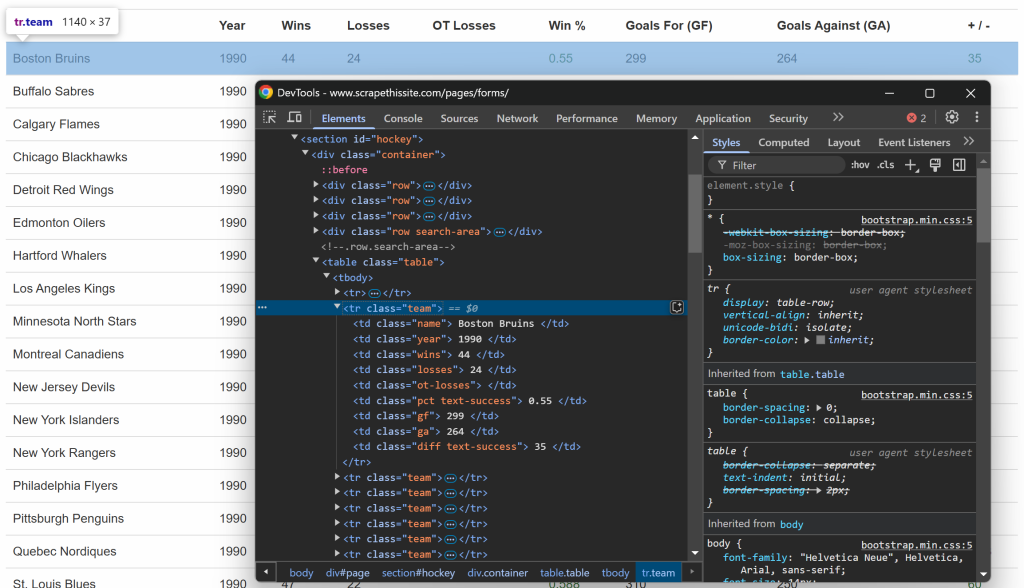
你会发现每一行都包含如下信息,并放在各自的列里:
- 球队名称 → 位于
.name元素内 - 赛季年份 → 位于
.year元素内 - 胜场数 → 位于
.wins元素内 - 败场数 → 位于
.losses元素内 - 加时赛败场数 → 位于
.ot-losses元素内 - 胜率 → 位于
.pct元素内 - 进球数(Goals For – GF) → 位于
.gf元素内 - 失球数(Goals Against – GA) → 位于
.ga元素内 - 净胜球 → 位于
.diff元素内
可使用下面的代码提取所有这类信息:
for row in rows:
    # Extract data from each column
    name = row.css("td.name::text").get()
    year = row.css("td.year::text").get()
    wins = row.css("td.wins::text").get()
    losses = row.css("td.losses::text").get()
    ot_losses = row.css("td.ot-losses::text").get()
    pct = row.css("td.pct::text").get()
    gf = row.css("td.gf::text").get()
    ga = row.css("td.ga::text").get()
    diff = row.css("td.diff::text").get()

    # Append the extracted data
    data.append({
        "name": name.strip(),
        "year": year.strip(),
        "wins": wins.strip(),
        "losses": losses.strip(),
        "ot_losses": ot_losses.strip(),
        "pct": pct.strip(),
        "gf": gf.strip(),
        "ga": ga.strip(),
        "diff": diff.strip()
    })
上述代码执行了以下操作:
完美!这就是使用 Parsel 进行数据爬取的核心逻辑。
步骤 4:打印数据并运行程序
最后一步,在命令行中打印被爬取的数据:
# Print the extracted data
print("Data from the page:")
for entry in data:
    print(entry)
运行程序:
python parsel_scraper.py这就是预期的结果:
太棒了!这正好与页面中的数据相匹配,并且是结构化格式。
步骤 5:处理分页
到目前为止,你只从目标 URL 的主页面中获取了数据。如果你想获取所有数据,就需要处理分页,这就意味着要对代码进行一些改动。
首先,你可以把之前的代码封装到一个函数里,例如:
def scrape_page(url):
    # Fetch the page content
    response = requests.get(url)
    # Parse the HTML content
    selector = Selector(text=response.text)

    # Scraping logic...

    return data
现在,让我们看一下负责分页的 HTML 元素:
这包含了所有页面的列表,每个页面的 URL 都在 <a> 标签中。可以把获取所有分页 URL 的逻辑封装成一个函数:
def get_all_page_urls(base_url="https://www.scrapethissite.com/pages/forms/"):
    # Fetch the first page to extract pagination links
    response = requests.get(base_url)
    # Parse the page
    selector = Selector(text=response.text)

    # Extract all page links from the pagination area
    page_links = selector.css("ul.pagination li a::attr(href)").getall()  # Adjust selector based on HTML structure

    unique_links = list(set(page_links))  # Remove duplicates if any

    # Construct full URLs for all pages
    full_urls = [urljoin(base_url, link) for link in unique_links]

    return full_urls
该函数的作用可以概括如下:
getall()方法可获取所有分页链接。list(set())用于去除重复项,防止重复访问同一页面。urljoin()方法(来自urlib.parse),将所有相对链接转换为绝对链接,以便后续发送 HTTP 请求。
要让上述代码可用,别忘了从 Python 标准库中引入 urljoin:
from urllib.parse import urljoin 你现在可以用下面的方式来抓取所有页面:
# Where to store the scraped data
data = []

# Get all page URLs
page_urls = get_all_page_urls()

# Iterate over them and apply the scraping logic
for url in page_urls:
    # Scrape the current page
    page_data = scrape_page(url)
    # Add the scraped data to the list
    data.extend(page_data)

# Print the extracted data
print("Data from all pages:")
for entry in data:
    print(entry)
以上代码做了以下几件事:
- 调用
get_all_page_urls()函数,获取所有分页链接。 - 遍历每个页面链接,并调用
scrape_page()函数获取数据,再通过extend()方法进行汇总。 - 打印提取到的数据。
很棒!现在已经实现了 Parsel 的分页处理逻辑。
步骤 6:整合所有代码
下面是 parsel_scraper.py 文件现在应该包含的完整内容:
import requests
from parsel import Selector
from urllib.parse import urljoin

def scrape_page(url):
    # Fetch the page content
    response = requests.get(url)
    # Parse the HTML content
    selector = Selector(text=response.text)

    # Where to store the scraped data
    data = []

    # Select all rows in the table body
    rows = selector.css("table.table tr.team")

    # Iterate over each row and scrape data from it
    for row in rows:
        # Extract data from each column
        name = row.css("td.name::text").get()
        year = row.css("td.year::text").get()
        wins = row.css("td.wins::text").get()
        losses = row.css("td.losses::text").get()
        ot_losses = row.css("td.ot-losses::text").get()
        pct = row.css("td.pct::text").get()
        gf = row.css("td.gf::text").get()
        ga = row.css("td.ga::text").get()
        diff = row.css("td.diff::text").get()

        # Append the extracted data to the list
        data.append({
            "name": name.strip(),
            "year": year.strip(),
            "wins": wins.strip(),
            "losses": losses.strip(),
            "ot_losses": ot_losses.strip(),
            "pct": pct.strip(),
            "gf": gf.strip(),
            "ga": ga.strip(),
            "diff": diff.strip(),
        })

    return data

def get_all_page_urls(base_url="https://www.scrapethissite.com/pages/forms/"):
    # Fetch the first page to extract pagination links
    response = requests.get(base_url)
    # Parse the page
    selector = Selector(text=response.text)

    # Extract all page links from the pagination area
    page_links = selector.css("ul.pagination li a::attr(href)").getall()  # Adjust selector based on HTML structure

    unique_links = list(set(page_links))  # Remove duplicates if any

    # Construct full URLs for all pages
    full_urls = [urljoin(base_url, link) for link in unique_links]

    return full_urls

# Where to store the scraped data
data = []

# Get all page URLs
page_urls = get_all_page_urls()

# Iterate over them and apply the scraping logic
for url in page_urls:
    # Scrape the current page
    page_data = scrape_page(url)
    # Add the scraped data to the list
    data.extend(page_data)

# Print the extracted data
print("Data from all pages:")
for entry in data:
    print(entry)
很好!你已经完成了使用 Parsel 的第一个爬虫项目。
Python 中 Parsel 的高级网络爬虫场景
在上一节中,你学习了如何使用 Parsel 和 CSS 选择器来从目标网页中提取数据。现在是时候看看更复杂一些的场景了!
通过文本来选择元素
Parsel 提供了多种方式来通过 XPath 匹配 HTML 中的文本内容。在此情况下,text() 函数可以用来提取元素的文本。
假设你有如下的 HTML 代码:
<html>
  <body>
    <h1>Welcome to Parsel</h1>
    <p>This is a paragraph.</p>
    <p>Another paragraph.</p>
  </body>
</html>
你可以如下方式来获取其中所有的文本:
from parsel import Selector

html = """
<html>
  <body>
    <h1>Welcome to Parsel</h1>
    <p>This is a paragraph.</p>
    <p>Another paragraph.</p>
  </body>
</html>
"""

selector = Selector(text=html)
# Extract text from the <h1> tag
h1_text = selector.xpath("//h1/text()").get()
print("H1 Text:", h1_text)
# Extract text from all <p> tags
p_texts = selector.xpath("//p/text()").getall()
print("Paragraph Text Nodes:", p_texts)
该代码会找到 <p> 和 <h1> 标签并使用 text() 提取其中的文本,输出将是:
H1 Text: Welcome to Parsel
Paragraph Text Nodes: ['This is a paragraph.', 'Another paragraph.']
另一个常见函数是 contains(),可用于匹配包含特定文本的元素。假设如下的 HTML 片段:
<html>
  <body>
    <p>This is a test paragraph.</p>
    <p>Another test paragraph.</p>
    <p>Unrelated content.</p>
  </body>
</html>
如果你只想提取包含单词 “test” 的段落文本,可用如下代码:
from parsel import Selector

# html = """..."""

selector = Selector(text=html)
# Extract paragraphs containing the word "test"
test_paragraphs = selector.xpath("//p[contains(text(), 'test')]/text()").getall()
print("Paragraphs containing 'test':", test_paragraphs)
这里使用的 XPath p[contains(text(), 'test')]/text() 可以精确匹配含有 “test” 的段落。结果会是:
Paragraphs containing 'test': ['This is a test paragraph.', 'Another test paragraph.']可是如果你想匹配以特定字符串开头的文本怎么办?可以使用 starts-with() 函数。示例如下 HTML:
<html>
  <body>
    <p>Start here.</p>
    <p>Start again.</p>
    <p>End here.</p>
  </body>
</html>
若要获取以 “Start” 开头的文本段落,可以使用 p[starts-with(text(), 'Start')]/text():
from parsel import Selector

# html = """..."""

selector = Selector(text=html)
# Extract paragraphs where text starts with "Start"
start_paragraphs = selector.xpath("//p[starts-with(text(), 'Start')]/text()").getall()
print("Paragraphs starting with 'Start':", start_paragraphs)
结果如下:
Paragraphs starting with 'Start': ['Start here.', 'Start again.']若想了解更多,请查看我们的CSS 与 XPath 选择器对比。
使用正则表达式
Parsel 支持使用 正则表达式 进行更高级的文本匹配,它可以凭借 re:test() 函数来实现。
假如你有如下的 HTML:
<html>
  <body>
    <p>Item 12345</p>
    <p>Item ABCDE</p>
    <p>A paragraph</p>
    <p>2025 is the current year</p>
  </body>
</html>
如果要提取仅包含数字的段落文本,可使用 re:test():
from parsel import Selector

# html = """..."""

selector = Selector(text=html)
# Extract paragraphs where text matches a numeric pattern
numeric_items = selector.xpath("//p[re:test(text(), '\\d+')]/text()").getall()
print("Numeric Items:", numeric_items)
结果如下:
Numeric Items: ['Item 12345', '2025 is the current year']另一个常见的正则表达式用例是匹配电子邮件地址。例如,假设你希望提取包含电子邮件地址的段落:
<html>
  <body>
    <p>Contact us at support@example.com</p>
    <p>Send an email to info@domain.org</p>
    <p>No email here.</p>
  </body>
</html>
你可以如下使用 re:test() 选择包含电子邮件地址的节点:
from parsel import Selector

selector = Selector(text=html)
# Extract paragraphs containing email addresses
emails = selector.xpath("//p[re:test(text(), '[a-zA-Z0-9._%+-]+@[a-zA-Z0-9.-]+\\.[a-zA-Z]{2,}')]/text()").getall()
print("Email Matches:", emails)
结果会是:
Email Matches: ['Contact us at support@example.com', 'Send an email to info@domain.org']在 HTML 树结构中导航
Parsel 可通过 XPath 在 HTML 树结构中自由导航,无论这个结构有多么嵌套。
来看下面的 HTML:
<html>
  <body>
    <div>
      <h1>Title</h1>
      <p>First paragraph</p>
    </div>
  </body>
</html>
你可以使用如下方式来获取 <p> 节点的父元素:
from parsel import Selector

selector = Selector(text=html)
# Select the parent of the <p> tag
parent_of_p = selector.xpath("//p/parent::*").get()
print("Parent of <p>:", parent_of_p)
结果如下:
Parent of <p>: <div>
      <h1>Title</h1>
      <p>First paragraph</p>
    </div>
同理,你也可以获取兄弟元素。假设有如下 HTML:
<html>
  <body>
    <ul>
      <li>Item 1</li>
      <li>Item 2</li>
      <li>Item 3</li>
    </ul>
  </body>
</html>
可利用 following-sibling 轻松获取其兄弟节点:
from parsel import Selector

selector = Selector(text=html)
# Select the next sibling of the first <li> element
next_sibling = selector.xpath("//li[1]/following-sibling::li[1]/text()").get()
print("Next Sibling of First <li>:", next_sibling)
# Select all siblings of the first <li> element
all_siblings = selector.xpath("//li[1]/following-sibling::li/text()").getall()
print("All Siblings of First <li>:", all_siblings)
输出结果如下:
Next Sibling of First <li>: Item 2
All Siblings of First <li>: ['Item 2', 'Item 3']
Parsel 在 Python 中进行 HTML 解析的替代方案
Parsel 是 Python 网络爬虫可使用的众多库之一,但并不是唯一可选。其他常见且使用广泛的库包括:
- Beautiful Soup:Python 库,可轻松从网页中抓取信息。可查阅我们的 Beautiful Soup 网络爬虫指南。
lxml:libxml2和libxslt的 Python 绑定。可在我们的 lxml 网络数据解析教程中看到示例。- PyQuery:允许你在 XML 文档上使用 jQuery 查询的库。这使得它成为 五大 Python HTML 解析库之一。
- Scrapy:一个开源、协作式的网络爬虫框架,可用来从网站中提取所需数据。可阅读我们的 Scrapy 网络爬虫指南。
html.parser:Python 标准库中的模块,用于解析 HTML 和 XTHML 文本内容。html5-parser:在 Python 中实现 HTML 5 的一个高效解析库。
结论
在本文中,你了解了 Python 中的 Parsel 以及如何使用它进行网络爬虫。你从基础开始,随后探讨了更复杂的使用场景。
无论你使用哪种 Python 爬虫库,最大的阻碍在于大多数网站都使用反爬虫和防机器人措施来保护数据。这些防御可以识别并阻止自动化请求,从而使传统爬取方法失效。
幸运的是,Bright Data 提供了一系列解决方案来帮助你避免这些问题:
- 网络解锁器:一个可以自动绕过反爬虫保护并返回任何网页干净 HTML 的 API,而且无需繁琐配置。
- 抓取浏览器:基于云端、可控制的浏览器,支持 JavaScript 渲染。它会自动为你处理验证码、浏览器指纹、重试等问题,并可无缝集成至 Panther 或 Selenium PHP。
- 网络抓取 API:提供针对数十个热门站点的 API,用于以编程方式获取其结构化数据。
如果你不想自行处理网络爬虫,但仍对线上数据感兴趣,欢迎探索我们的现成数据集!
立即注册 Bright Data,开启免费试用,来体验我们的爬虫解决方案吧。


