您将通过本教程学到以下内容:
- Google Maps 抓取工具的定义
- 您可使用该抓取工具提取哪些数据
- 如何使用 Python 构建 Google Maps 抓取脚本
现在就来一探究竟吧!
什么是 Google Maps 抓取工具?
Google Maps 抓取工具是专门用于从 Google Maps 中提取数据的工具。它能通过 Python 抓取脚本等自动完成 Google Maps 数据采集流程。使用此类抓取工具检索到的数据通常可用于市场研究、竞争对手分析等。
您可从 Google Maps 获取哪些数据
您可从 Google Maps 抓取以下信息:
- 企业名称:Google Maps 上列出的企业名称或地点。
- 地址:相关企业或地点的实际街道地址。
- 电话号码:企业联系电话。
- 网站:企业网站的 URL。
- 营业时间:企业的营业时间和休息时间。
- 评论:顾客评论,包括评分和详细反馈。
- 评分:基于用户反馈的平均星级评分。
- 照片:企业或客户上传的图片。
使用 Python 抓取 Google Maps 的分步指南
在本指南章节,您将学习如何构建 Python 脚本来抓取 Google Maps。
本文将以检索 Google Maps 上“意大利餐厅”页面中的相关数据项为例,详细说明这一操作流程:
请按照以下步骤操作!
步骤 #1:项目设置
在开始之前,请确保您的计算机已安装 Python 3。如未安装,请先下载该软件,并按照安装向导进行安装。
接下来,您需要为项目创建一个文件夹,然后进入该文件夹并在其中创建虚拟环境,您可通过以下命令实现上述操作:
mkdir google-maps-scraper
cd google-maps-scraper
python -m venv env
图中的 google-maps-scraper 目录即为 Python Google Maps 抓取工具的项目文件夹。
在您收藏的 Python IDE 中加载项目文件夹。PyCharm Community Edition 或带 Python 扩展的 Visual Studio Code 都是不错的选择。
在项目文件夹中,创建 scraper.py 文件。这是您的项目目前应具备的文件结构:scraper.py 现在是一个空白的 Python 脚本,但它很快就会包含抓取逻辑。
在 IDE 的终端中,激活虚拟环境。为此,您需要在 Linux 或 macOS 中运行以下命令:
./env/bin/activate
或在 Windows 中运行下方命令:
env/Scripts/activate
很好,您现在已为抓取工创建好 Python 环境!
步骤 #2:选择抓取库
Google Maps 是高度交互的平台,因而没必要花时间去判断它是静态网站还是动态网站。这种情况下,使用浏览器自动化工具是最佳抓取方法。
即使您尚不熟悉这项技术,也无大碍,浏览器自动化工具可以让您在可控的浏览器环境中渲染网页,并与之交互。此外,创建有效的 Google Maps 搜索 URL 并非易事。最简单的处理方法是直接在浏览器中进行搜索。
Selenium 是最适合 Python 的浏览器自动化工具之一,因此是抓取 Google Maps 的理想选择。请务必要安装它,因为本文的抓取任务主要依赖这个库来完成!
步骤 #3:安装和配置抓取库
在已激活的 Python 虚拟环境中执行以下命令,以通过 selenium pip 包安装 Selenium:
pip install selenium
如想进一步了解该工具的使用方法,请参阅有关使用 Selenium 抓取网页的教程。
在 scraper.py 中导入 Selenium,并创建一个 WebDriver 对象,以在无头模式下控制 Chrome 实例:
from selenium import webdriver
from selenium.webdriver.chrome.service import Service
from selenium.webdriver.chrome.options import Options

# to launch Chrome in headless mode
options = Options()
options.add_argument("--headless") # comment it while developing

# create a Chrome web driver instance with the
# specified options
driver = webdriver.Chrome(
    service=Service(),
    options=options
)
上方代码片段用于初始化 Chrome WebDriver 实例,以编程方式控制 Chrome 浏览器窗口。“--headless” 标志用于在无头模式下启动 Chrome(在后台启动,无需加载窗口)。如要进行调试,您可直接注释掉这一行,以便观察脚本的实时运行情况。
然后,请记得写入下方这一命令作为 Google Maps 抓取脚本的最后一行,以关闭网络驱动程序:
driver.quit()
太棒了!您现在已完成配置,可以开始抓取 Google Maps 页面。
步骤 #4:连接至目标页面
使用 get() 方法连接至 Google Maps 主页:
driver.get("https://www.google.com/maps")
现在,scraper.py 将包含以下几行命令:
from selenium import webdriver
from selenium.webdriver.chrome.service import Service
from selenium.webdriver.chrome.options import Options

# to launch Chrome in headless mode
options = Options()
options.add_argument("--headless") # comment it while developing

# create a Chrome web driver instance with the
# specified options
driver = webdriver.Chrome(
    service=Service(),
    options=options
)

# connect to the Google Maps home page
driver.get("https://www.google.com/maps")

# scraping logic...

# close the web browser
driver.quit()
太棒了,您现在即可开始抓取动态网站,例如 Google Maps 等!
步骤 #5:处理 GDPR Cookie 对话框
注意:如您不在欧盟境内,则可跳过此步骤。
在有头模式下运行 scraper.py 脚本,并尽可能在最后一行前添加一个断点。这将使浏览器窗口保持打开状态,不会立即关闭,使您可以观察它。如您位于欧盟境内,则会看到以下页面:

注意:如显示 “Chrome 正在被自动测试软件控制”信息,则表示 Selenium 已成功控制 Chrome。
由于 GDPR 法规要求,Google 必须向欧盟用户显示一些 Cookie 政策选项。如您是欧盟用户,则需处理此选项,以便与网页进行交互。如不是,则可直接跳至步骤 6。
仔细查看浏览器地址栏中的 URL,您会发现它与 get() 中指定的页面地址并不一致。原因在于 Google 将您重定向了。点击“全部接受”按钮后,您将被带回目标页面,即 Google Maps 主页。
要处理 GDPR 选项,请在浏览器隐身模式下打开 Google Maps 主页,然后等待页面重定向。右键单击“全部接受”按钮,然后选择“检查”选项:
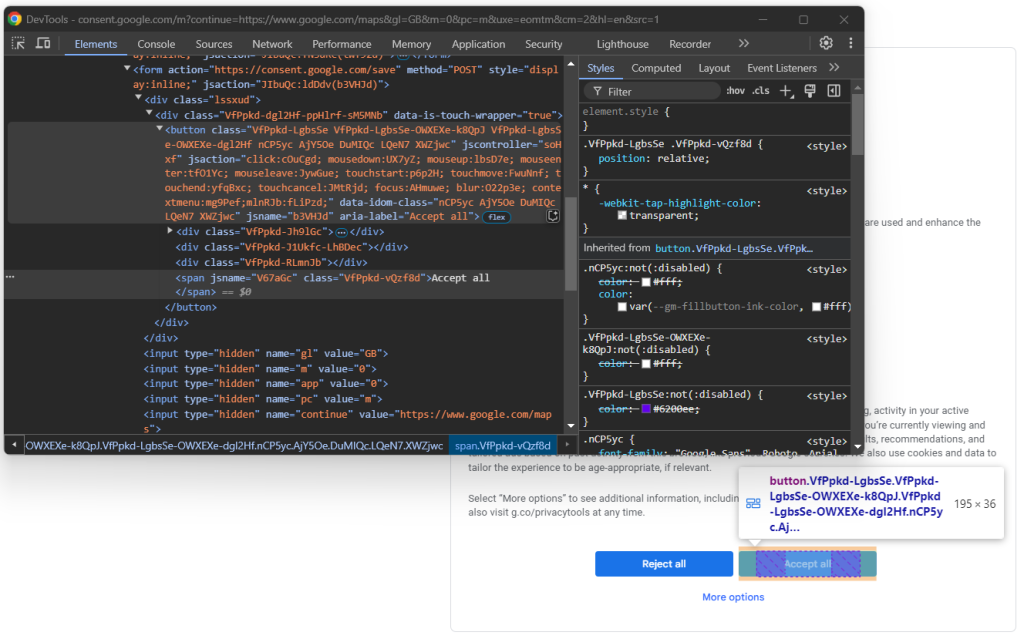
您可能已注意到,页面上 HTML 元素的 CSS 类似乎是随机生成的。这意味着它们无法确保有效的网页数据抓取,因为其可能会在每次部署时更新。因此,您需要重点关注更稳定的属性,比如 aria-label:
accept_button = driver.find_element(By.CSS_SELECTOR, "[aria-label="Accept all"]")
find_element() 是 Selenium 中的一种方法,用于通过各种策略定位页面中的 HTML 元素。本例中,我们使用的是 CSS 选择器。如想进一步了解各种选择器类型,请参阅 “XPath vs CSS 选择器”文档。
请务必要记得导入 By 包,您可通过添加下方命令将其导入至 scraper.py:
from selenium.webdriver.common.by import By
下一条命令是点击按钮:
accept_button.click()
以下是这几项命令合在一起的脚本画面,以用于处理可选 Google Cookie 页面:
try:
     # select the "Accept all" button from the GDPR cookie option page
    accept_button = driver.find_element(By.CSS_SELECTOR, "[aria-label="Accept all"]")
    # click it
    accept_button.click()
except NoSuchElementException:
    print("No GDPR requirenments")
click() 命令会指示抓取工具点击“全部接受”按钮,让 Google 将您重定向到 Google Maps 主页。如您不在欧盟境内,则页面上不会出现此按钮,而这将导致 noSuchElementException 异常。脚本将捕获此异常并继续,因为它并非严重错误,仅属于可能出现的情形。
请务必要导入 noSuchElementException:
from selenium.common import NoSuchElementException
干得好!您现在可以集中精力抓取 Google Maps 了。
步骤 #6:提交搜索表单
现在,您的 Google Maps 抓取工具应该会进入类似下方的页面:
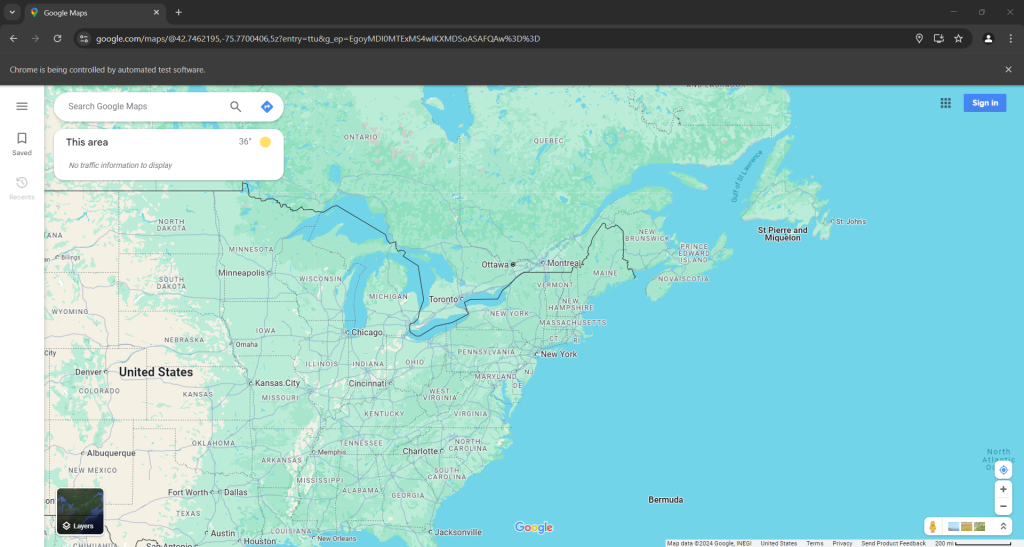
请注意,地图上的位置取决于您的 IP 位置。本示例中,我们位于纽约。
接下来,您需要填写 “Search Google Maps” 字段并提交搜索表单。要定位此元素,请在浏览器隐身模式下打开 Google Maps 主页。右键单击搜索输入字段,并选择“检查”选项:
search_input = WebDriverWait(driver, 5).until(
    EC.presence_of_element_located((By.CSS_SELECTOR, "#searchboxinput"))
)
WebdriverWait 是 Selenium 中的一个类,专门用于在页面上的特定条件得到满足前暂停脚本。在上方示例中,它最多会等待 5 秒,以等待所输入的 HTML 元素出现。如您需要按照步骤 5 进行操作(由于重定向之故),则这种等待是必需的,它可确保页面完全加载。
要使上述命令行生效,还需添加以下命令,以将相关模块导入 scraper.py:
from selenium.webdriver.support.ui import WebDriverWait
from selenium.webdriver.support import expected_conditions as EC

Next, fill out the input with the `[send_keys()](https://www.selenium.dev/documentation/webdriver/actions_api/keyboard/#send-keys)` method:

search_query = "italian restaurants"
search_input.send_keys(search_query)
在本例中,“意大利餐厅”即为搜索查询的内容,但您也可以搜索其他任何术语。
现在只剩表单提交这一步了。请检查提交按钮的元素(按钮以放大镜标志显示):
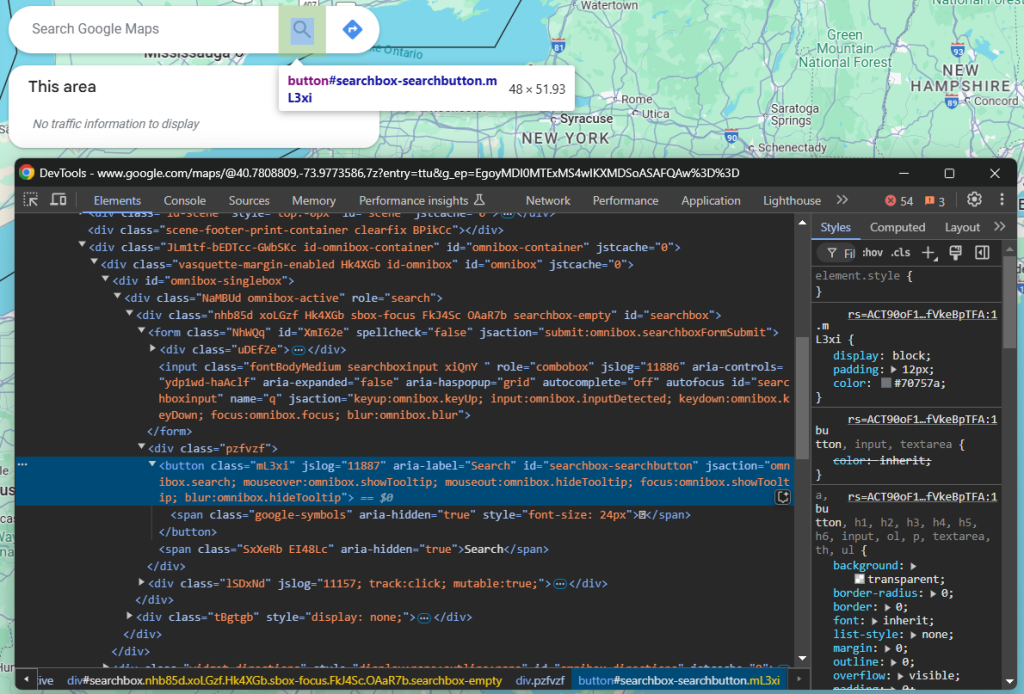
通过定位其 aria-label 属性将其选中,然后点击它:
search_button = driver.find_element(By.CSS_SELECTOR, "button[aria-label="Search"]")
search_button.click()
棒极了!现在,受控浏览器可以加载要抓取的数据了。
步骤 #7:选择 Google Maps 数据项
您的抓取脚本目前应如下所示:
要抓取的数据包含在左侧的 Google Maps 数据项中。由于这是一个列表,因此数组是包含抓取数据的最佳数据结构。初始化一个数组:
items = []
现在需要选择左侧的 Google Maps 数据项。检查其中一个数据项的元素:
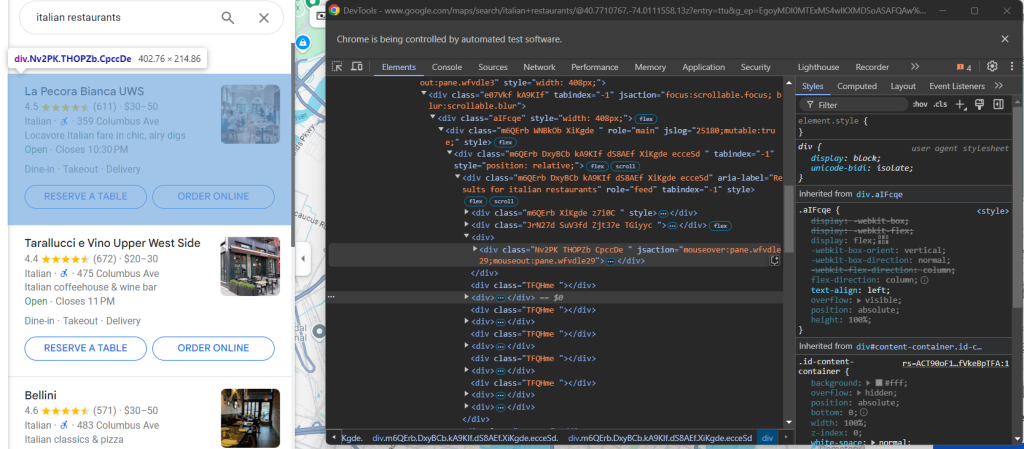
再一次发现,CSS 类似乎是随机生成的,因此它们无法确保有效的数据抓取。但是您可以将 jsaction 属性作为目标。由于该属性的部分内容也是随机生成的,因此请重点关注其中的一致字符串,特别是 “mouseover: pane”。
XPath 选择器将帮您选择满足以下条件的所有
元素:它们位于具有 role= “feed” 属性的父级
元素下,且其自身的 jsaction 属性包含 “mouseover: pane” 字符串,具体命令如下所示:
maps_items = WebDriverWait(driver, 10).until(
    EC.presence_of_all_elements_located((By.XPATH, '//div[@role="feed"]//div[contains(@jsaction, "mouseover:pane")]'))
)
这里同样需要 WebdriverWait,因为左侧中的内容是动态加载至页面的。
遍历每个元素并准备好 Google Maps 抓取工具,以提取一些数据:
for maps_item in maps_items:
    # scraping logic...
很好!下一步是从这些元素中提取数据。
步骤 #8:抓取 Google Maps 数据项
检查单个 Google Maps 数据项,并重点关注其包含的各项元素:
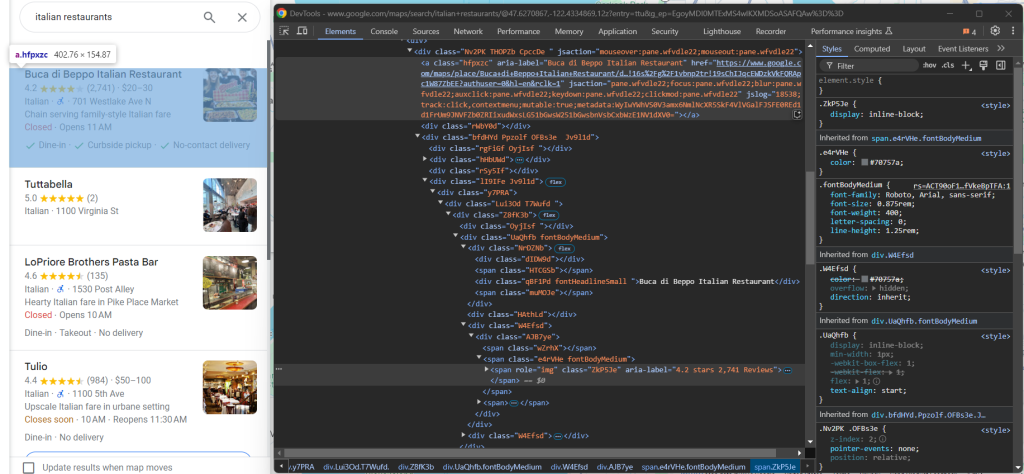
您可在此处看到可抓取的数据:
- 来自
a[jsaction][jslog]元素的 Google Maps 数据项链接 - 来自
div.fontHeadlineSmall元素的标题 - 来自
span[role="img"] 的星级和评论数
您可通过以下逻辑获取这些数据:
link_element = maps_item.find_element(By.CSS_SELECTOR, "a[jsaction][jslog]")
url = link_element.get_attribute("href")

title_element = maps_item.find_element(By.CSS_SELECTOR, "div.fontHeadlineSmall")
title = title_element.text

reviews_element = maps_item.find_element(By.CSS_SELECTOR, "span[role="img"]")
reviews_string = reviews_element.get_attribute("aria-label")

# define a regular expression pattern to extract the stars and reviews count
reviews_string_pattern = r"(d+.d+) stars (d+[,]*d+) Reviews"

# use re.match to find the matching groups
reviews_string_match = re.match(reviews_string_pattern, reviews_string)

reviews_stars = None
reviews_count = None

# if a match is found, extract the data
if reviews_string_match:
    # convert stars to float
    reviews_stars = float(reviews_string_match.group(1))
    # convert reviews count to integer
    reviews_count = int(reviews_string_match.group(2).replace(",", ""))
get_attribute() 函数会返回指定 HTML 属性内的内容,而 .text 则返回节点内的字符串内容。
注意,请记得使用正则表达式从 “X.Y stars in Z reviews” 字符串中提取特定数据字段。如想了解更多信息,请参阅有关使用正则表达式进行网页抓取的文章。
千万别忘记从 Python 标准库中导入 re 包:
import re
继续检查 Google Maps 数据项:
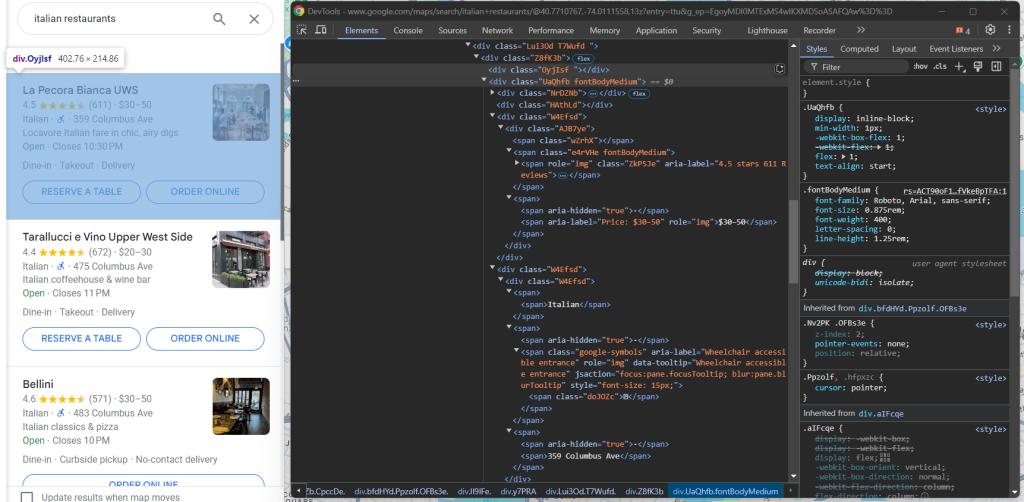
在带有 fondBodyMedium 类的
中,您可以从没有属性或只有 style 属性的 节点获取大部分信息。至于可选的价格元素,您可以通过定位其 aria-label 属性中包含 “Price” 字样的节点来选择它:
info_div = maps_item.find_element(By.CSS_SELECTOR, ".fontBodyMedium")

# scrape the price, if present
try:
    price_element = info_div.find_element(By.XPATH, ".//*[@aria-label[contains(., 'Price')]]")
    price = price_element.text
except NoSuchElementException:
    price = None

info = []
# select all <span> elements with no attributes or the @style attribute
# and descendant of a <span>
span_elements = info_div.find_elements(By.XPATH, ".//span[not(@*) or @style][not(descendant::span)]")
for span_element in span_elements:
  info.append(span_element.text.replace("⋅", "").strip())

# to remove any duplicate info and empty strings
info = list(filter(None, list(set(info))))
由于价格元素为可选项,因此您必须使用 try ... except 块来包裹上述逻辑。如此一来,如果价格节点不在页面中,脚本将继续运行而不会出现抓取失败问题。如果您跳过第 5 步,则可直接导入 noSuchElementException:
from selenium.common import NoSuchElementException
您可使用 filter() 和set()来避免空字符串和重复的信息元素。
现在,把注意力放在图片抓取上:
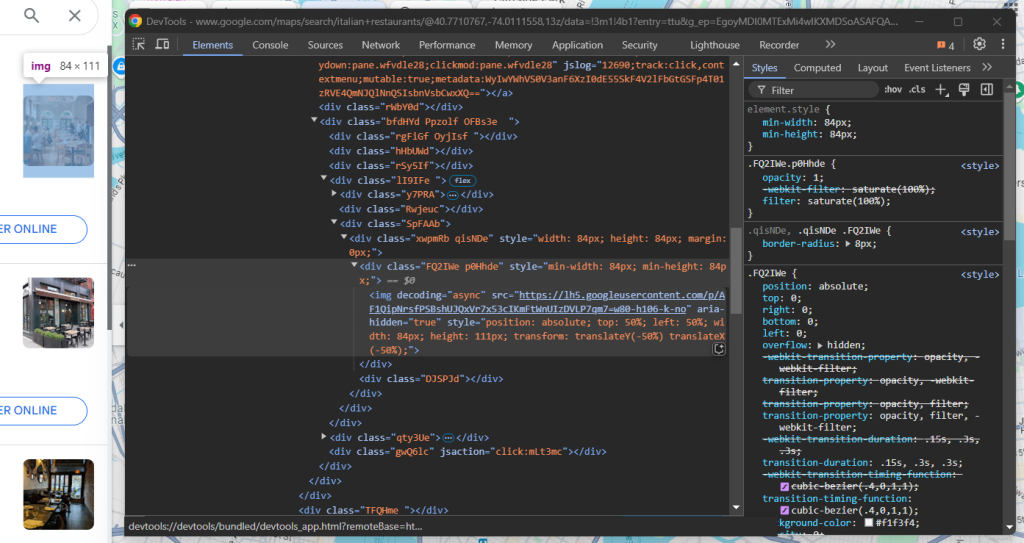
您可通过以下命令抓取图片:
img_element = WebDriverWait(driver, 5).until(
    EC.presence_of_element_located((By.CSS_SELECTOR, "img[decoding="async"][aria-hidden="true"]"))
)
image = img_element.get_attribute("src")
请记住,这里必须使用 WebDriverWait,因为图片是异步加载的,可能需要一段时间才能显示。
最后一步是抓取底部元素中的标签:
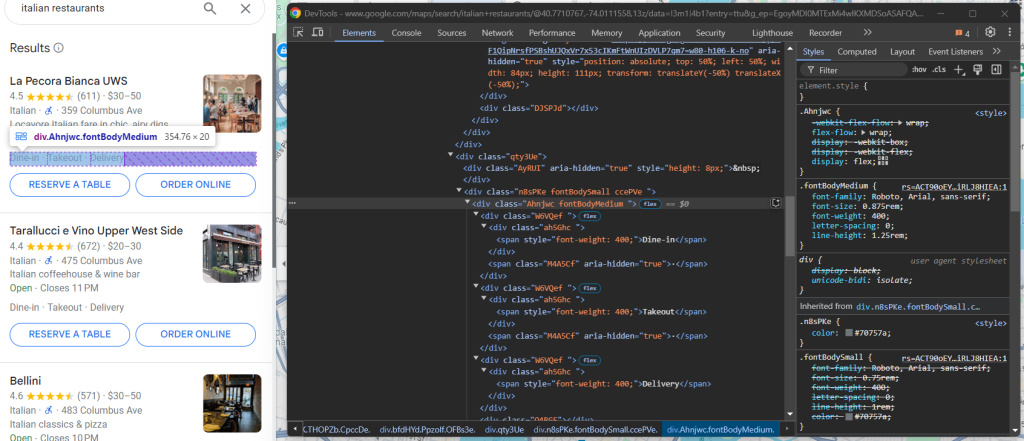
您可以通过最后一个 .fontBodyMedium 元素中的 style 属性,从 节点检索所有标签:
tags_div = maps_item.find_elements(By.CSS_SELECTOR, ".fontBodyMedium")[-1]
tags = []
tag_elements = tags_div.find_elements(By.CSS_SELECTOR, "span[style]")
for tag_element in tag_elements:
  tags.append(tag_element.text)
太棒了!Python Google Maps 抓取逻辑现已构建完毕。
步骤 #9:收集抓取的数据
您现在已抓取到多个变量的数据。请创建一个新的 item 对象并使用这些数据填充它:
item = {
  "url": url,
  "image": image,
  "title": title,
  "reviews": {
    "stars": reviews_stars,
    "count": reviews_count
  },
  "price": price,
  "info": info,
  "tags": tags
}
然后,将其附加到 items 数组:
items.append(item)
在 Google Maps 数据项节点上的 for循环结束后,items 将包含您所有的抓取数据。您只需以 CSV 等便于用户理解的可读文件格式导出抓取的数据即可。
步骤 #10:导出为 CSV 文件
从 Python 标准库中导入 csv 包:
import csv
接下来 ,使用该包将 Google Maps 数据填充到平面 CSV 文件。
# output CSV file path
output_file = "items.csv"

# flatten and export to CSV
with open(output_file, mode="w", newline="", encoding="utf-8") as csv_file:
    # define the CSV field names
    fieldnames = ["url", "image", "title", "reviews_stars", "reviews_count", "price", "info", "tags"]
    writer = csv.DictWriter(csv_file, fieldnames=fieldnames)

    # write the header
    writer.writeheader()

    # write each item, flattening info and tags
    for item in items:
        writer.writerow({
            "url": item["url"],
            "image": item["image"],
            "title": item["title"],
            "reviews_stars": item["reviews"]["stars"],
            "reviews_count": item["reviews"]["count"],
            "price": item["price"],
            "info": "; ".join(item["info"]),
            "tags": "; ".join(item["tags"])
        })
使用上方代码片段,即可将 items 导出到名为 items.csv 的 CSV 文件中。其中用到的重要函数如下所示:
open():以写入模式打开指定文件,并使用 UTF-8 编码来处理文本输出。csv.dictWriter():使用指定的字段名创建 CSV 写入器对象,允许以字典形式写入行。writeheader():根据字段名称将标头行写入 CSV 文件。writer.writerow():将每个数据项作为一行写入 CSV 文件。
请记得使用 join() 字符串函数,以将数组转换为平面字符串。这可确保输出的 CSV 文件是一个干净的单级文件。
步骤 #11:整合所有代码
以下是 Python Google Maps 抓取工具的最终代码:
from selenium import webdriver
from selenium.webdriver.chrome.service import Service
from selenium.webdriver.chrome.options import Options
from selenium.webdriver.common.by import By
from selenium.common import NoSuchElementException
from selenium.webdriver.support.ui import WebDriverWait
from selenium.webdriver.support import expected_conditions as EC
import re
import csv

# to launch Chrome in headless mode
options = Options()
options.add_argument("--headless") # comment it while developing

# create a Chrome web driver instance with the
# specified options
driver = webdriver.Chrome(
    service=Service(),
    options=options
)

# connect to the Google Maps home page
driver.get("https://www.google.com/maps")

# to deal with the option GDPR options
try:
     # select the "Accept all" button from the GDPR cookie option page
    accept_button = driver.find_element(By.CSS_SELECTOR, "[aria-label="Accept all"]")
    # click it
    accept_button.click()
except NoSuchElementException:
    print("No GDPR requirenments")

# select the search input and fill it in
search_input = WebDriverWait(driver, 5).until(
    EC.presence_of_element_located((By.CSS_SELECTOR, "#searchboxinput"))
)
search_query = "italian restaurants"
search_input.send_keys(search_query)

# submit the search form
search_button = driver.find_element(By.CSS_SELECTOR, "button[aria-label="Search"]")
search_button.click()

# where to store the scraped data
items = []

# select the Google Maps items
maps_items = WebDriverWait(driver, 10).until(
    EC.presence_of_all_elements_located((By.XPATH, '//div[@role="feed"]//div[contains(@jsaction, "mouseover:pane")]'))
)

# iterate over the Google Maps items and
# perform the scraping logic
for maps_item in maps_items:
    link_element = maps_item.find_element(By.CSS_SELECTOR, "a[jsaction][jslog]")
    url = link_element.get_attribute("href")

    title_element = maps_item.find_element(By.CSS_SELECTOR, "div.fontHeadlineSmall")
    title = title_element.text

    reviews_element = maps_item.find_element(By.CSS_SELECTOR, "span[role="img"]")
    reviews_string = reviews_element.get_attribute("aria-label")

    # define a regular expression pattern to extract the stars and reviews count
    reviews_string_pattern = r"(d+.d+) stars (d+[,]*d+) Reviews"

    # use re.match to find the matching groups
    reviews_string_match = re.match(reviews_string_pattern, reviews_string)

    reviews_stars = None
    reviews_count = None

    # if a match is found, extract the data
    if reviews_string_match:
        # convert stars to float
        reviews_stars = float(reviews_string_match.group(1))
        # convert reviews count to integer
        reviews_count = int(reviews_string_match.group(2).replace(",", ""))

    # select the Google Maps item <div> with most info
    # and extract data from it
    info_div = maps_item.find_element(By.CSS_SELECTOR, ".fontBodyMedium")

    # scrape the price, if present
    try:
        price_element = info_div.find_element(By.XPATH, ".//*[@aria-label[contains(., 'Price')]]")
        price = price_element.text
    except NoSuchElementException:
        price = None

    info = []
    # select all <span> elements with no attributes or the @style attribute
    # and descendant of a <span>
    span_elements = info_div.find_elements(By.XPATH, ".//span[not(@*) or @style][not(descendant::span)]")
    for span_element in span_elements:
      info.append(span_element.text.replace("⋅", "").strip())

    # to remove any duplicate info and empty strings
    info = list(filter(None, list(set(info))))

    img_element = WebDriverWait(driver, 5).until(
        EC.presence_of_element_located((By.CSS_SELECTOR, "img[decoding="async"][aria-hidden="true"]"))
    )
    image = img_element.get_attribute("src")

    # select the tag <div> element and extract data from it
    tags_div = maps_item.find_elements(By.CSS_SELECTOR, ".fontBodyMedium")[-1]
    tags = []
    tag_elements = tags_div.find_elements(By.CSS_SELECTOR, "span[style]")
    for tag_element in tag_elements:
      tags.append(tag_element.text)

    # populate a new item with the scraped data
    item = {
      "url": url,
      "image": image,
      "title": title,
      "reviews": {
        "stars": reviews_stars,
        "count": reviews_count
      },
      "price": price,
      "info": info,
      "tags": tags
    }
    # add it to the list of scraped data
    items.append(item)

# output CSV file path
output_file = "items.csv"

# flatten and export to CSV
with open(output_file, mode="w", newline="", encoding="utf-8") as csv_file:
    # define the CSV field names
    fieldnames = ["url", "image", "title", "reviews_stars", "reviews_count", "price", "info", "tags"]
    writer = csv.DictWriter(csv_file, fieldnames=fieldnames)

    # write the header
    writer.writeheader()

    # write each item, flattening info and tags
    for item in items:
        writer.writerow({
            "url": item["url"],
            "image": item["image"],
            "title": item["title"],
            "reviews_stars": item["reviews"]["stars"],
            "reviews_count": item["reviews"]["count"],
            "price": item["price"],
            "info": "; ".join(item["info"]),
            "tags": "; ".join(item["tags"])
        })

# close the web browser
driver.quit()
仅需大约 150 行代码,您就构建了一个 Google Maps 抓取脚本!
启动 scraper.py 文件即可验证抓取工具是否可正常运行。在 Windows 上,可使用以下命令运行抓取工具:
python scraper.py
如在 Linux 或 macOS 上,则使用以下命令运行:
python3 scraper.py
抓取工具运行完毕后,项目根目录中会出现 items.csv 文件。打开该文件查看提取的数据,就会看到如下所示的数据:

恭喜,抓取任务圆满完成!
结论
在本教程中,您学习了 Google Maps 抓取工具的基本概念以及在 Python 中构建该工具的操作方法。正如您在文中看到的那样,只需短短几行 Python 代码即可构建简单的脚本,自动检索 Google Maps 的数据。
不过,本文中的解决方案只适用于小型抓取项目,不适合进行大规模地抓取。Google 采用先进的反机器人检查机制,例如验证码和 IP 封禁等,可以阻止您抓取数据。而且将抓取流程扩展到多个页面也会增加基础架构成本。此外,文中的简单示例并未考虑 Google Maps 页面所需的各项复杂交互。
这是否意味着您无法高效、可靠地抓取 Google Maps 的数据?当然不是!您只需采用先进的解决方案即可,比如 Bright Data 的 Google Maps 抓取工具 API。
我们的 Google Maps 抓取工具 API 提供多个端点,用于检索 Google Map 的数据,使您无需应付各种棘手挑战。您只需调用简单的 API,便可以 JSON 或 HTML 格式获取所需数据。如您不喜欢调用 API,则可了解一下我们的即用型 Google Maps 数据集。
立即创建免费的 Bright Data 账户,试用我们的抓取工具 API 或了解我们的数据集!


