在本指南中,您将学习:
- Gospider 是什么以及它如何工作
- 它提供哪些功能
- 如何使用它进行网页爬取
- 如何将其与 Colly 集成以进行网页抓取
- 它的主要限制以及如何规避这些限制
让我们开始吧!
什么是 Gospider?
Gospider 是一个用 Go 编写的快速且高效的命令行网页爬取工具。它可以并行扫描网站并提取 URL,同时处理多个请求和域名。此外,它会遵从 robots.txt,并可在 JavaScript 文件中发现链接。
Gospider 提供了多种自定义参数(flags)来控制爬取的深度、请求延迟等。它也支持代理集成以及其他多项配置,为爬取流程提供更灵活的控制。
Gospider 在进行 Web 爬取时有哪些独特之处?
若要更好地理解 Gospider 在网页爬取方面的特别之处,我们可以深入了解它的功能和支持的标志(flag)。
功能
下列功能是 Gospider 在进行网页爬取时提供的主要特性:
- 快速网页爬取:高效率地对单个网站进行快速爬取。
- 并行爬取:可以并行爬取多个网站,加快数据收集。
- 解析
sitemap.xml:自动处理 sitemap 文件,以增强爬取。 - 解析
robots.txt:遵守robots.txt中的爬取指令,进行合规爬取。 - 解析 JavaScript 链接:从 JavaScript 文件中提取链接。
- 可自定义爬取选项:通过各种灵活的参数,调整爬取深度、并发量、延迟、超时等。
User-Agent随机化:在移动端和桌面端的 User-Agent 间进行随机,模拟更真实的请求方式。想了解更多可阅读 设置User-Agent的最佳实践。- Cookie 和 Header 自定义:可设置自定义的 Cookie 和 HTTP Header。
- 链接查找器:能识别站点上的 URL 和其他资源。
- 检测 AWS S3 存储桶:可从响应中分析出 AWS S3 存储桶。
- 发现子域名:从响应中找到子域名。
- 第三方来源:可从 Wayback Machine、Common Crawl、VirusTotal、Alien Vault 等服务中提取 URL。
- 简洁的输出格式:输出结果的格式易于使用
grep等工具进行分析。 - 支持 Burp Suite:可与 Burp Suite 集成,更方便测试与爬取。
- 高级过滤:可制定黑名单和白名单,包括对域名级别的过滤。
- 子域名支持:在爬取目标站点及第三方来源时,可包含子域名。
- 调试和详细模式:启用调试和详细日志,便于故障排查。
命令行选项
下面展示了一个通用的 Gospider 命令格式:
gospider [flags]详情可参考 官方文档中支持的参数列表:
-s, --site:要爬取的网站。-S, --sites:要爬取的网站列表。-p, --proxy:代理 URL。-o, --output:输出文件夹。-u, --user-agent:User Agent(例如web、mobi,或自定义)。--cookie:要使用的 Cookie(例如testA=a; testB=b)。-H, --header:要使用的 Header(可多次使用该标志设置多个 Header)。--burp string:从 Burp Suite 的原始 HTTP 请求中加载 Header 和 Cookie。--blacklist:URL 正则黑名单。--whitelist:URL 正则白名单。--whitelist-domain:域名白名单。-t, --threads:并行运行的线程数(默认:1)。-c, --concurrent:对匹配的域名允许的最大并发请求数(默认:5)。-d, --depth:URL 最多递归爬取层级(设置为0表示无限,默认:1)。-k, --delay int:请求的间隔时间(单位:秒)。-K, --random-delay int:请求前附加的随机延迟(单位:秒)。-m, --timeout int:请求超时时间(单位:秒,默认:10)。-B, --base:禁用所有内容,仅使用 HTML 内容。--js:在 JavaScript 文件中启用链接查找(默认:true)。--subs:包含子域名。--sitemap:爬取sitemap.xml。--robots:爬取robots.txt(默认:true)。-a, --other-source:从第三方来源(Archive.org、CommonCrawl、VirusTotal、AlienVault 等)查找 URL。-w, --include-subs:包含从第三方来源发现的子域名(默认:仅主域名)。-r, --include-other-source:包含第三方来源的 URL 并继续爬取。--debug:启用调试模式。--json:启用 JSON 输出。-v, --verbose:启用详细输出。-l, --length:显示 URL 长度。-L, --filter-length:按长度过滤 URL。-R, --raw:显示原始输出。-q, --quiet:不显示任何输出,仅展示 URL。--no-redirect:禁用重定向。--version:查看版本。-h, --help:显示帮助。
使用 Gospider 进行网页爬取:分步指南
本节将演示如何利用 Gospider 来爬取多页面站点的链接。我们将以 Books to Scrape 网站为目标示例:
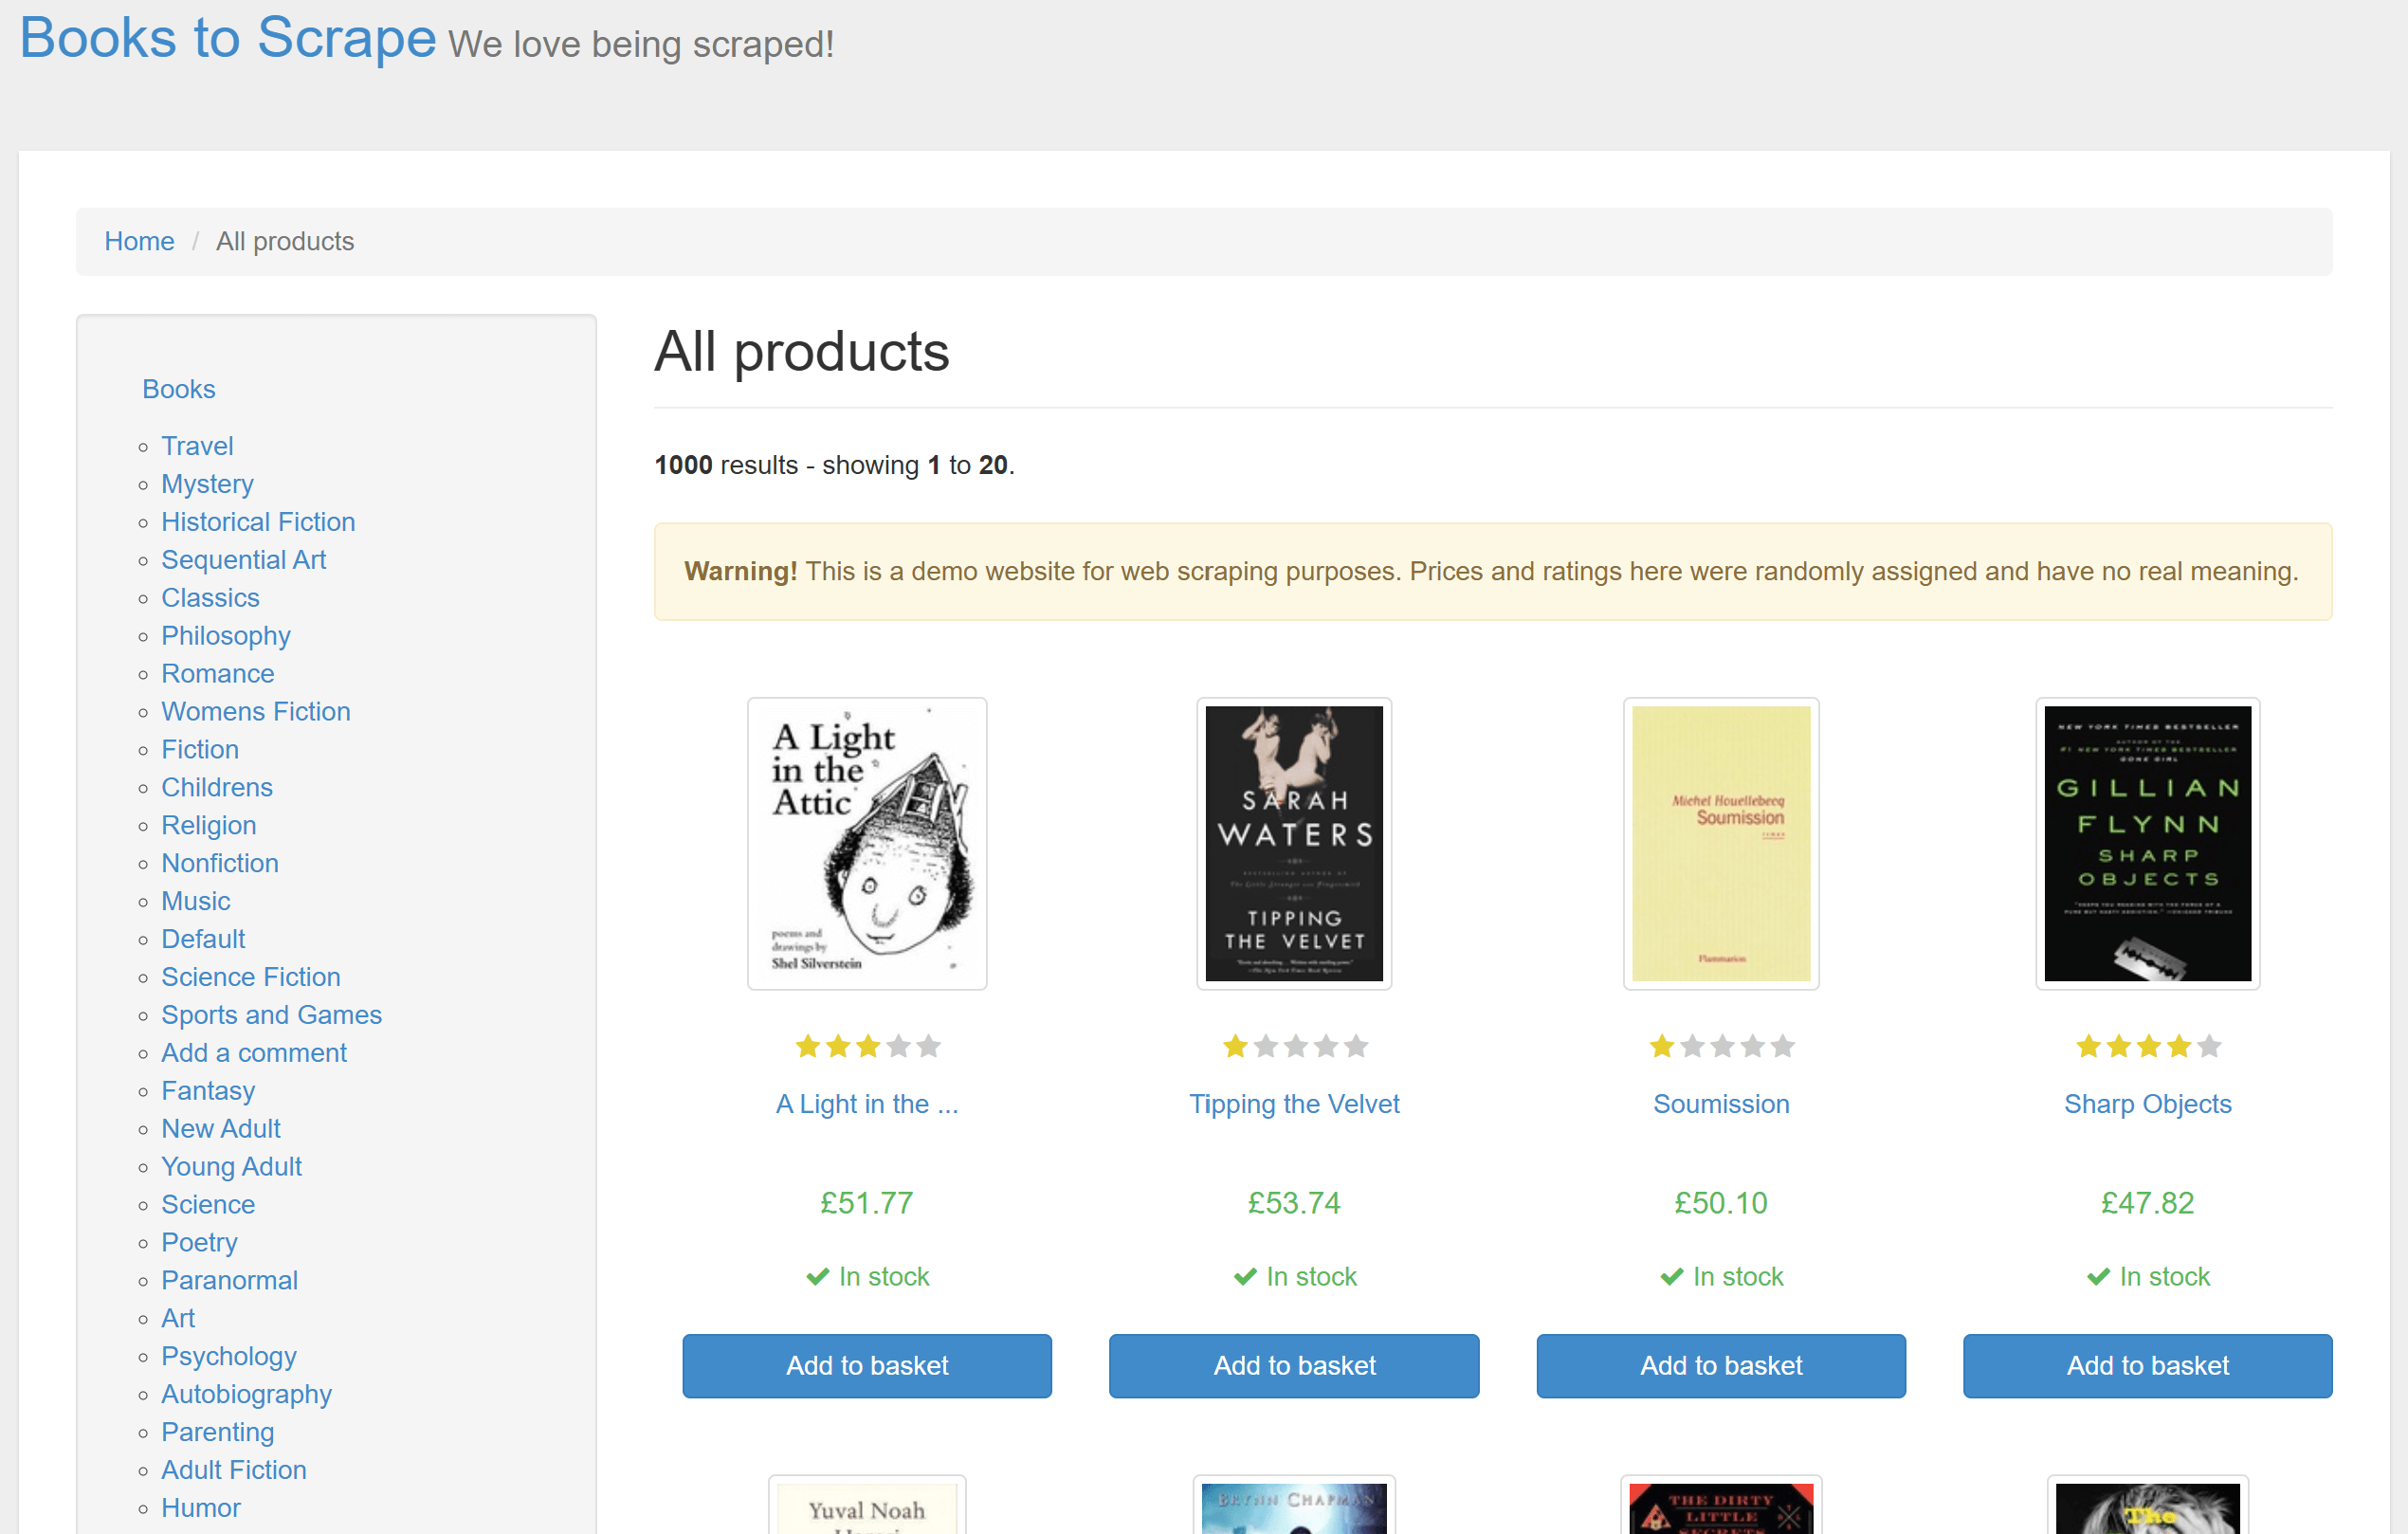
该网站包含 50 页的产品列表,每个列表页面上的产品也有对应的独立产品页。下面的操作将带领您了解如何使用 Gospider 来获取所有这些产品页 URL!
先决条件和项目设置
在开始之前,请确保您拥有以下环境:
- 在本机安装了 Go:如果尚未安装,请从 Go 官方网站 下载并按照说明安装。
- 有一个 Go IDE:推荐使用 Visual Studio Code 并安装 Go 扩展。
要验证是否已正确安装 Go,请运行:
go version如果 Go 安装正常,您会看到类似这样的输出(在 Windows 上):
go version go1.24.1 windows/amd64太好了!Go 已准备就绪。
创建一个新的项目文件夹,并在终端中进入该文件夹:
mkdir gospider-project
cd gospider-project
现在,您就可以安装 Gospider 并使用它进行网页爬取了!
步骤 #1:安装 Gospider
运行以下 go install 命令来编译并全局安装 Gospider:
go install github.com/jaeles-project/gospider@latest安装完成后,运行以下命令以验证 Gospider 是否安装成功:
gospider -h这会打印出类似下面的 Gospider 使用说明:
Fast web spider written in Go - v1.1.6 by @thebl4ckturtle & @j3ssiejjj

Usage:
  gospider [flags]

Flags:
  -s, --site string               Site to crawl
  -S, --sites string              Site list to crawl
  -p, --proxy string              Proxy (Ex: http://127.0.0.1:8080)
  -o, --output string             Output folder
  -u, --user-agent string         User Agent to use
                                        web: random web user-agent
                                        mobi: random mobile user-agent
                                        or you can set your special user-agent (default "web")
      --cookie string             Cookie to use (testA=a; testB=b)
  -H, --header stringArray        Header to use (Use multiple flag to set multiple header)
      --burp string               Load headers and cookie from burp raw http request
      --blacklist string          Blacklist URL Regex
      --whitelist string          Whitelist URL Regex
      --whitelist-domain string   Whitelist Domain
  -L, --filter-length string      Turn on length filter
  -t, --threads int               Number of threads (Run sites in parallel) (default 1)
  -c, --concurrent int            The number of the maximum allowed concurrent requests of the matching domains (default 5)
  -d, --depth int                 MaxDepth limits the recursion depth of visited URLs. (Set it to 0 for infinite recursion) (default 1)
  -k, --delay int                 Delay is the duration to wait before creating a new request to the matching domains (second)
  -K, --random-delay int          RandomDelay is the extra randomized duration to wait added to Delay before creating a new request (second)
  -m, --timeout int               Request timeout (second) (default 10)
  -B, --base                      Disable all and only use HTML content
      --js                        Enable linkfinder in javascript file (default true)
      --sitemap                   Try to crawl sitemap.xml
      --robots                    Try to crawl robots.txt (default true)
  -a, --other-source              Find URLs from 3rd party (Archive.org, CommonCrawl.org, VirusTotal.com, AlienVault.com)
  -w, --include-subs              Include subdomains crawled from 3rd party. Default is main domain
  -r, --include-other-source      Also include other-source's urls (still crawl and request)
      --subs                      Include subdomains
      --debug                     Turn on debug mode
      --json                      Enable JSON output
  -v, --verbose                   Turn on verbose
  -q, --quiet                     Suppress all the output and only show URL
      --no-redirect               Disable redirect
      --version                   Check version
  -l, --length                    Turn on length
  -R, --raw                       Enable raw output
  -h, --help                      help for gospider
非常好!Gospider 已安装完成,现在可以使用它来爬取单个或多个网站。
步骤 #2:爬取目标页面上的 URL
要爬取目标页面上的所有链接,可运行以下命令:
gospider -s "https://books.toscrape.com/" -o output -d 1下面是所使用的 Gospider 参数:
-s "https://books.toscrape.com/":指定要爬取的目标 URL。-o output:将爬取结果保存到output文件夹。-d 1:将爬取深度设置为1,意味着 Gospider 只在当前页面检测到的链接进行收集,不会进一步跟进已发现链接的 deeper 层级。
上述命令执行后,将生成如下目录结构:
gospider-project/
  └── output/
        └── books_toscrape_com
打开 output 文件夹下的 books_toscrape_com 文件,可以看到类似以下内容:
[url] - [code-200] - https://books.toscrape.com/
[href] - https://books.toscrape.com/static/oscar/favicon.ico
# omitted for brevity...
[href] - https://books.toscrape.com/catalogue/page-2.html
[javascript] - http://ajax.googleapis.com/ajax/libs/jquery/1.9.1/jquery.min.js
# omitted for brevity...
[javascript] - https://books.toscrape.com/static/oscar/js/bootstrap-datetimepicker/locales/bootstrap-datetimepicker.all.js
[url] - [code-200] - http://ajax.googleapis.com/ajax/libs/jquery/1.9.1/jquery.min.js
# omitted for brevity...
[linkfinder] - [from: https://books.toscrape.com/static/oscar/js/bootstrap-datetimepicker/locales/bootstrap-datetimepicker.all.js] - dd/mm/yyyy
# omitted for brevity...
[url] - [code-200] - https://books.toscrape.com/static/oscar/js/bootstrap-datetimepicker/bootstrap-datetimepicker.js
该文件中包含了多种类型的检测链接:
[url]:爬取到的页面/资源链接。[href]:在页面中通过<a href>标签发现的链接。[javascript]:指向 JavaScript 文件的 URL。[linkfinder]:从 JavaScript 代码中提取到的嵌入链接。
步骤 #3:爬取整个网站
从上面的输出可以看出,Gospider 仅定位到了第一个分页页面的链接,但并未继续访问它。
您可以在 books_toscrape_com 文件中看到:
[href] - https://books.toscrape.com/catalogue/page-2.html[href] 标签说明该链接已被发现,但由于没有对应的 [url] 条目,表示实际上并未访问该链接。
如果您检查目标页面,您可以发现上述 URL 对应的是第二页分页链接:
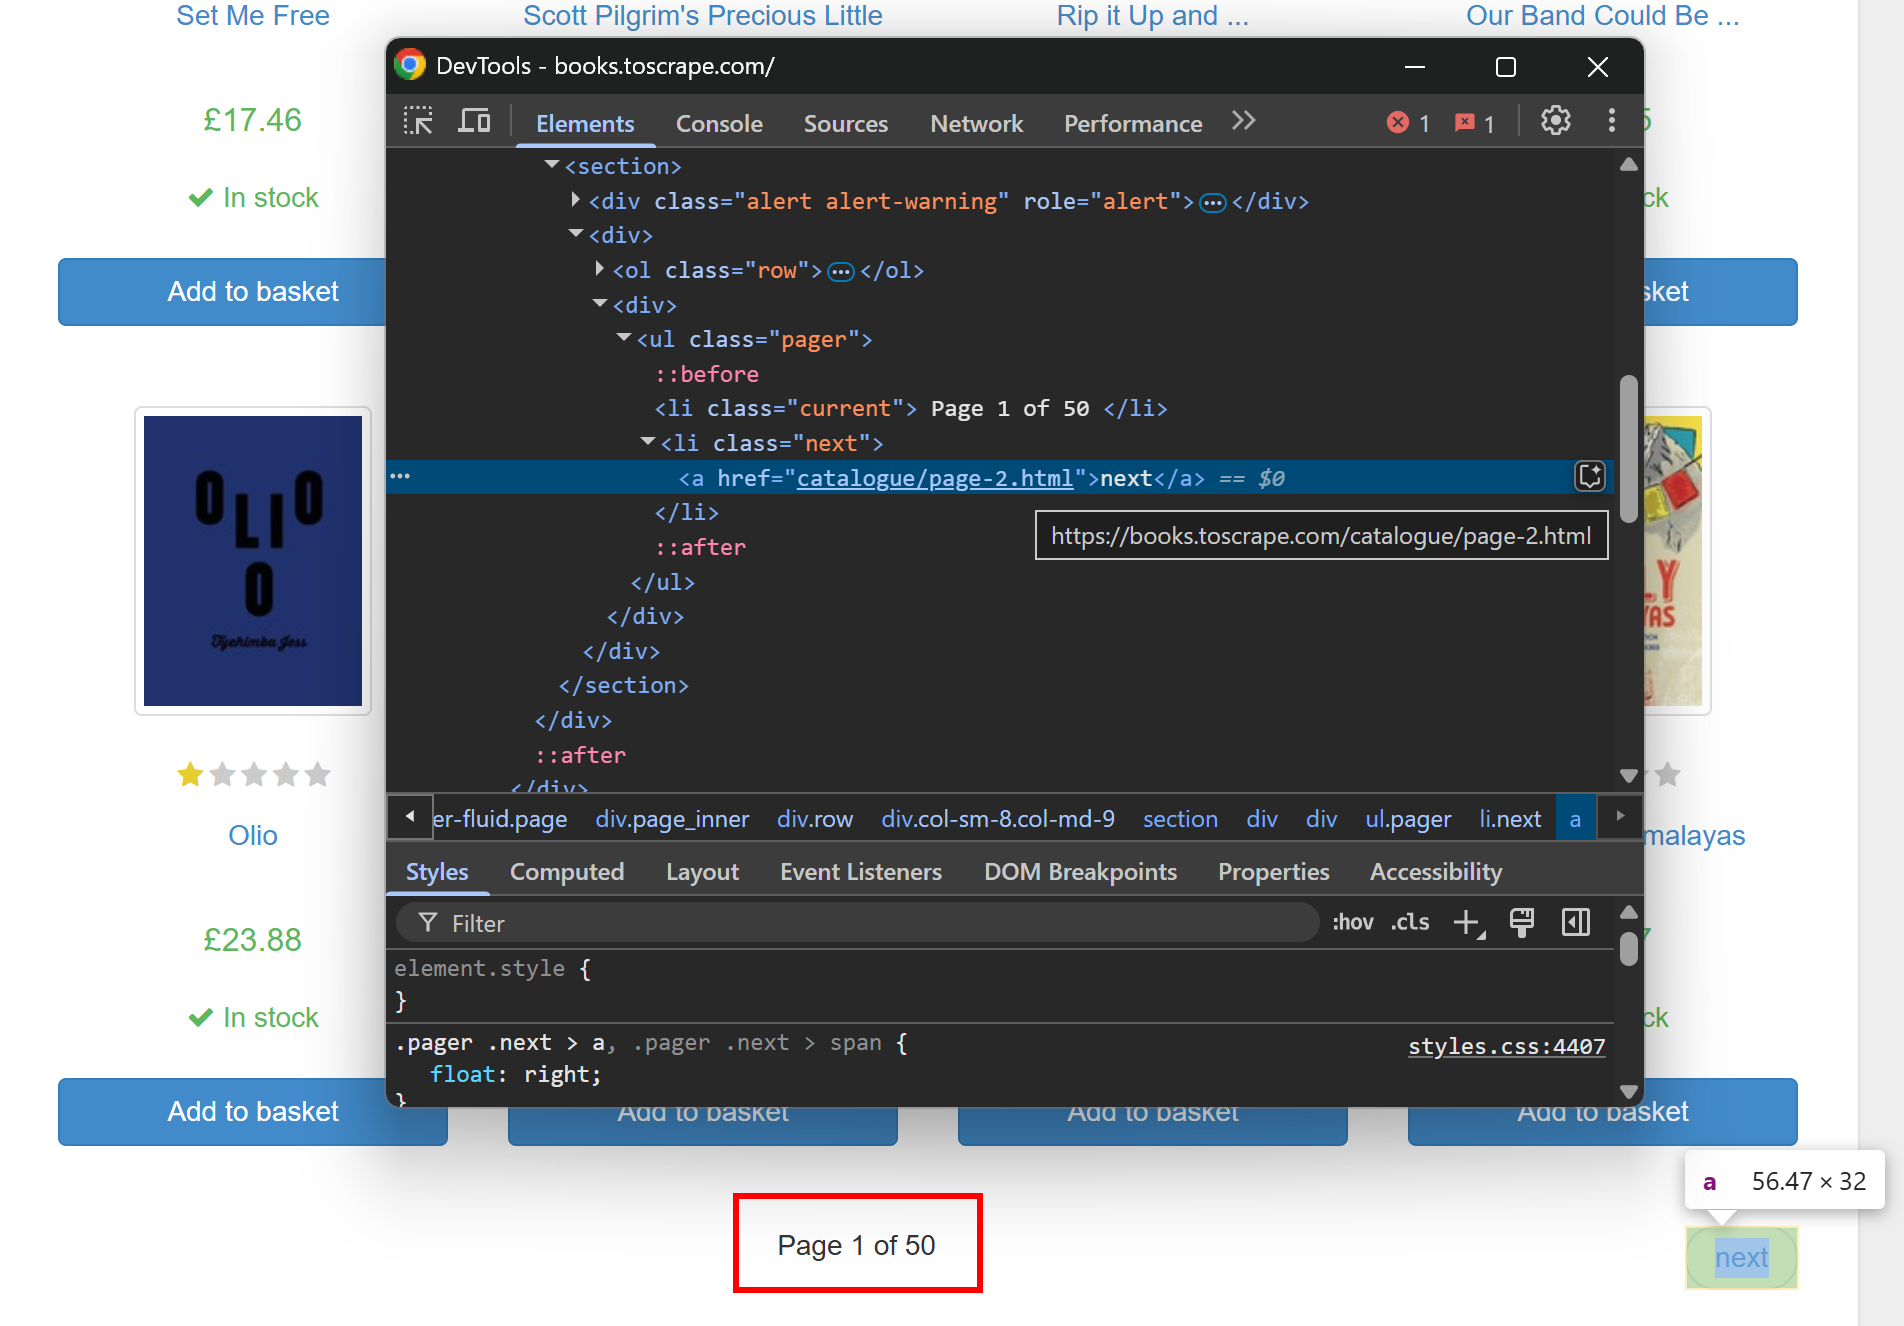
要爬取整个网站,需追踪所有分页链接。就像上图中所示,目标网站有 50 页产品(见“Page 1 of 50”)。将 Gospider 的深度设置为 50,以便它能访问所有页面。
由于这会涉及较多页面,建议再提高并发量(同时请求数)。默认并发数为 5,可以将其提高到 10 来加快执行。
最终爬取所有产品页面的命令如下:
gospider -s "https://books.toscrape.com/" -o output -d 50 -c 10在执行时,Gospider 的运行时间会更长,并且会产生大量的 URL 输出。此时的文件中会包含类似以下的内容:
[url] - [code-200] - https://books.toscrape.com/
[href] - https://books.toscrape.com/static/oscar/favicon.ico
[href] - https://books.toscrape.com/static/oscar/css/styles.css
# omitted for brevity...
[href] - https://books.toscrape.com/catalogue/page-50.html
[url] - [code-200] - https://books.toscrape.com/catalogue/page-50.html
最需要留意的是,最后的分页链接也出现了:
[url] - [code-200] - https://books.toscrape.com/catalogue/page-50.html很好!这说明 Gospider 成功跟进了所有分页链接并爬取了完整的产品目录。
步骤 #4:仅获取产品页面
Gospider 在短时间内就收集了整个网站的所有 URL。到此,您已经可以完成爬取任务,但我们还可以更进一步。
如果只想获取产品页 URL,该怎么办?我们可以先检查目标页面中产品元素的结构:
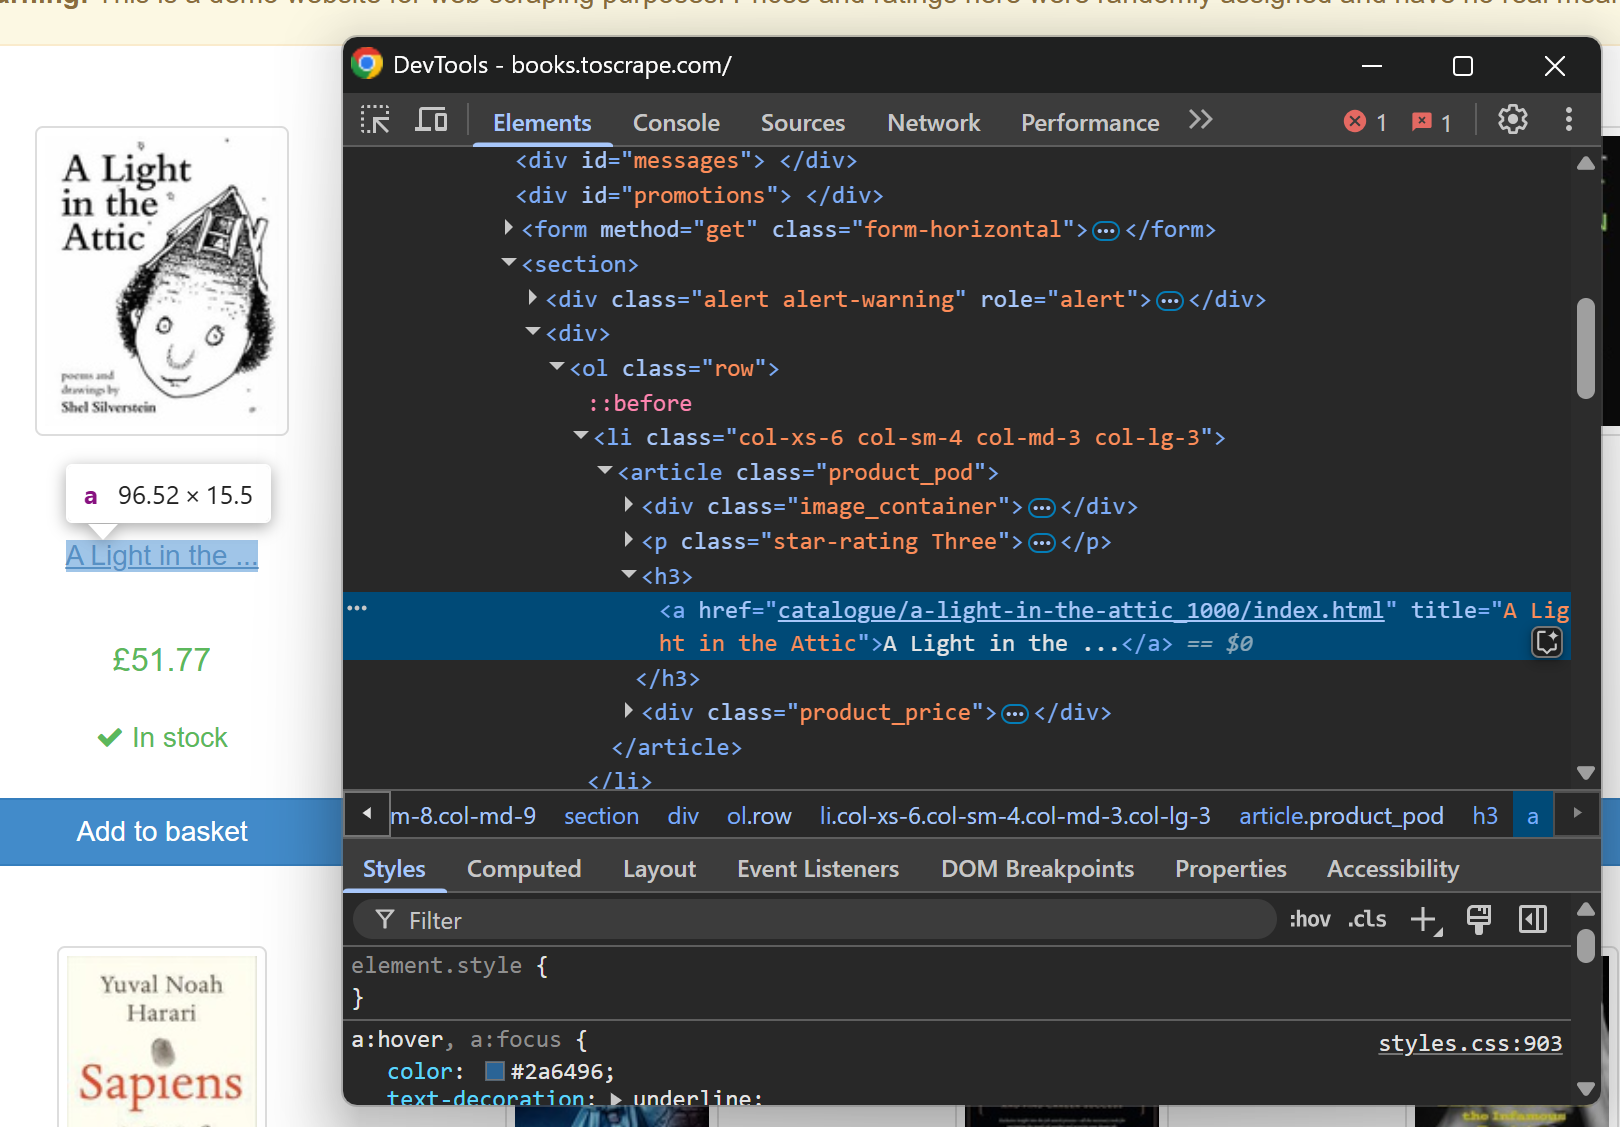
从该检查可知,产品页面 URL 大致形如:
https://books.toscrape.com/catalogue/<product_slug>/index.html要从全部原始爬取结果中过滤出这些产品页 URL,可使用自定义的 Go 脚本。
首先,在您的 Gospider 项目目录中创建一个 Go 模块:
go mod init crawler接着,在项目文件夹中新建 crawler 文件夹,并在其中创建 crawler.go 文件,然后在 IDE 中打开该项目。目录结构如下:
gospider-project/
├── crawler/
│   └── crawler.go
└── output/
    └── books_toscrape_com
crawler.go 脚本需要实现以下功能:
- 从干净环境下执行一次 Gospider 命令。
- 读取 Gospider 输出文件中所有 URL。
- 使用正则表达式筛选出产品页面 URL。
- 将这些产品页 URL 导出到 .txt 文件。
以下是可实现上述目标的 Go 代码示例:
package main

import (
        "bufio"
        "fmt"
        "os"
        "os/exec"
        "regexp"
        "slices"
        "path/filepath"
)

func main() {
        // Delete the output folder if it exists to start with a clean run
        outputDir := "output"
        os.RemoveAll(outputDir)

        // Create the Gospider CLI command to crawl the "books.toscrape.com" site
        fmt.Println("Running Gospider...")
        cmd := exec.Command("gospider", "-s", "https://books.toscrape.com/", "-o", outputDir, "-d", "50", "-c", "10")
        cmd.Stdout = os.Stdout
        cmd.Stderr = os.Stderr

        // Run the Gospider command and wait for it to finish
        cmd.Run()
        fmt.Println("Gospider finished")

        // Open the generated output file that contains the crawled URLs
        fmt.Println("nReading the Gospider output file...")
        inputFile := filepath.Join(outputDir, "books_toscrape_com")
        file, _ := os.Open(inputFile)
        defer file.Close()

        // Extract product page URLs from the file using a regular expression
        // to filter out the URLs that point to individual product pages
        urlRegex := regexp.MustCompile(`(https://books.toscrape.com/catalogue/[^/]+/index.html)`)
        var productURLs []string

        // Read each line of the file and check for matching URLs
        scanner := bufio.NewScanner(file)
        for scanner.Scan() {
                line := scanner.Text()
                // Extract all URLs from the line
                matches := urlRegex.FindAllString(line, -1)
                for _, url := range matches {
                        // Ensure that the URL has not been added already to avoid duplicates
                        if !slices.Contains(productURLs, url) {
                                productURLs = append(productURLs, url)
                        }
                }
        }
        fmt.Printf("%d product page URLs foundn", len(productURLs))

        // Export the product page URLs to a new file
        fmt.Println("nExporting filtered product page URLs...")
        outputFile := "product_urls.txt"
        out, _ := os.Create(outputFile)
        defer out.Close()

        writer := bufio.NewWriter(out)
        for _, url := range productURLs {
                _, _ = writer.WriteString(url + "n")
        }
        writer.Flush()
        fmt.Printf("Product page URLs saved to %sn", outputFile)
}
这个 Go 程序通过以下步骤自动化了爬取流程:
- 使用
os.RemoveAll()删除(如果已存在)output/目录,以确保每次执行都从干净环境开始。 - 调用
exec.Command()与cmd.Run()启动并执行一个 Gospider 命令行进程,实现站点爬取。 - 通过
os.Open()和bufio.NewScanner()打开并逐行读取 Gospider 生成的输出文件(即books_toscrape_com)。 - 用
regexp.MustCompile()与FindAllString()将正则匹配到的产品页 URL 提取出来,并使用slices.Contains()去重。 - 使用
os.Create()和bufio.NewWriter()将过滤后得到的产品页 URL 写入到product_urls.txt文件中。
步骤 #5:运行爬取脚本
使用以下命令来运行 crawler.go 脚本:
go run crawler/crawler.go脚本会在终端打印如下输出:
Running Gospider...
# Gospider output omitted for brevity...
Gospider finished

Reading the Gospider output file...
1000 product page URLs found

Exporting filtered product page URLs...
Product page URLs saved to product_urls.txt
Gospider 爬取脚本成功找到了 1000 个产品页面 URL。您可以在目标网站上验证,确实有 1000 个产品页面:

这些 URL 都保存在项目文件夹中名为 product_urls.txt 的文件中,打开后可见:
https://books.toscrape.com/catalogue/a-light-in-the-attic_1000/index.html
# omitted for brevity...
https://books.toscrape.com/catalogue/frankenstein_20/index.html
恭喜!您已经创建了一个结合 Gospider 的 Go 脚本来进行网页爬取。
[进阶] 将网页抓取逻辑加入到 Gospider 爬取流程
通常,网页爬取只是整个网页抓取项目中的一步。想深入了解网页爬取与抓取的区别,可参阅我们关于 Web Crawling 与 Web Scraping 的详细解读。
为了让本教程更完整,下面演示如何使用已爬取的链接进行网页抓取。我们将做如下操作:
- 从
product_urls.txt(前面由 Gospider 脚本生成)读取产品页面 URL。 - 访问每个产品页面并抓取产品数据。
- 将抓取到的产品数据导出为 CSV 文件。
接下来让我们为 Gospider 的爬取流程加入 Colly 的网页抓取逻辑!
步骤 #1:安装 Colly
我们所用的抓取库是 Colly,这是一个优雅的 Golang 抓取与爬取框架。如果您不熟悉 Colly,可阅读我们关于 Go 语言进行网页抓取的教程。
执行以下命令安装 Colly:
go get -u github.com/gocolly/colly/...然后,在项目文件夹中新建名为 scraper 的文件夹,并在其中创建一个 scraper.go 文件。项目结构将如下所示:
gospider-project/
├── crawler/
│   └── crawler.go
├── output/
│   └── books_toscrape_com
└── scraper/
    └── scraper.go
打开 scraper.go 文件后,先导入 Colly:
import (
        "bufio"
        "encoding/csv"
        "os"
        "strings"

        "github.com/gocolly/colly"
)
一切就绪!接下来按照以下步骤,使用 Colly 从爬取到的产品链接中抓取数据。
步骤 #2:读取待抓取的 URL
使用下面的代码从之前由 crawler.go 生成的 product_urls.txt 文件中读取要抓取的产品页面链接:
// Open the input file with the crawled URLs
file, _ := os.Open("product_urls.txt")
defer file.Close()

// Read page URLs from the input file
var urls []string
scanner := bufio.NewScanner(file)
for scanner.Scan() {
        urls = append(urls, scanner.Text())
}
为使上述代码正常运行,需要在文件开头添加以下 import:
import (
        "bufio"
        "os"
)这样一来,urls 切片就包含了我们要抓取的所有产品页面链接。
步骤 #3:实现数据提取逻辑
要实现数据提取逻辑,先要了解产品页面的 HTML 结构。
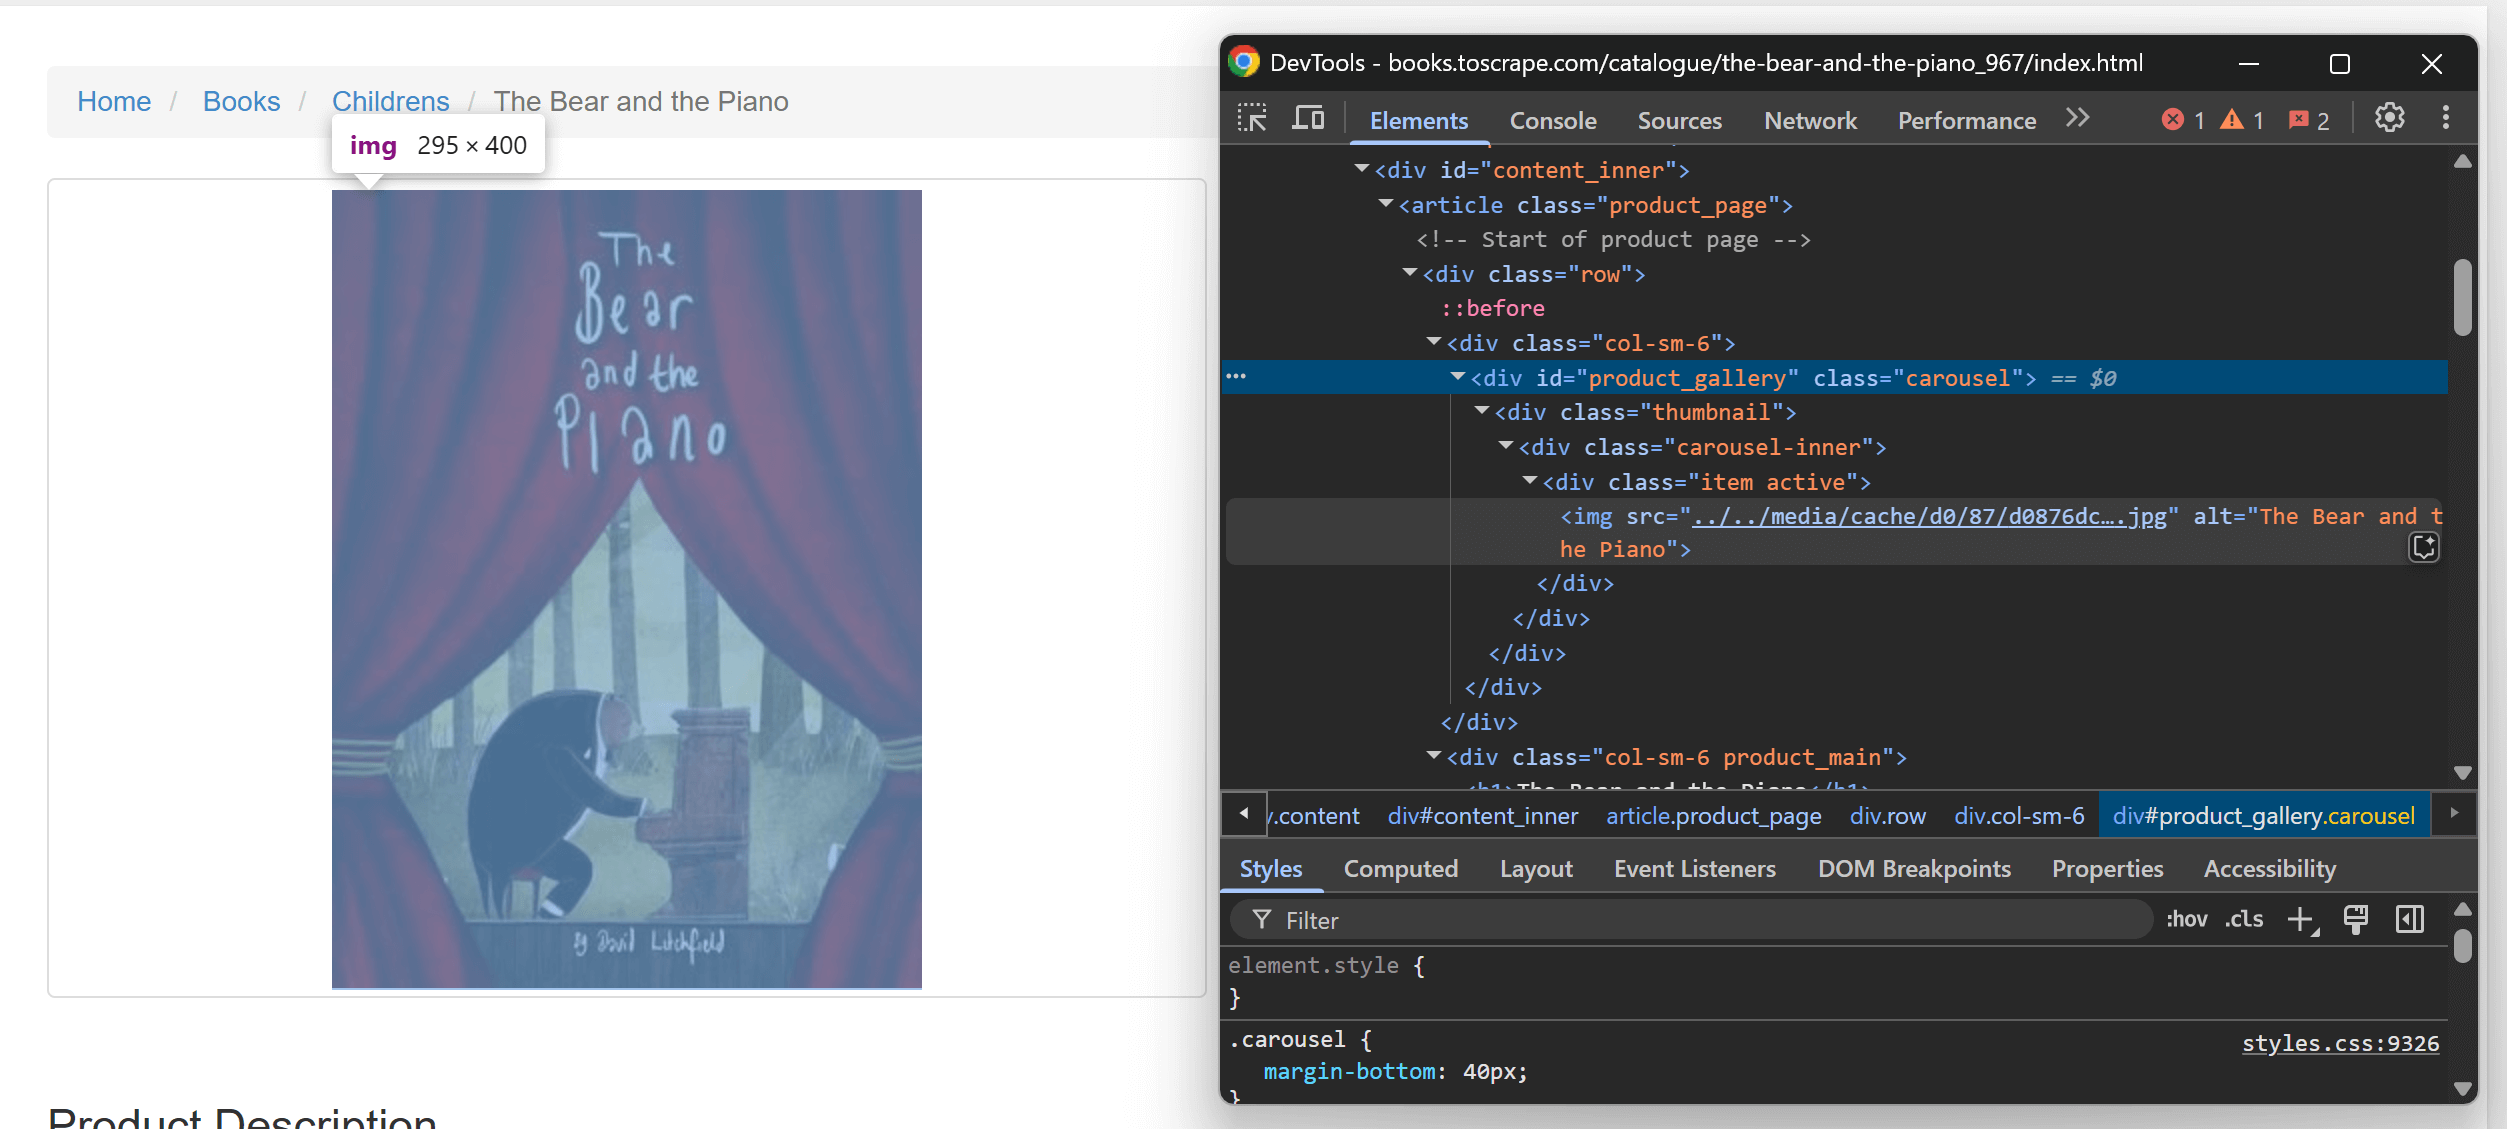
在浏览器的无痕窗口中打开任意一个产品页面,打开 DevTools 依次检查页面元素。先看产品图片的 HTML:
再查看产品信息区域:
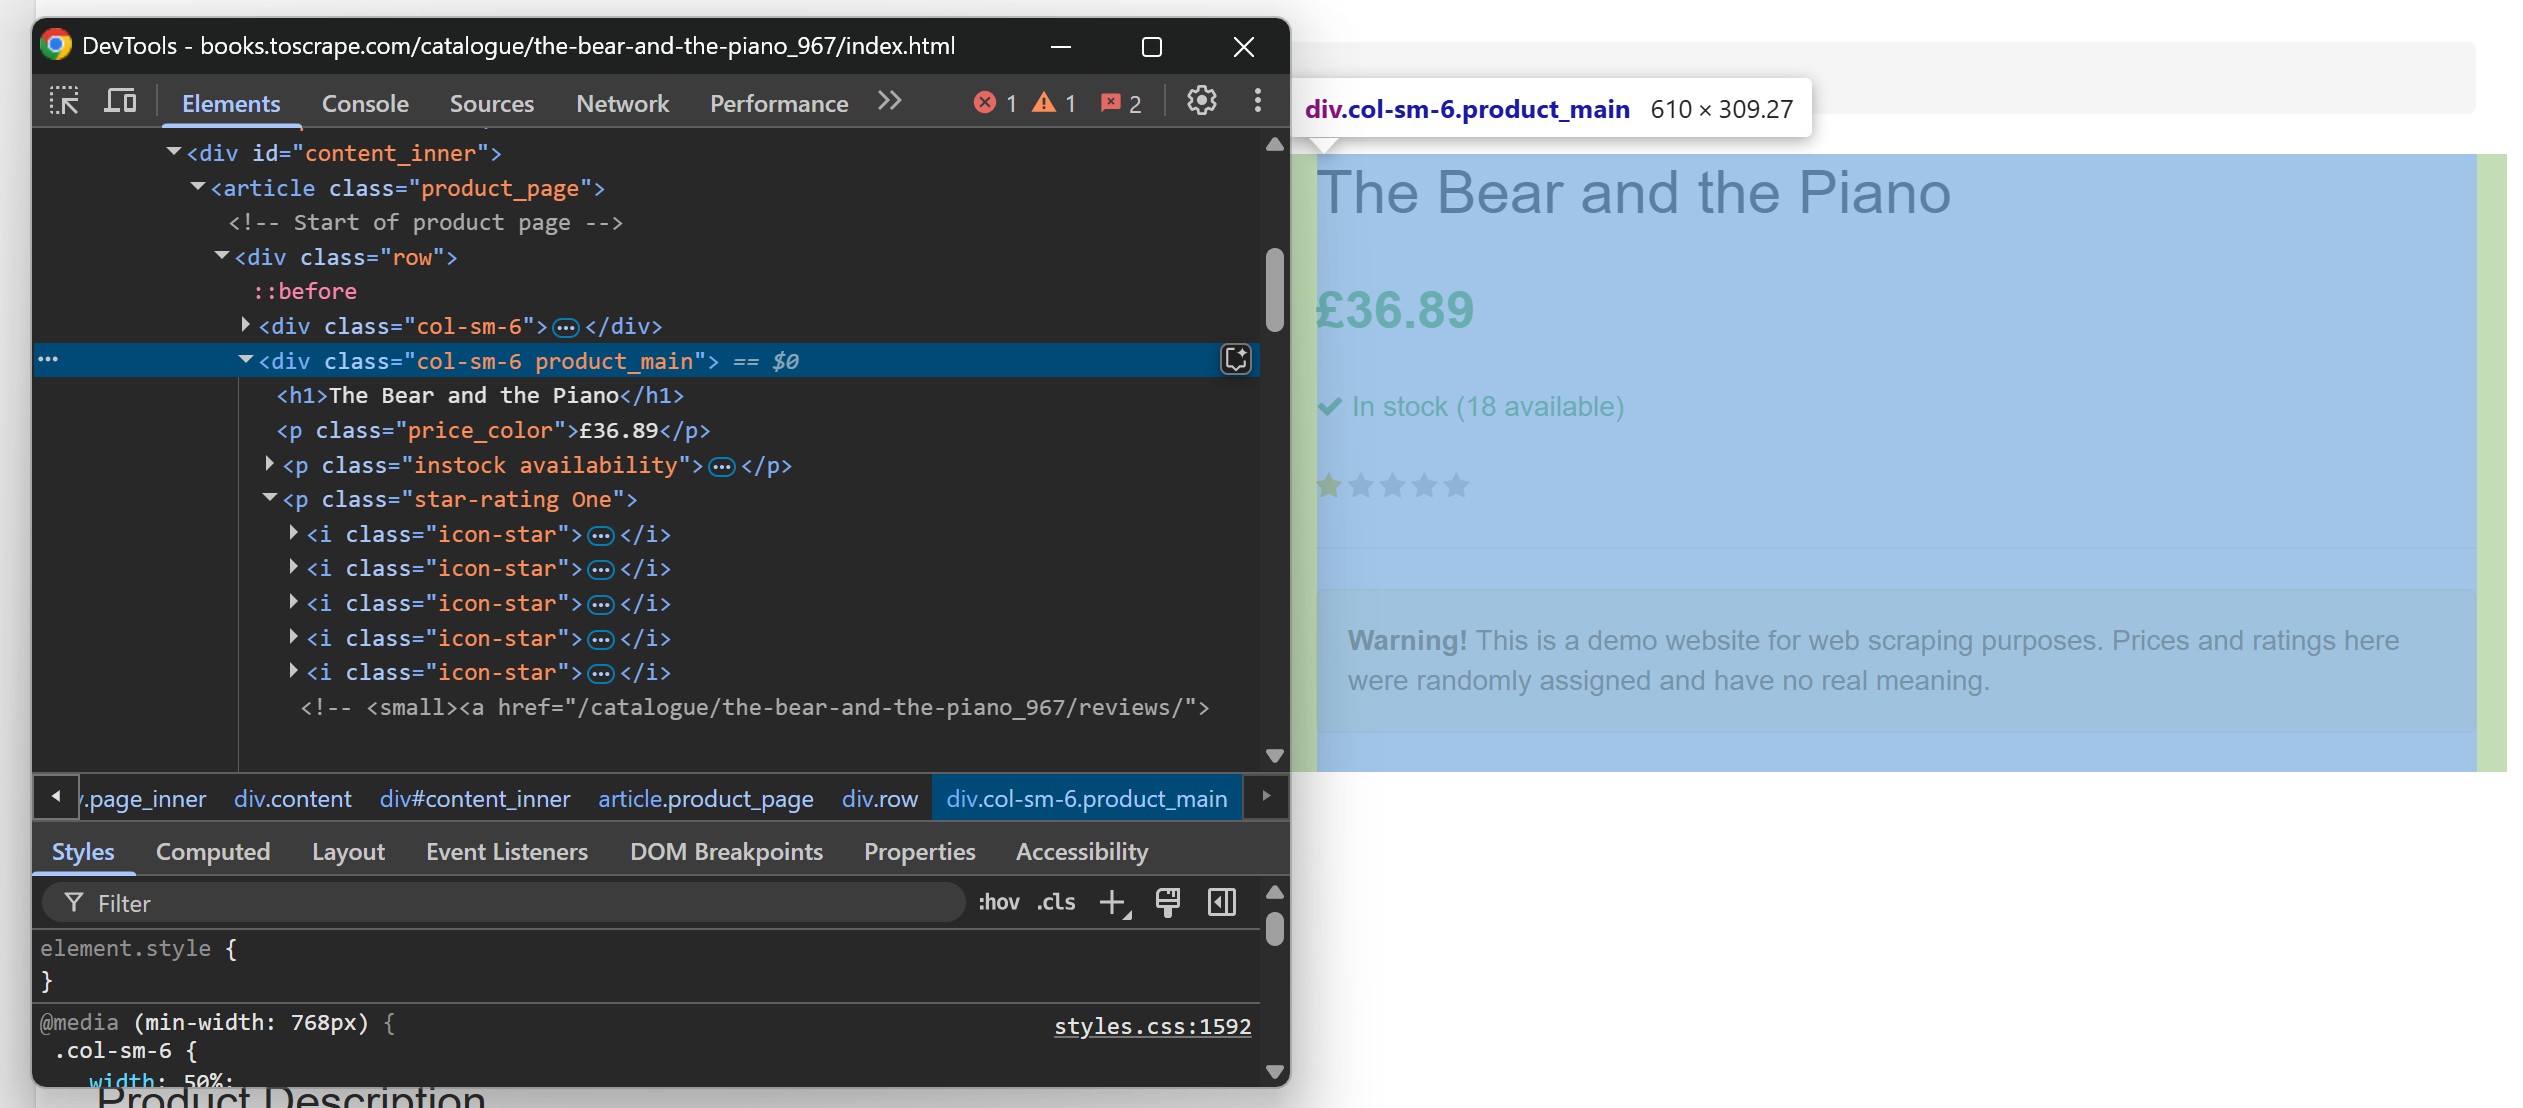
通过查看,可提取以下信息:
- 产品标题来自
<h1>标签。 - 产品价格来自页面上第一个
.price_color元素。 - 产品评分(星级)可从
.star-rating标签的 class 信息中获取。 - 产品图片 URL 位于
#product_gallery img元素。
根据这些信息,定义一个 Go 结构体(struct) 存储抓取到的数据:
type Product struct {
        Title    string
        Price    string
        Stars    string
        ImageURL string
}
由于要抓取多个产品页面,可定义一个切片来存储提取结果:
var products []Product要进行抓取,先初始化一个 Colly Collector:
c := colly.NewCollector()利用 Colly 的 OnHTML() 回调来实现抓取逻辑:
c.OnHTML("html", func(e *colly.HTMLElement) {
        // Scraping logic
        title := e.ChildText("h1")
        price := e.DOM.Find(".price_color").First().Text()

        stars := ""
        e.ForEach(".star-rating", func(_ int, el *colly.HTMLElement) {
                class := el.Attr("class")
                if strings.Contains(class, "One") {
                        stars = "1"
                } else if strings.Contains(class, "Two") {
                        stars = "2"
                } else if strings.Contains(class, "Three") {
                        stars = "3"
                } else if strings.Contains(class, "Four") {
                        stars = "4"
                } else if strings.Contains(class, "Five") {
                        stars = "5"
                }
        })

        imageURL := e.ChildAttr("#product_gallery img", "src")
        // Adjust the relative image path
        imageURL = strings.Replace(imageURL, "../../", "https://books.toscrape.com/", 1)

        // Create a new product object with the scraped data
        product := Product{
                Title:    title,
                Price:    price,
                Stars:    stars,
                ImageURL: imageURL,
        }

        // Append the product to the products slice
        products = append(products, product)
})
注意这里通过 else if 根据 .star-rating 的 class 属性来获取星级,还使用 strings.Replace() 将相对图片路径转换成绝对路径。
另外,需要导入:
import (
        "strings"
)
现在,Go 抓取脚本已经可以按需求提取数据!
步骤 #4:访问目标页面
Colly 采用回调式的抓取方式,可在真正获取 HTML 前先定义好抓取逻辑,这种灵活的流程有别于传统方式,但非常强大。
现在我们已经实现了数据提取逻辑,接下来让 Colly 逐个访问产品页面:
pageLimit := 50
for _, url := range urls[:pageLimit] {
        c.Visit(url)
}注意:这里将抓取数量限制在前 50 个链接,以避免对目标网站发起过多请求。在实际生产环境中,您可根据需求移除或调整这个限制。
Colly 会:
- 依次访问
urls列表中的链接。 - 调用
OnHTML()回调进行数据提取。 - 将提取到的数据存放于
products切片。
一切就绪!最后只需将抓取到的数据以 CSV 格式导出即可。
步骤 #5:导出抓取到的数据
使用以下代码将 products 切片中的内容写入 CSV 文件:
outputFile := "products.csv"
csvFile, _ := os.Create(outputFile)
defer csvFile.Close()

// Initialize a new CSV writer
writer := csv.NewWriter(csvFile)
defer writer.Flush()

// Write CSV header
writer.Write([]string{"Title", "Price", "Stars", "Image URL"})

// Write each product's data to the CSV
for _, product := range products {
        writer.Write([]string{product.Title, product.Price, product.Stars, product.ImageURL})
}
这个片段会创建 products.csv 文件,并将抓取到的数据写入其中。
别忘了导入 CSV 包:
import (
       "encoding/csv"
)
大功告成!Gospider 的爬取和 Colly 的抓取项目已经全部完成整合。
步骤 #6:整体实现
最后,您的 scraper.go 文件应如下所示:
package main

import (
        "bufio"
        "encoding/csv"
        "os"
        "strings"

        "github.com/gocolly/colly"
)

// Define a data type for the data to scrape
type Product struct {
        Title    string
        Price    string
        Stars    string
        ImageURL string
}

func main() {
        // Open the input file with the crawled URLs
        file, _ := os.Open("product_urls.txt")
        defer file.Close()

        // Read page URLs from the input file
        var urls []string
        scanner := bufio.NewScanner(file)
        for scanner.Scan() {
                urls = append(urls, scanner.Text())
        }

        // Create an array where to store the scraped data
        var products []Product

        // Set up Colly collector
        c := colly.NewCollector()

        c.OnHTML("html", func(e *colly.HTMLElement) {
                // Scraping logic
                title := e.ChildText("h1")
                price := e.DOM.Find(".price_color").First().Text()

                stars := ""
                e.ForEach(".star-rating", func(_ int, el *colly.HTMLElement) {
                        class := el.Attr("class")
                        if strings.Contains(class, "One") {
                                stars = "1"
                        } else if strings.Contains(class, "Two") {
                                stars = "2"
                        } else if strings.Contains(class, "Three") {
                                stars = "3"
                        } else if strings.Contains(class, "Four") {
                                stars = "4"
                        } else if strings.Contains(class, "Five") {
                                stars = "5"
                        }
                })

                imageURL := e.ChildAttr("#product_gallery img", "src")
                // Adjust the relative image path
                imageURL = strings.Replace(imageURL, "../../", "https://books.toscrape.com/", 1)

                // Create a new product object with the scraped data
                product := Product{
                        Title:    title,
                        Price:    price,
                        Stars:    stars,
                        ImageURL: imageURL,
                }

                // Append the product to the products slice
                products = append(products, product)
        })

        // Iterate over the first 50 URLs to scrape them all
        pageLimit := 50 // To avoid overwhelming the target server with too many requests
        for _, url := range urls[:pageLimit] {
                c.Visit(url)
        }

        // Export the scraped products to CSV
        outputFile := "products.csv"
        csvFile, _ := os.Create(outputFile)
        defer csvFile.Close()

        // Initialize a new CSV writer
        writer := csv.NewWriter(csvFile)
        defer writer.Flush()

        // Write CSV header
        writer.Write([]string{"Title", "Price", "Stars", "Image URL"})

        // Write each product's data to the CSV
        for _, product := range products {
                writer.Write([]string{product.Title, product.Price, product.Stars, product.ImageURL})
        }
}
通过以下命令运行该抓取脚本:
go run scraper/scraper.go脚本执行可能需要一段时间,请耐心等待。执行完成后,项目文件夹中将出现 products.csv 文件。打开该文件,可看到表格形式整理好的抓取数据:
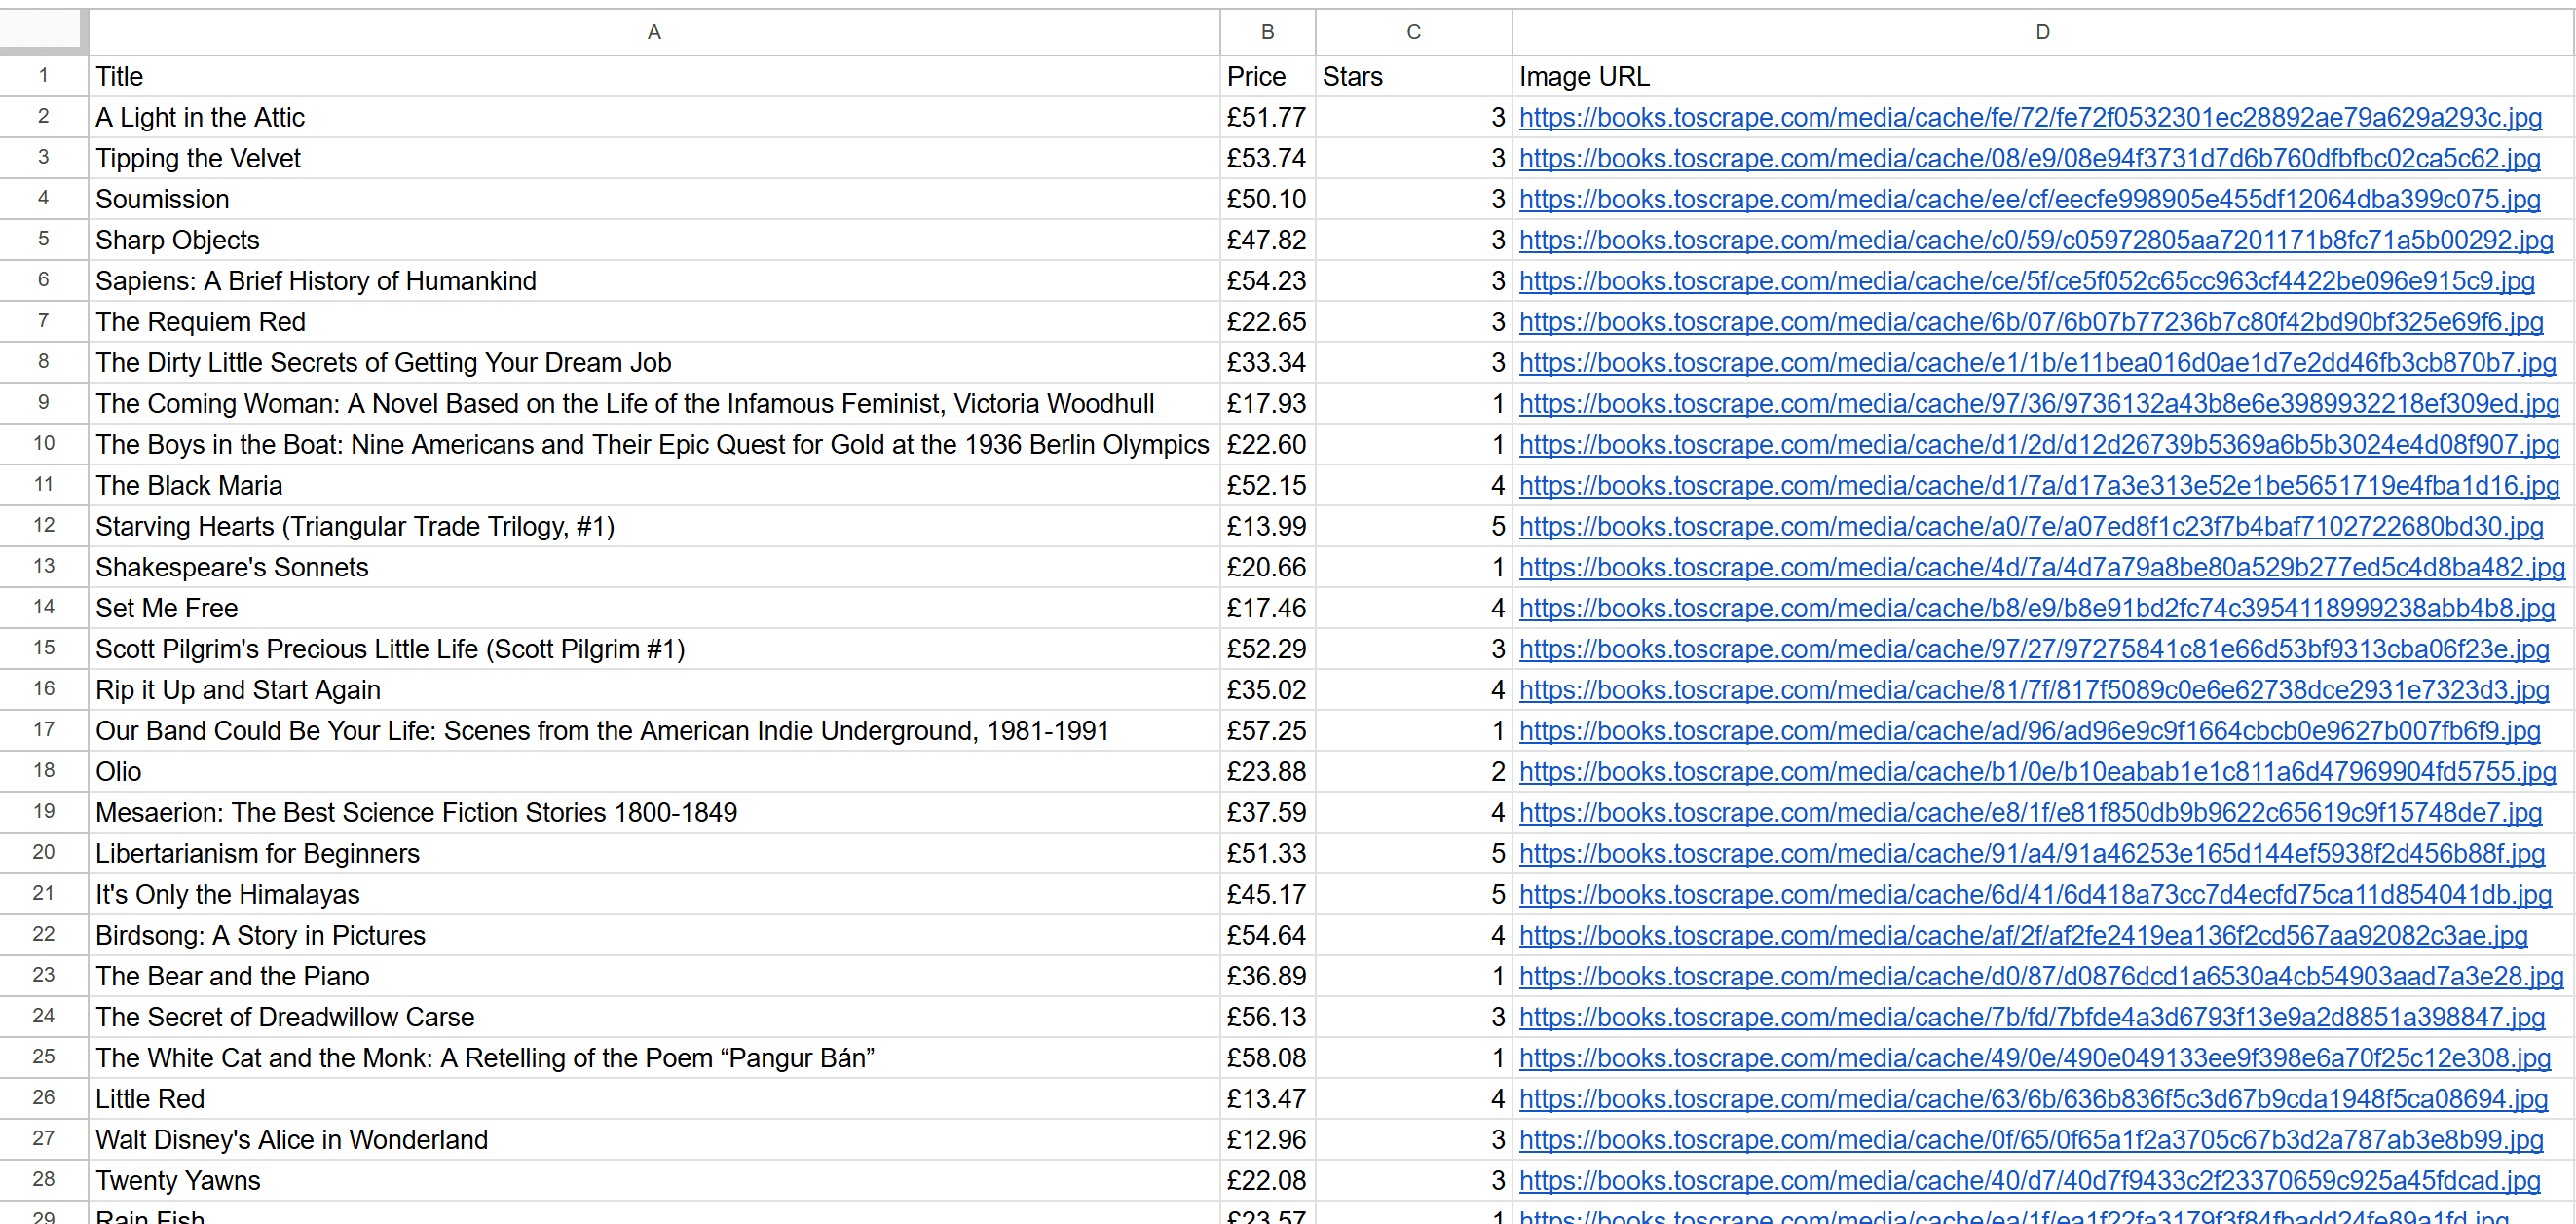
成功!将 Gospider 用于爬取,再用 Colly 进行抓取,是一个非常出色的组合。
Gospider 的爬取方式有哪些局限?
Gospider 的爬取方式主要面临两个限制:
- 由于请求过多而发生 IP 封禁。
- 目标网站使用的各种反爬虫技术。
下面我们分别看看应对方案:
避免 IP 封禁
当同一台机器向目标服务器发起过多请求时,就有可能被封禁 IP,这是网页爬取非常常见的问题,特别是在没做好速率控制或缺乏合规爬取的情况下。
Gospider 默认会尊重 robots.txt 来降低封禁风险,但并非所有网站都提供 robots.txt 文件,或者即便存在也未必能给出合理的速率限制。
若想减少 IP 封禁风险,可以尝试 Gospider 的 --delay、--random-delay、--timeout 这些参数,让请求发送得更慢一些。不过,要找到合适的组合可能需要耗费较多时间,效果也未必理想。
更有效的方式是使用 轮换代理,让 Gospider 每次请求都从不同的 IP 发出,从而防止被目标网站识别并封禁。
要在 Gospider 中使用轮换代理,可通过 -p(或 --proxy)参数指定代理 URL:
gospider -s "https://example.com" -o output -p "<PROXY_URL>"如果您还没有轮换代理,可在此免费获取:Bright Data 免费试用。
绕过反爬虫技术
即使使用了轮换代理,仍可能遇到有着严格反爬和反抓取策略的网站。比如,当您执行以下命令爬取 Cloudflare 保护的网站时:
gospider -s "https://community.cloudflare.com/" -o output结果就会是:
[url] - [code-403] - https://community.cloudflare.com/即目标服务器返回了 403 Forbidden,说明网站识别并封锁了 Gospider 发送的请求,致使无法进行任何链接爬取。
要避免这种情况,您需要使用 专业解锁型代理。它可绕过防爬虫和防抓取策略,让您获取到所有网页的 HTML。
注意:Bright Data 的 Web Unlocker 不仅能处理这些挑战,还可充当代理使用。一旦完成相关配置,便可像常规代理一样,直接在 Gospider 命令里使用。
结论
在这篇文章中,您了解了 Gospider 是什么、它的功能以及如何使用它在 Go 语言环境下实现网页爬取。我们还演示了如何与 Colly 配合,完成从爬取到抓取的完整流程。
在进行网页爬取时,面临的最大挑战之一是如何避免被封禁或被反爬措施拦截。应对的最佳方式是结合使用代理或 Web Unlocker 等服务。
Bright Data 的产品和服务适用于多种爬取及抓取场景,而不仅局限于 Gospider 的集成。下面是我们其他一些解决方案:
- 网络抓取 API:针对 100 多个热门网站的定制抓取、返回结构化数据。
- SERP API:一键解锁搜索引擎并抓取搜索结果页面。
- 网页爬虫 IDE:以无服务器函数形式运行自定义抓取逻辑的完整界面。
- 抓取浏览器:与 Puppeteer、Selenium、Playwright 兼容,并内置解锁机制。
立即注册 Bright Data,免费测试我们的代理服务和抓取产品吧!


