Python是进行网页抓取时最受欢迎的语言之一。互联网上最大的资讯来源是什么?谷歌!这就是为什么使用Python抓取谷歌如此流行。这个想法是自动检索SERP数据,并将其用于营销、竞争对手监控等。
按照这个指导教程,学习如何使用Selenium在Python中进行谷歌抓取。让我们开始吧!
从谷歌抓取什么数据?
谷歌是互联网上最大的公共数据来源之一。你可以从中检索到大量有趣的信息,从谷歌地图评论到“人们也在问”的答案:

然而,用户和公司通常感兴趣的是SERP数据。SERP,即“搜索 引擎结果页面”,是搜索引擎如谷歌响应用户查询时返回的页面。通常,它包括一个包含链接和网页文本描述的卡片列表。
这是SERP页面的样子:
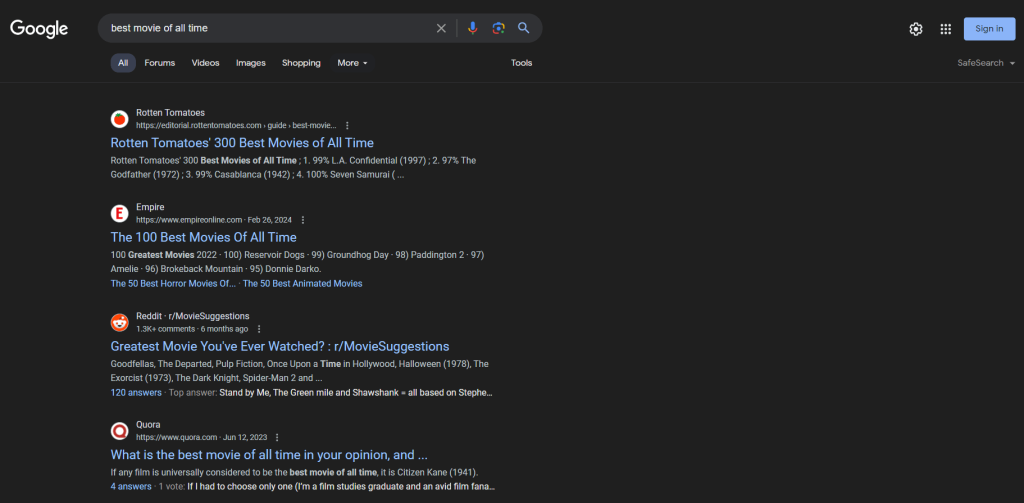
SERP数据对于企业了解其在线可见性和研究竞争对手非常重要。它提供了用户偏好、关键词表现和竞争对手策略的见解。通过分析SERP数据,企业可以优化其内容、提升SEO排名,并定制营销策略以更好地满足用户需求。
所以,现在你知道SERP数据无疑是非常有价值的。剩下的就是找到合适的工具来检索它。Python是进行网页抓取的 最佳编程语言之一 ,非常适合这个目的。但在深入手动抓取之前,让我们探讨一下抓取谷歌搜索结果的最佳和最快选项: Bright Data的SERP API。
介绍Bright Data的SERP API
在深入手动抓取指南之前,请考虑利用Bright Data的SERP API进行高效且无缝的数据采集。SERP API提供来自所有主要搜索引擎的实时搜索结果访问,包括谷歌、必应、DuckDuckGo、Yandex、百度、雅虎和Naver。这个强大的工具建立在Bright Data的 行业领先的代理服务 和先进的反机器人解决方案之上,确保数据检索的可靠性和准确性,而无需面对通常与网页抓取相关的挑战。
为什么选择Bright Data的SERP API而不是手动抓取?
- 实时结果和高准确性: SERP API提供实时搜索引擎结果,确保你获得准确和最新的数据。具有精确到城市级别的位置信息,你可以看到世界各地真实用户看到的内容。
- 先进的反机器人解决方案: 无需担心被封锁或处理CAPTCHA挑战。SERP API包括 自动CAPTCHA解决、浏览器指纹和全代理管理,确保数据采集顺畅无阻。
- 可定制和可扩展: API支持多种定制搜索参数,允许你根据具体需求定制查询。它为大流量设计,轻松处理增长的流量和高峰期。
- 易于使用: 通过简单的API调用,你可以以JSON或HTML格式获取结构化的SERP数据,轻松集成到现有系统和工作流程中。响应时间极快,通常不到5秒。
- 成本效益: 通过使用SERP API节省运营成本。你只需为成功请求付费,无需投资于维护抓取基础设施或处理服务器问题。
立即开始免费试用,体验Bright Data的SERP API的高效性和可靠性!
在Python中构建谷歌SERP抓取器
按照这个分步教程,看看如何在Python中构建一个谷歌SERP抓取脚本。
步骤1:项目设置
要跟随本指南,你需要在机器上安装Python 3。如果你需要安装它,下载安装程序,启动它,并按照向导操作。
你现在拥有了在Python中抓取谷歌所需的一切!
使用以下命令创建一个带有 虚拟环境的Python项目:
mkdir google-scraper

cd google-scraper

python -m venv env
google-scraper 将是你的项目的根目录。
在你喜欢的Python IDE中加载项目文件夹。 PyCharm社区版 或 Visual Studio Code带有Python扩展 都是很好的选择。
在Linux或macOS中,使用以下命令激活虚拟环境:
./env/bin/activate在Windows上则运行:
env/Scripts/activate注意,一些IDE会自动识别虚拟环境,因此不需要手动激活。
在你的项目文件夹中添加一个scraper.py文件并按如下所示初始化:
print("Hello, World!")这是一个简单的脚本,打印“Hello, World!”消息,但它很快就会包含谷歌抓取逻辑。
通过在IDE中点击运行按钮或使用以下命令启动脚本,验证你的脚本是否正常工作:
python scraper.py脚本应打印:
Hello, World!做得好!你现在有了一个用于SERP抓取的Python环境。
在跳到使用Python抓取谷歌之前,考虑一下我们的 使用Python进行网页抓取的指南。
步骤2:安装抓取库
是时候为抓取谷歌数据安装合适的Python抓取库了。有几种可用的选项,选择最佳方法需要对目标网站进行分析。与此同时,这是谷歌,我们都 知道谷歌的运作方式。
伪造一个不会引起谷歌反机器人技术注意的搜索URL是复杂的。归根结底,我们都知道谷歌需要用户互动。这就是为什么通过浏览器模拟真实用户与搜索引擎互动是最简单和最有效的方法。
换句话说,你将需要一个 无头浏览器工具 在可控的浏览器中渲染网页。 Selenium 将是完美的选择!
在激活的Python虚拟环境中,执行以下命令安装 selenium 包:
pip install selenium安装过程可能需要一些时间,请耐心等待。
太棒了!你刚刚将 selenium 添加到你的项目依赖项中。
步骤3:设置Selenium
通过将以下行添加到 scraper.py 来导入Selenium:
from selenium import webdriver

from selenium.webdriver.chrome.service import Service

from selenium.webdriver.chrome.options import Options
初始化一个 Chrome WebDriver 实例以在无头模式下控制Chrome窗口,如下所示:
# options to launch Chrome in headless mode

options = Options()

options.add_argument('--headless') # comment it while developing locally

# initialize a web driver instance with the

# specified options

driver = webdriver.Chrome(

service=Service(),

options=options

)注意:--headless标志确保Chrome将在没有GUI的情况下启动。如果你想查看脚本在谷歌页面上执行的操作,请注释掉该选项。通常,在本地开发时禁用--headless标志,但在生产环境中保留它。这是因为运行带有GUI的Chrome消耗大量资源。
作为脚本的最后一行,不要忘记关闭Web驱动程序实例:
driver.quit()你的scraper.py文件现在应包含:
from selenium import webdriver

from selenium.webdriver.chrome.service import Service

from selenium.webdriver.chrome.options import Options

# options to launch Chrome in headless mode

options = Options()

options.add_argument('--headless') # comment it while developing locally

# initialize a web driver instance with the

# specified options

driver = webdriver.Chrome(

service=Service(),

options=options

)

# scraping logic...

# close the browser and free up its resources

driver.quit()
太棒了!你拥有了抓取动态网站所需的一切。
步骤4:访问谷歌
在Python中抓取谷歌的第一步是连接到目标网站。使用 get() 函数从 driver 对象指示Chrome访问谷歌主页:
driver.get("https://google.com/")到目前为止,你的Python SERP抓取脚本应如下所示:
from selenium import webdriver

from selenium.webdriver.chrome.service import Service

from selenium.webdriver.chrome.options import Options

# options to launch Chrome in headless mode

options = Options()

options.add_argument('--headless') # comment it while developing locally

# initialize a web driver instance with the

# specified options

driver = webdriver.Chrome(

service=Service(),

options=options

)

# connect to the target site

driver.get("https://google.com/")

# scraping logic...

# close the browser and free up its resources

driver.quit()
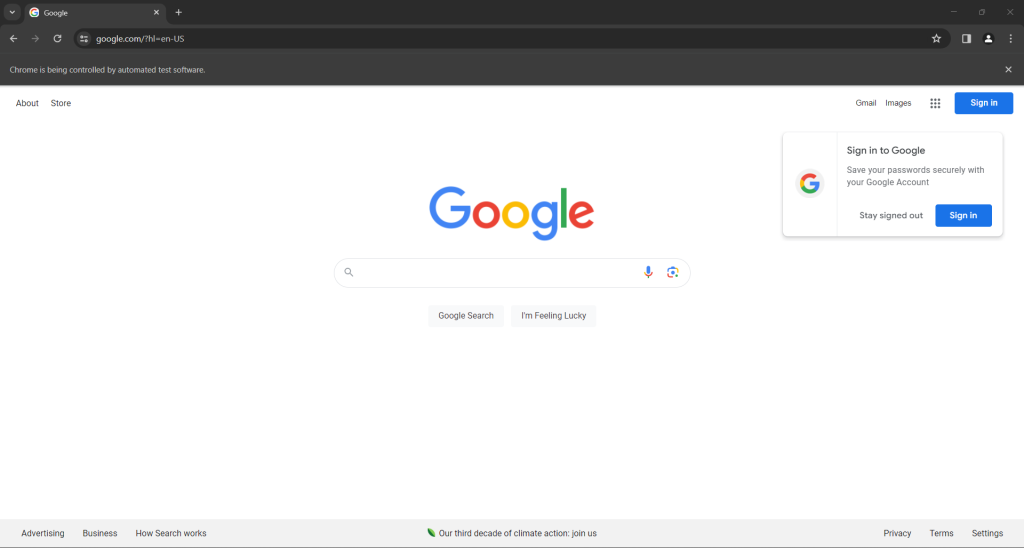
在有界模式下启动脚本,你会看到以下浏览器窗口在 quit() 指令终止前的一瞬间显示:
如果你是位于欧盟(European Union)的用户,谷歌主页还会包含以下GDPR弹出窗口:
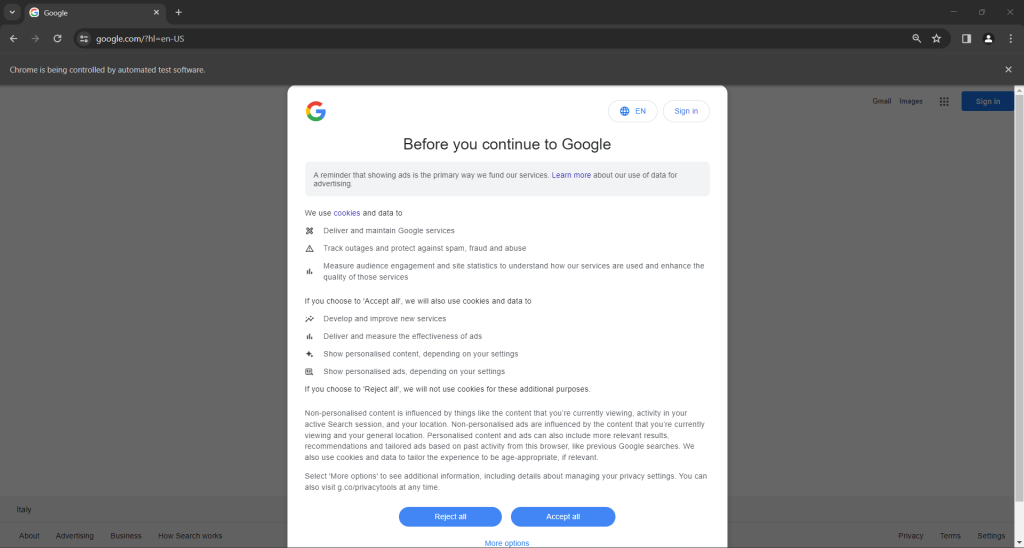
在两种情况下,“Chrome正被自动化测试软件控制”消息告知你Selenium正在按你希望的方式控制Chrome。
很棒!Selenium按预期打开了谷歌页面。
注意:如果谷歌因 GDPR 原因显示了cookie政策对话框,请按照下一步操作。否则,你可以跳到步骤6。
步骤5:处理GDPR cookie对话框
以下谷歌GDPR cookie对话框是否出现取决于你的IP位置。 将代理服务器集成到Selenium中 以选择你喜欢的国家的出口IP,避免此问题。
使用DevTools检查cookie对话框的HTML元素:
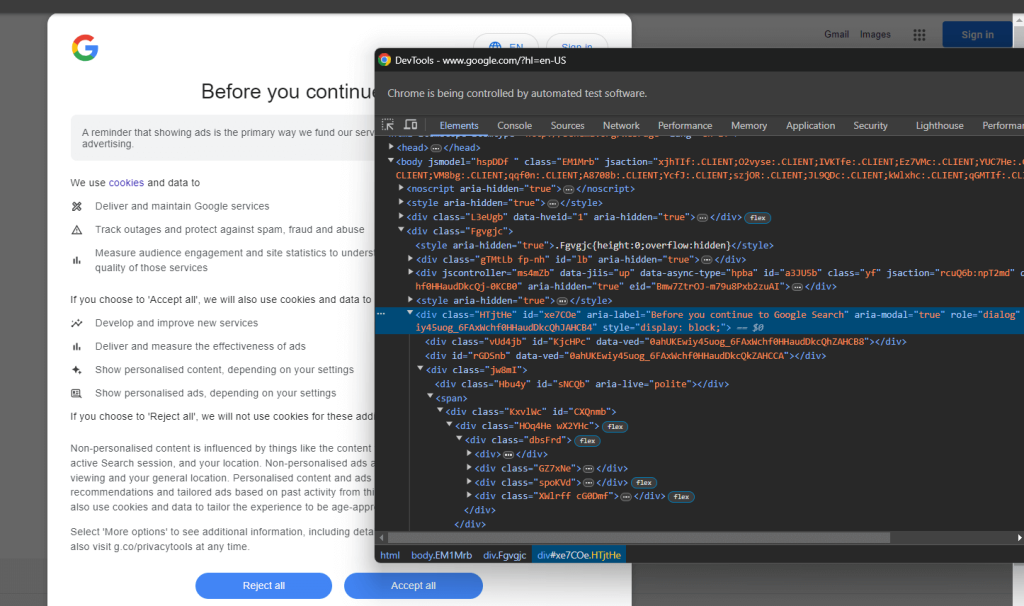
展开代码,你会注意到可以使用以下CSS选择器选择此HTML元素:
[role='dialog']如果你检查“接受所有”按钮,你会注意到没有简单的CSS选择策略来选择它:
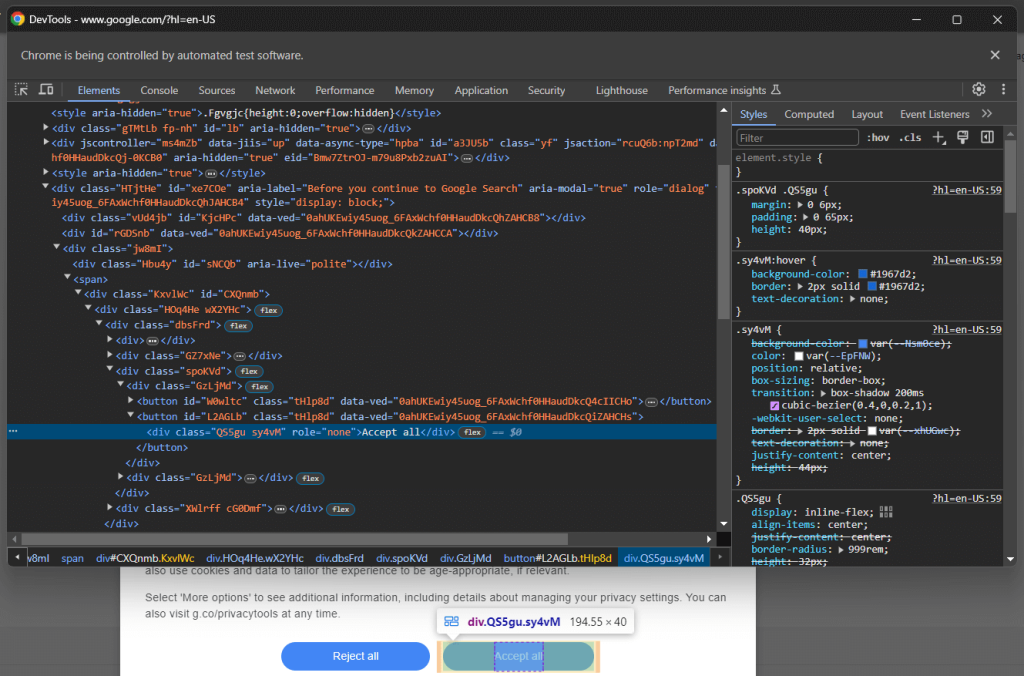
详细来说,HTML代码中的CSS类似乎是随机生成的。要选择该按钮,请获取cookie对话框元素中的所有按钮,并找到带有“接受所有”文本的按钮。选择对话框内所有按钮的CSS选择器是:
[role='dialog'] button通过将其传递给 find_elements() Selenium方法在DOM上应用CSS选择器。根据指定的策略选择页面上的HTML元素,在此情况下是 CSS选择器:
buttons = driver.find_elements(By.CSS_SELECTOR, "[role='dialog'] button")
要正常工作,上述行需要以下导入:
from selenium.webdriver.common.by import By使用 next() 找到“接受所有”按钮。然后,点击它:
accept_all_button = next((b for b in buttons if "Accept all" in b.get_attribute("innerText")), None)

# click the "Accept all" button, if present

if accept_all_button is not None:

accept_all_button.click()
此指令将定位对话框中文本包含“接受所有”字符串的<button>元素。如果存在,它将通过调用Selenium的click()方法点击它。
太棒了!你已经准备好在Python中模拟谷歌搜索以收集一些SERP数据。
步骤6:模拟谷歌搜索
在浏览器中打开谷歌,并在DevTools中检查搜索表单:
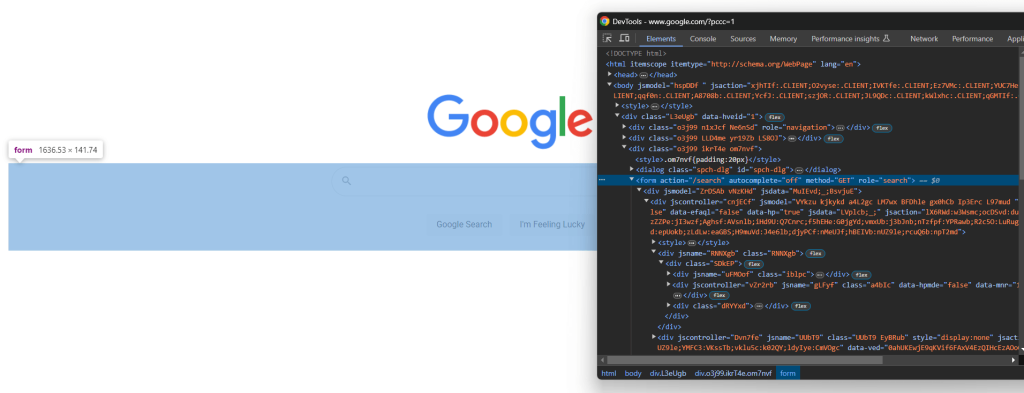
CSS类似乎是随机生成的,但你可以通过定位其 action 属性选择表单,使用以下CSS选择器:
form[action='/search']在Selenium中应用它,通过 find_element() 方法检索表单元素:
search_form = driver.find_element(By.CSS_SELECTOR, "form[action='/search']")如果你跳过了步骤5,你需要添加以下导入:
from selenium.webdriver.common.by import By展开表单的HTML代码,聚焦在搜索文本区域:
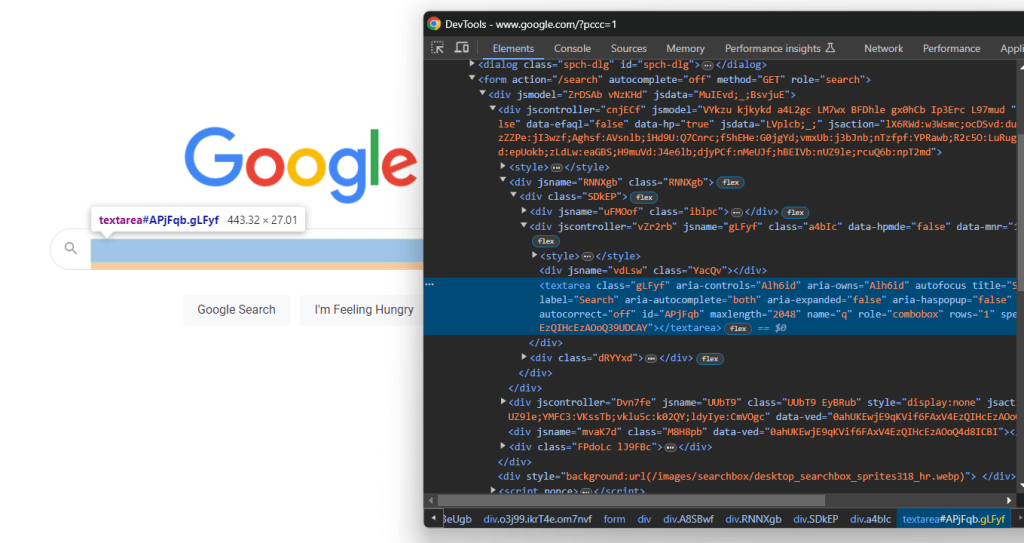
再次,CSS类是随机生成的,但你可以通过定位其aria-label值选择它:
textarea[aria-label='Search']因此,在表单内定位文本区域,并使用 send_keys() 方法键入谷歌搜索查询:
search_form_textarea= search_form.find_element(By.CSS_SELECTOR, "textarea[aria-label='Search']")

google_search_query = "bright data"

search_form_textarea.send_keys(google_search_query)
在此情况下,谷歌查询将是“bright data”。请记住,任何其他查询都可以。
现在,调用表单元素上的 submit() 方法提交表单,模拟谷歌搜索:
search_form.submit()谷歌将根据指定的查询执行搜索,并将你重定向到所需的SERP页面:
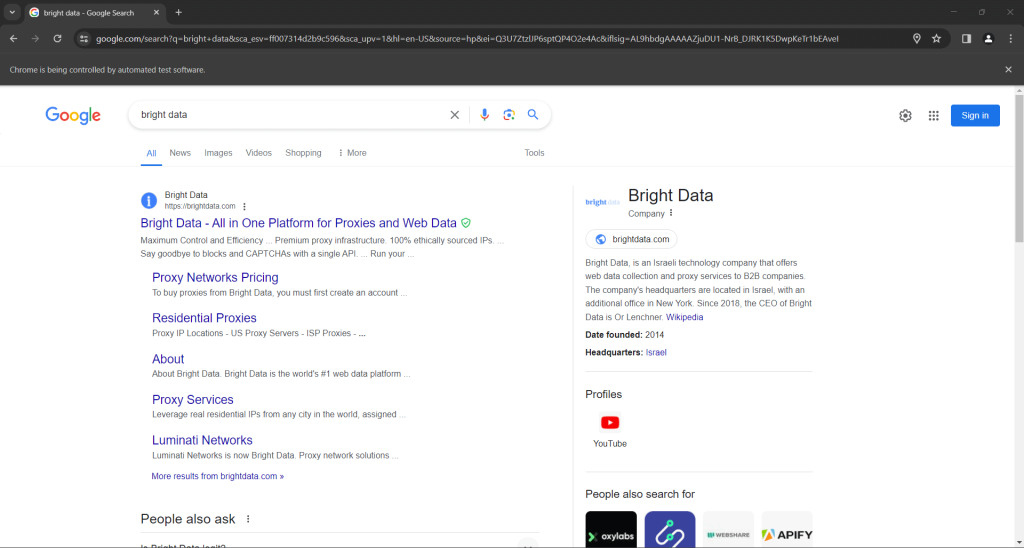
在Python中使用Selenium模拟谷歌搜索的行如下:
# select the Google search form

search_form = driver.find_element(By.CSS_SELECTOR, "form[action='/search']")

# select the textarea inside the form

search_form_textarea = search_form.find_element(By.CSS_SELECTOR, "textarea[aria-label='Search']")

# fill out the text area with a given query

google_search_query = "bright data"

search_form_textarea.send_keys(google_search_query)

# submit the form and perform the Google search

search_form.submit()
这里我们走了!准备通过在Python中抓取谷歌检索SERP数据。
步骤7:选择搜索结果元素
检查右侧栏中的结果部分:
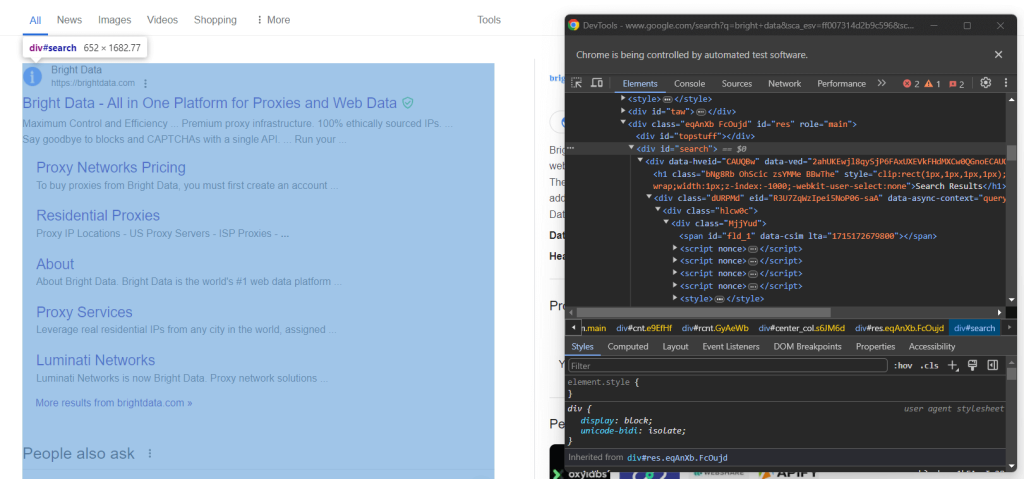
如你所见,这是一个 <div> 元素,你可以使用以下CSS选择器选择它:
#search不要忘记,谷歌页面是动态的。因此,在与它交互之前,你应该等待此元素出现在页面上。通过以下行实现:
search_div = WebDriverWait(driver, 10).until(EC.presence_of_element_located((By.CSS_SELECTOR, '#search')))WebDriverWait 是Selenium提供的一个特殊类,用于实现显式等待。特别是,它允许你等待页面上发生特定事件。
在此情况下,脚本将等待最多10秒,直到 #search HTML节点出现在节点上。这样,你可以确保谷歌SERP按预期加载。
WebDriverWait 需要一些额外的导入,因此将它们添加到 scraper.py中:
from selenium.webdriver.support.wait import WebDriverWait

from selenium.webdriver.support import expected_conditions as EC
现在,检查谷歌搜索元素:
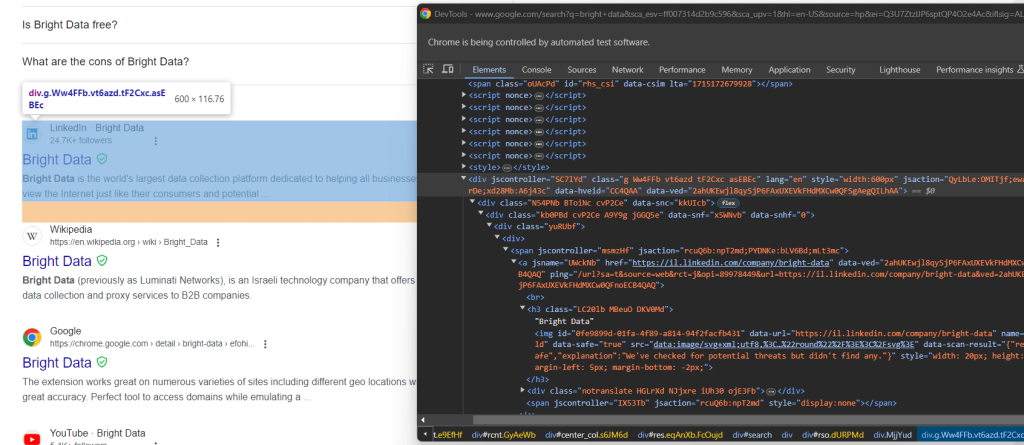
再次,通过CSS类选择它们不是一个好方法。相反,专注于它们不寻常的HTML属性。获取谷歌搜索元素的适当CSS选择器是:
div[jscontroller][lang][jsaction][data-hveid][data-ved]这标识了所有具有 jscontroller、lang、jsaction、data-hveid和 data-ved 属性的 <div>。
将其传递给 find_elements() 以通过Selenium在Python中选择所有谷歌搜索元素:
google_search_elements = search_div.find_elements(By.CSS_SELECTOR, "div[jscontroller][lang][jsaction][data-hveid][data-ved]")整个逻辑如下:
# wait up to 10 seconds for the search div to be on the page

# and select it

search_div = WebDriverWait(driver, 10).until(EC.presence_of_element_located((By.CSS_SELECTOR, '#search')))

# select the Google search elements in the SERP

google_search_elements = search_div.find_elements(By.CSS_SELECTOR, "div[jscontroller][lang][jsaction][data-hveid][data-ved]")
太棒了!你离通过Python抓取SERP数据仅一步之遥。
步骤8:提取SERP数据
并非所有谷歌SERP都是相同的。在某些情况下,页面上的第一个搜索结果具有不同的HTML代码:
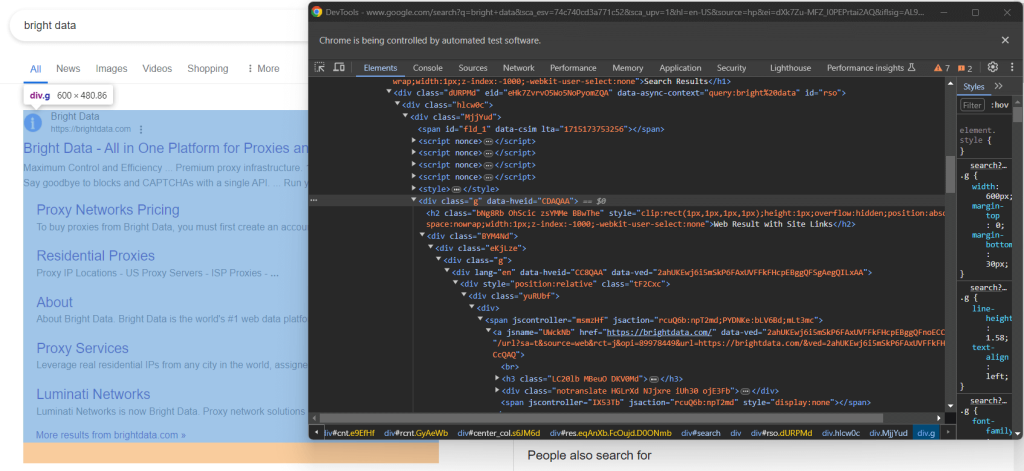
例如,在这种情况下,第一个搜索结果元素可以通过以下CSS选择器检索:
div.g[data-hveid]除此之外,谷歌搜索元素包含的内容基本相同。这包括:
- 在
<h3>节点中的页面标题。 - 在包含上述
<h3>元素的<a>元素中的特定页面的URL。 - 在
[data-sncf='1'] <div>中的描述。
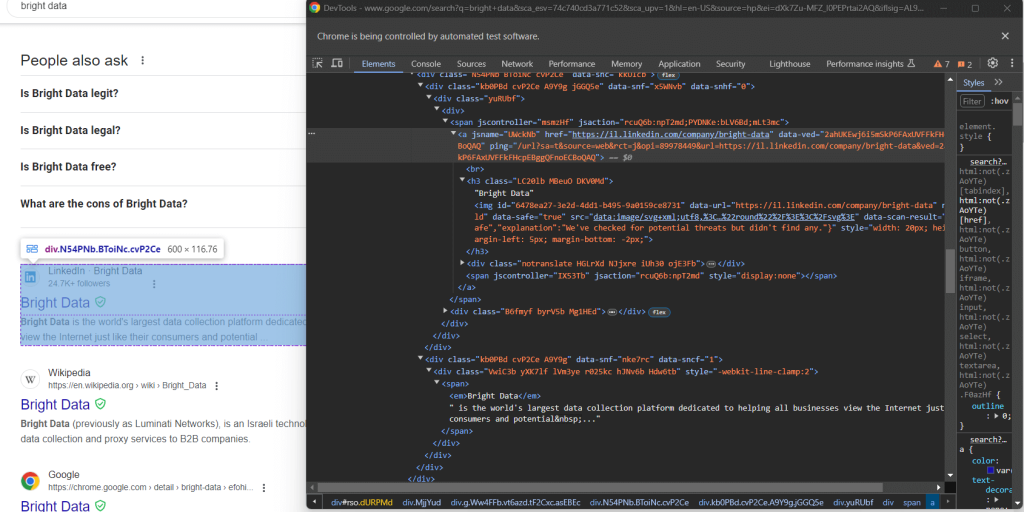
由于单个SERP包含多个搜索结果,请初始化一个数组来存储抓取的数据:
serp_elements = []你还需要一个 rank 整数来跟踪它们在页面上的排名:
rank = 1定义一个函数来在Python中抓取谷歌搜索元素,如下所示:
def scrape_search_element(search_element, rank):

# select the elements of interest inside the

# search element, ignoring the missing ones, and apply

# the data extraction logic

try:

title_h3 = search_element.find_element(By.CSS_SELECTOR, "h3")

title = title_h3.get_attribute("innerText")

except NoSuchElementException:

title = None

try:

# get the "a" element that has an "h3" child

url_a = search_element.find_element(By.CSS_SELECTOR, "a:has(> h3)")

url = url_a.get_attribute("href")

except NoSuchElementException:

url = None

try:

description_div = search_element.find_element(By.CSS_SELECTOR, "[data-sncf='1']")

description = description_div.get_attribute("innerText")

except NoSuchElementException:

description = None

# return a new SERP data element

return {

'rank': rank,

'url': url,

'title': title,

'description': description

}
谷歌往往经常更改其SERP页面。搜索元素内的节点可能会消失,你应该使用 try ... catch 语句进行保护。详细来说,当元素不在DOM上时,find_element() 会引发 NoSuchElementException 异常。
导入异常:
from selenium.common import NoSuchElementException注意使用 has() CSS运算符来选择具有特定子节点的节点。在 官方文档 中了解更多信息。
现在,将第一个搜索元素和其余的传递给 scrape_search_element() 函数。然后,将返回的对象添加到 serp_elements 数组中:
# scrape data from the first element on the SERP

# (if present)

try:

first_search_element = driver.find_element(By.CSS_SELECTOR, "div.g[data-hveid]")

serp_elements.append(scrape_search_element(first_search_element, rank))

rank += 1

except NoSuchElementException:

pass

# scrape data from all search elements on the SERP

for google_search_element in google_search_elements:

serp_elements.append(scrape_search_element(google_search_element, rank))

rank += 1在这些指令结束时,serp_elements 将存储所有感兴趣的SERP数据。通过在终端中打印它进行验证:
print(serp_elements)这将产生如下内容:
[

{'rank': 1, 'url': 'https://brightdata.com/', 'title': 'Bright Data - All in One Platform for Proxies and Web Data', 'description': None},

{'rank': 2, 'url': 'https://il.linkedin.com/company/bright-data', 'title': 'Bright Data', 'description': "Bright Data is the world's largest data collection platform dedicated to helping all businesses view the Internet just like their consumers and potential..."},

# omitted for brevity...

{'rank': 6, 'url': 'https://aws.amazon.com/marketplace/seller-profile?id=bf9b4324-6ee3-4eb3-9ca4-083e558d04c4', 'title': 'Bright Data - AWS Marketplace', 'description': 'Bright Data is a leading data collection platform, which enables our customers to collect structured and unstructured data sets from millions of websites...'},

{'rank': 7, 'url': 'https://techcrunch.com/2024/02/26/meta-drops-lawsuit-against-web-scraping-firm-bright-data-that-sold-millions-of-instagram-records/', 'title': 'Meta drops lawsuit against web-scraping firm Bright Data ...', 'description': 'Feb 26, 2024 — Meta has dropped its lawsuit against Israeli web-scraping company Bright Data, after losing a key claim in its case a few weeks ago.'}

]
不可思议!只剩下将抓取的数据导出为CSV。
步骤9:将抓取的数据导出为CSV
现在你知道如何使用Python抓取谷歌,看看如何将检索到的数据导出为CSV文件。
首先,从Python标准库导入 csv 包:
import csv接下来,使用 csv 包将你的SERP数据填充到输出的 serp_data.csv 文件中:
header = ["rank", "url", "title", "description"]

with open("serp_data.csv", 'w', newline='', encoding='utf-8') as csvfile:

writer = csv.DictWriter(csvfile, fieldnames=header)

writer.writeheader()

writer.writerows(serp_elements)
大功告成!你的谷歌Python抓取脚本已经准备好了。
步骤10:将所有内容整合在一起
这是你 scraper.py 脚本的最终代码:
from selenium import webdriver

from selenium.webdriver.chrome.service import Service

from selenium.webdriver.chrome.options import Options

from selenium.webdriver.common.by import By

from selenium.webdriver.support.wait import WebDriverWait

from selenium.webdriver.support import expected_conditions as EC

from selenium.common import NoSuchElementException

import csv

def scrape_search_element(search_element, rank):

# select the elements of interest inside the

# search element, ignoring the missing ones, and apply

# the data extraction logic

try:

title_h3 = search_element.find_element(By.CSS_SELECTOR, "h3")

title = title_h3.get_attribute("innerText")

except NoSuchElementException:

title = None

try:

# get the "a" element that has an "h3" child

url_a = search_element.find_element(By.CSS_SELECTOR, "a:has(> h3)")

url = url_a.get_attribute("href")

except NoSuchElementException:

url = None

try:

description_div = search_element.find_element(By.CSS_SELECTOR, "[data-sncf='1']")

description = description_div.get_attribute("innerText")

except NoSuchElementException:

description = None

# return a new SERP data element

return {

'rank': rank,

'url': url,

'title': title,

'description': description

}

# options to launch Chrome in headless mode

options = Options()

options.add_argument('--headless') # comment it while developing locally

# initialize a web driver instance with the

# specified options

driver = webdriver.Chrome(

service=Service(),

options=options

)

# connect to the target site

driver.get("https://google.com/?hl=en-US")

# select the buttons in the cookie dialog

buttons = driver.find_elements(By.CSS_SELECTOR, "[role='dialog'] button")

accept_all_button = next((b for b in buttons if "Accept all" in b.get_attribute("innerText")), None)

# click the "Accept all" button, if present

if accept_all_button is not None:

accept_all_button.click()

# select the Google search form

search_form = driver.find_element(By.CSS_SELECTOR, "form[action='/search']")

# select the textarea inside the form

search_form_textarea = search_form.find_element(By.CSS_SELECTOR, "textarea[aria-label='Search']")

# fill out the text area with a given query

google_search_query = "bright data"

search_form_textarea.send_keys(google_search_query)

# submit the form and perform the Google search

search_form.submit()

# wait up to 10 seconds for the search div to be on the page

# and select it

search_div = WebDriverWait(driver, 10).until(EC.presence_of_element_located((By.CSS_SELECTOR, '#search')))

# select the Google search elements in the SERP

google_search_elements = search_div.find_elements(By.CSS_SELECTOR, "div[jscontroller][lang][jsaction][data-hveid][data-ved]")

# where to store the scraped data

serp_elements = []

# to keep track of the current ranking

rank = 1

# scrape data from the first element on the SERP

# (if present)

try:

first_search_element = driver.find_element(By.CSS_SELECTOR, "div.g[data-hveid]")

serp_elements.append(scrape_search_element(first_search_element, rank))

rank += 1

except NoSuchElementException:

pass

# scrape data from all search elements on the SERP

for google_search_element in google_search_elements:

serp_elements.append(scrape_search_element(google_search_element, rank))

rank += 1

# export the scraped data to CSV

header = ["rank", "url", "title", "description"]

with open("serp_data.csv", 'w', newline='', encoding='utf-8') as csvfile:

writer = csv.DictWriter(csvfile, fieldnames=header)

writer.writeheader()

writer.writerows(serp_elements)

# close the browser and free up its resources

driver.quit()
哇!在仅仅100多行代码中,你就可以在Python中构建一个谷歌SERP抓取器。
通过在你的IDE中运行它或使用以下命令验证它是否产生预期结果:
python scraper.py等待抓取器执行结束,一个 serp_results.csv 文件将出现在项目的根文件夹中。打开它,你会看到:

恭喜!你刚刚在Python中执行了谷歌抓取。
结论
在本教程中,你看到了可以从谷歌收集哪些数据以及为什么SERP数据最有趣。特别是,你学习了如何使用浏览器自动化在Python中构建一个使用Selenium的SERP抓取器。
这适用于简单示例,但在使用Python抓取谷歌时存在三个主要挑战:
- 谷歌不断更改SERP的页面结构。
- 谷歌拥有市场上最先进的反机器人解决方案之一。
- 建立一个能够并行检索大量SERP数据的有效抓取过程既复杂又成本高昂。
通过Bright Data的SERP API忘记这些挑战。这个下一代API提供一组端点,公开来自所有主要搜索引擎的实时SERP数据。SERP API基于顶级的Bright Data 代理服务和 反机器人绕过解决方案,无需努力即可定位多个搜索引擎。
只需一个简单的API调用,通过 SERP API获取你的SERP数据,今天开始免费试用!
支持支付宝等多种支付方式

