在本指南中,您将学习:
- 什么是阿里巴巴爬虫,以及它是如何工作的
- 可以从阿里巴巴自动获取的各种数据类型
- 如何使用 Python 构建一个阿里巴巴爬虫脚本
让我们开始吧!
什么是阿里巴巴爬虫?
阿里巴巴爬虫是一种 网络爬虫机器人,专门用于自动从阿里巴巴的页面中提取数据。它通过模拟用户浏览行为来访问阿里巴巴页面,可处理诸如分页等交互,并获取诸如产品详情、价格和公司数据等结构化信息。
可以从阿里巴巴爬取的数据类型
阿里巴巴蕴藏着大量有价值的信息,例如:
- 产品详情:名称、描述、图片、价格范围、卖家信息等。
- 公司信息:公司名称、制造商详情、联系方式和评分等。
- 客户反馈:评分、产品评论等。
- 物流和库存:库存状态、最小起订量、运输方式等。
- 类别与标签:产品类别、相关标签或标识。
下面演示如何爬取这些数据!
使用 Python 爬取阿里巴巴:分步指南
在本章节,您将学习如何通过一个循序渐进的教程来构建阿里巴巴爬虫。
本教程的目标是教您如何编写 Python 脚本,以自动化方式从阿里巴巴的 “laptop” 页面提取数据:
准备好了吗?请按照以下步骤操作!
步骤 #1:项目初始化
首先,确保您的机器上安装了 Python 3。如果没有,请从 Python 官网 下载并按照安装向导进行安装。
现在,使用以下命令为您的项目创建一个文件夹:
mkdir alibaba-scraperalibaba-scraper 文件夹将用来存放 Python 的阿里巴巴爬虫脚本。
在终端中进入该文件夹,并在其中创建一个 虚拟环境:
cd alibaba-scraper
python -m venv env
在您常用的 Python IDE(如 Visual Studio Code(配合 Python 插件)或 PyCharm Community Edition)中加载该项目文件夹。
在项目目录下创建一个名为 scraper.py 的文件。此时,项目结构应该如下所示:

现在 scraper.py 还只是一个空的 Python 脚本,但后续我们会在其中加入爬虫逻辑。
在 IDE 的终端中,激活该虚拟环境。对于 Linux 或 macOS 系统,执行以下命令:
./env/bin/activate如果是 Windows 系统,则执行:
env/Scripts/activate太棒了!您的用于爬取阿里巴巴的 Python 环境已经准备就绪!
步骤 #2:选择爬取库
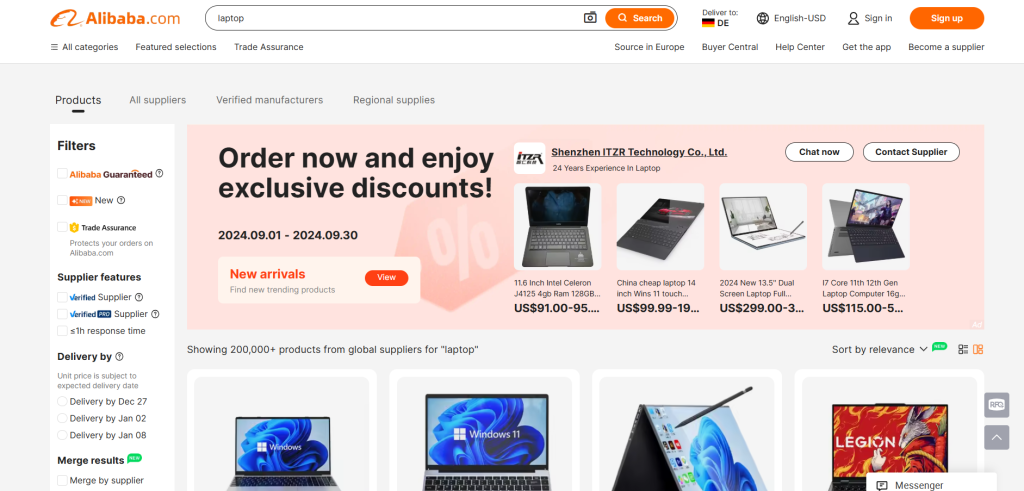
接下来,我们需要确定阿里巴巴页面是静态还是动态内容。为此,请在浏览器的无痕模式中打开 阿里巴巴目标页面。然后,在页面空白处右键选择“Inspect(检查)”,进入 “Network(网络)” 标签页,选择 “Fetch/XHR” 过滤器,随后刷新页面:
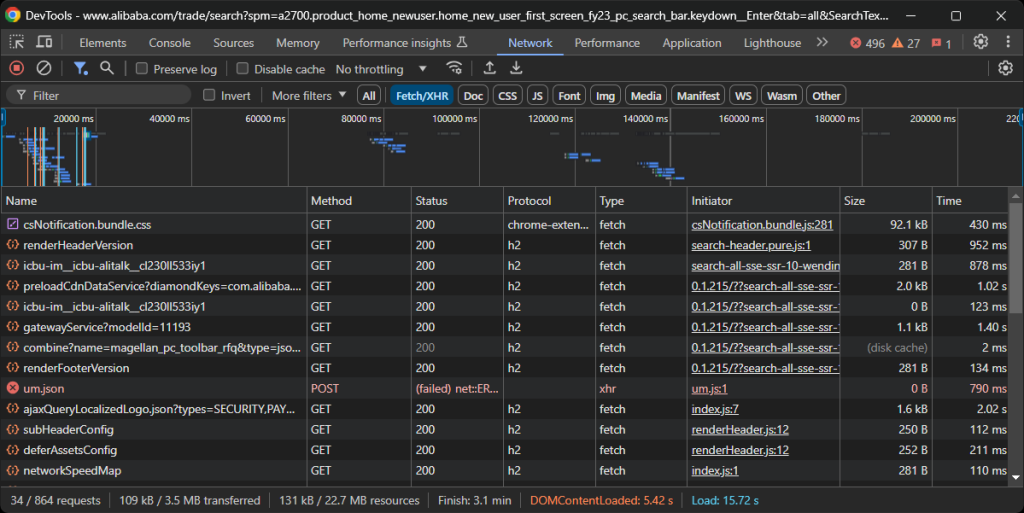
在开发者工具的这一部分,观察页面是否进行了动态请求。我们可以发现页面确实有明显的动态请求,说明它是动态页面。进一步分析可知,该页面使用 JavaScript 渲染。
换句话说,您需要使用类似 Selenium 这样的浏览器自动化工具来有效地爬取阿里巴巴。有关更多信息,可参阅我们的 Selenium 爬虫教程。
Selenium 允许您以编程方式控制浏览器,来模拟用户交互并因此能够抓取由 JavaScript 渲染的内容。现在让我们开始安装并使用它吧!
步骤 #3:安装并配置 Selenium
在已经激活的虚拟环境中,通过以下命令安装 Selenium:
pip install -U selenium在 scraper.py 文件中导入 Selenium,并创建一个 WebDriver 对象:
from selenium import webdriver
from selenium.webdriver.chrome.service import Service

# initialize a Chrome web driver instance
driver = webdriver.Chrome(service=Service())
以上代码通过 WebDriver 控制 Chrome。需要注意的是,阿里巴巴有一定的反爬措施,可能会阻止无头浏览器。
因此,您不应设置 --headless 标志。您也可以考虑使用 Playwright Stealth 这样更“隐身”的方式。
在爬虫脚本末尾别忘了关闭浏览器驱动:
driver.quit()很好!现在您已经准备好开始爬取阿里巴巴。
步骤 #4:连接到目标页面
通过使用 Selenium get() 方法访问目标页面:
url = "https://www.alibaba.com/trade/search?spm=a2700.product_home_newuser.home_new_user_first_screen_fy23_pc_search_bar.keydown__Enter&tab=all&SearchText=laptop"
driver.get(url)
您的 scraper.py 文件内容现在应该包含以下代码:
from selenium import webdriver
from selenium.webdriver.chrome.service import Service

# initialize a Chrome web driver instance
driver = webdriver.Chrome(service=Service())

# the url of the target page
url = "https://www.alibaba.com/trade/search?spm=a2700.product_home_newuser.home_new_user_first_screen_fy23_pc_search_bar.keydown__Enter&tab=all&SearchText=laptop"

# connect to the target page
driver.get(url)

# scraping logic...

# close the browser
driver.quit()
在最后一行设置一个调试断点,然后使用调试器运行脚本。您应该能看到类似如下的画面:

“Chrome 正在被自动测试软件控制”这条信息表示 Selenium 成功控制了 Chrome。干得好!
步骤 #5:选取商品元素
由于阿里巴巴的产品页面中包含多个商品,您可以先初始化一个数据结构来存储爬取结果。数组(列表)非常适合此用途:
products = []接下来,检查页面中每个商品对应的 HTML 元素,以便了解:
- 如何选取它们
- 它们包含哪些数据
- 该如何提取这些数据
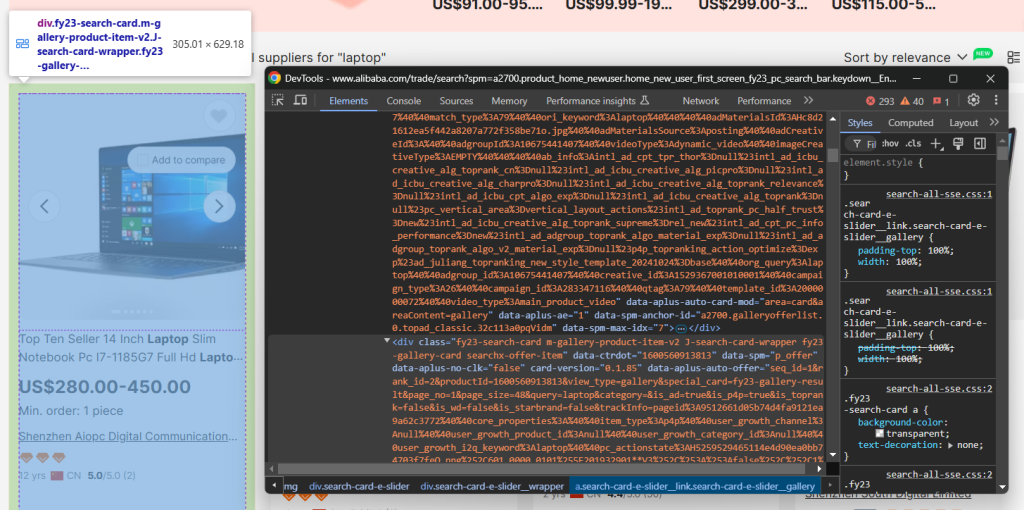
如上图所示,每个商品元素都是一个 .m-gallery-product-item-v2 节点。
使用 Selenium 来获取页面中所有商品元素:
product_elements = driver.find_elements(By.CSS_SELECTOR, ".m-gallery-product-item-v2")find_elements() 会根据给定的选择器策略获取页面中的所有匹配元素。这里所使用的选择器策略是 CSS 选择器。
别忘了导入 By:
from selenium.webdriver.common.by import By遍历所有匹配到的商品元素,为每个元素做数据提取的准备:
for product_element in product_elements:
    # scrape data from each product element
非常好!您距离成功爬取阿里巴巴又近了一步。
步骤 #6:爬取商品元素
再次检查单个商品元素,以了解其 HTML 结构:
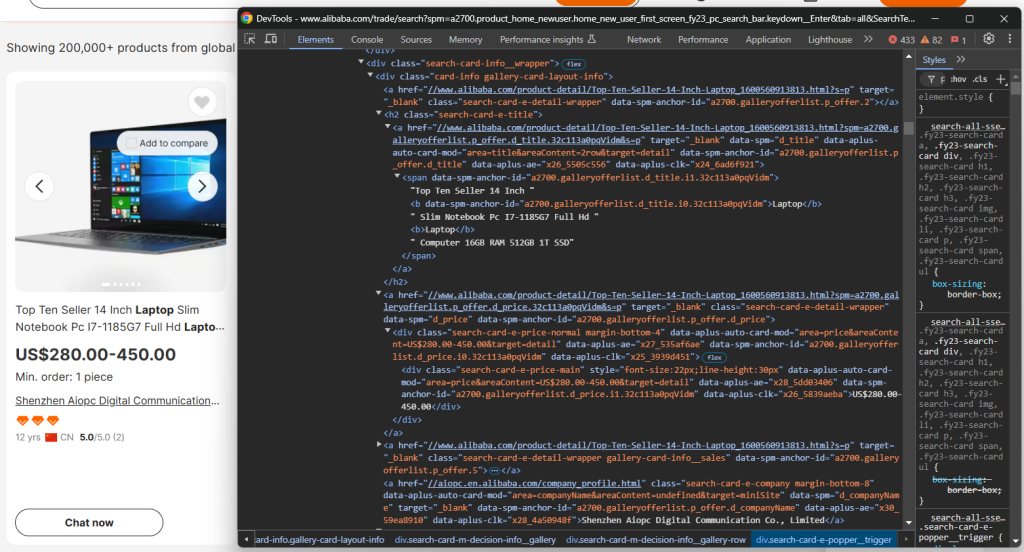
可以看到,您可以爬取:
- 商品图片:
.search-card-e-slider__img - 商品描述:
.search-card-e-title - 商品价格区间:
.search-card-e-price-main - 公司或制造商名称:
.search-card-e-company
在 for 循环中,将其转化为爬取逻辑:
img_element = product_element.find_element(By.CSS_SELECTOR,".search-card-e-slider__img")
img = img_element.get_attribute("src")

description_element = product_element.find_element(By.CSS_SELECTOR,".search-card-e-title")
description = description_element.text.strip()

price_element = product_element.find_element(By.CSS_SELECTOR,".search-card-e-price-main")
price = price_element.text.strip()

company_element = product_element.find_element(By.CSS_SELECTOR,".search-card-e-company")
company = company_element.text.strip()
find_element() 获取匹配给定 CSS 选择器的唯一元素,然后可以通过 text 属性来访问其文本内容。想要获取节点某个 HTML 属性的值,可以使用 get_attribute() 方法。
将爬到的数据组装成一个字典,添加到 products 列表中:
product = {
    "img": img,
    "description": description,
    "price": price,
    "company": company
}
products.append(product)
太好了!阿里巴巴的数据提取部分已经完成。
步骤 #7:将爬到的数据导出为 CSV
您目前获取的数据都保存在 products 列表中。为了便于查看和分享,最好导出到人类可读格式,例如 CSV 文件。
使用下面的代码来创建并填充 CSV 文件:
csv_file_name = "products.csv"

with open(csv_file_name, mode="w", newline="", encoding="utf-8") as csv_file:
    writer = csv.DictWriter(csv_file, fieldnames=["image", "description", "price", "company"])

    # write the header row
    writer.writeheader()

    # write product data rows
    for product in products:
        writer.writerow(product)
别忘了从 Python 标准库中导入 csv:
import csv太棒了!您的阿里巴巴爬虫脚本已经完成。
步骤 #8:整合所有代码
以下是完整的阿里巴巴爬虫脚本示例:
from selenium import webdriver
from selenium.webdriver.chrome.service import Service
from selenium.webdriver.common.by import By
import csv

# initialize a Chrome web driver instance
driver = webdriver.Chrome(service=Service())

# the URL of the target page
url = "https://www.alibaba.com/trade/search?spm=a2700.product_home_newuser.home_new_user_first_screen_fy23_pc_search_bar.keydown__Enter&tab=all&SearchText=laptop"

# connect to the target page
driver.get(url)

# where to store the scraped data
products = []

# select all product elements on the page
product_elements = driver.find_elements(By.CSS_SELECTOR, ".m-gallery-product-item-v2")

# iterate over the product nodes and scrape data from them
for product_element in product_elements:
    # extract the product details
    img_element = product_element.find_element(By.CSS_SELECTOR,".search-card-e-slider__img")
    img = img_element.get_attribute("src")

    description_element = product_element.find_element(By.CSS_SELECTOR,".search-card-e-title")
    description = description_element.text.strip()

    price_element = product_element.find_element(By.CSS_SELECTOR,".search-card-e-price-main")
    price = price_element.text.strip()

    company_element = product_element.find_element(By.CSS_SELECTOR,".search-card-e-company")
    company = company_element.text.strip()

    # create a product dictionary with the
    # scraped data
    product = {
        "img": img,
        "description": description,
        "price": price,
        "company": company
    }

    # add the product data to the array
    products.append(product)

# define the output CSV file name
csv_file_name = "products.csv"

# open the file in write mode and create a CSV writer
with open(csv_file_name, mode="w", newline="", encoding="utf-8") as csv_file:
    writer = csv.DictWriter(csv_file, fieldnames=["img", "description", "price", "company"])

    # write the header row
    writer.writeheader()

    # write product data rows
    for product in products:
        writer.writerow(product)

# close the browser
driver.quit()
在 60 多行代码里,您就编写出了一个可以爬取阿里巴巴的 Python 脚本!
使用下面的命令来运行该爬虫脚本:
python3 script.py在 Windows 上则为:
python script.py项目目录下会生成 products.csv 文件。打开即可看到以下内容:
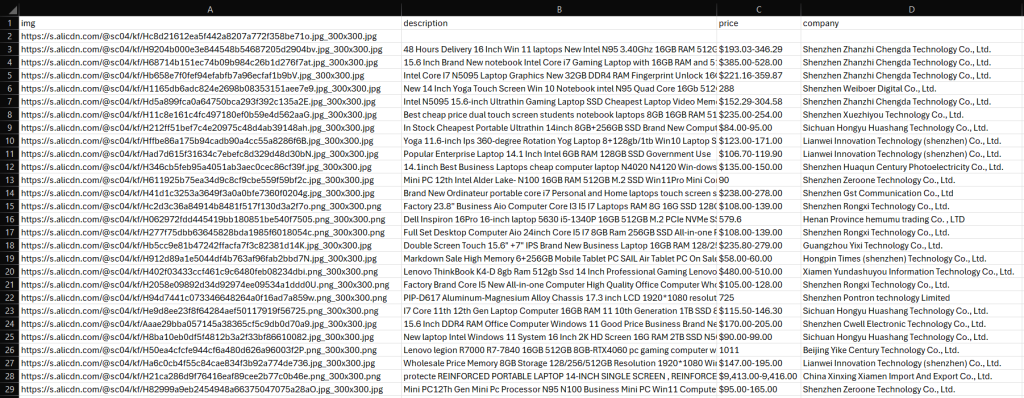
瞧!大功告成。下一步?处理分页、部署脚本、自动化其执行并进一步优化性能!
总结
通过本教程,您了解了什么是阿里巴巴爬虫以及它能获取哪些类型的数据,并且掌握了如何通过不到百行的 Python 代码来爬取阿里巴巴商品数据的完整流程。
值得注意的是,爬取阿里巴巴会面临一些挑战。该平台使用了严格的反机器人措施,并且采用了分页等交互方式,这些都会让爬虫更加复杂。要构建一个可扩展且有效的阿里巴巴爬虫并不轻松。
不过,使用我们的 阿里巴巴 Scraper API,您无需再担心各种难题!这个专用解决方案允许您通过简单的 API 调用来获取目标站点数据,不必担心被阻拦。
如果您并不想自行进行爬虫开发,但仍然需要产品数据,可以考虑使用我们现成的 阿里巴巴数据集!
立即创建一个免费的 Bright Data 账户,来试用我们的刮取 API,或探索我们的数据集吧。


技术写作
 5.5 years experience
Antonello是一名软件工程师,但他更喜欢称自己为技术传教士。通过写作传播知识是他的使命。