

在本指南中,您将了解:
- 什么是 Crunchbase 抓取器(scraper),以及它是如何工作的
- 可以从 Crunchbase 自动收集到哪些数据
- 如何使用 Python 编写 Crunchbase 抓取脚本
- 为什么您可能需要一个更高级的解决方案来抓取该网站
让我们开始吧!
什么是 Crunchbase 抓取器?
Crunchbase 抓取器是一种自动化工具,用于从 Crunchbase 网页中提取数据。它会自动浏览网站,识别所需信息,然后通过 网页抓取 将其收集起来。
Crunchbase 使用了先进的防机器人程序和防抓取措施来保护其数据。因此,一个高效的 Crunchbase 抓取器必须具备 JavaScript 渲染、验证码(CAPTCHA)识别以及伪造浏览器指纹等功能。
从 Crunchbase 抓取哪些数据
以下是可通过网页抓取方式从 Crunchbase 自动获取的数据列表:
- 公司信息:名称、简介、行业、总部地点、成立日期、状态(例如:活跃、被收购)等
- 融资数据:总融资额、融资轮次、投资方等
- 核心人员:创始人、高管、团队成员、职务与头衔等
- 产品与服务:产品描述、提供的产品或服务类别等
- 收购与合并:被收购公司的详情、收购日期和条款等
- 市场和财务数据:收入估算、员工数量等
- 新闻与动态:新闻稿、重要里程碑或事件等
- 竞争对手:竞争公司列表等
如何用 Python 搭建一个 Crunchbase 抓取器
在本教程部分,您将学习如何使用 Python 创建一个 Crunchbase 抓取器。我们的目标是编写一个脚本,能够自动从 Bright Data 的 Crunchbase 页面 收集数据:
按照以下步骤,来了解如何使用 Python 抓取 Crunchbase 数据!
步骤 #1:创建一个 Python 项目
首先,确保您的机器上安装了 Python 3 以上版本。如果还没有,请从 Python 官方网站 下载并按照说明安装。
创建一个目录来存放您的 Python Crunchbase 抓取器:
mkdir crunchbase-scrapercrunchbase-scraper 文件夹将用于存放您的 抓取机器人。
在您喜欢的 Python IDE(例如 PyCharm Community Edition 或 安装了 Python 扩展的 Visual Studio Code)中打开该项目文件夹。
接下来,在项目文件夹里创建一个 scraper.py 文件,此文件将存放 Crunchbase 的抓取逻辑。
现在,在您的终端中初始化一个 Python 虚拟环境(venv)。如果您使用 macOS 或 Linux,请执行:
python3 -m venv env在 Windows 上,则运行:
python -m venv env这样会在您的项目中创建一个 env 目录。
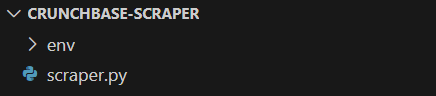
此时,您的项目结构应当如下所示:
使用以下命令激活虚拟环境:
source env/bin/activate或(在 Windows 上):
env\Scripts\activate太好了!现在您有一个 Python 项目,可在其中本地安装依赖。
记住,您可以使用以下命令来运行脚本:
python3 scraper.py在 Windows 上:
python scraper.py步骤 #2:确定并安装所需的抓取库
现在您需要找出最适合从 Crunchbase 提取数据的抓取库。首先,使用桌面端 HTTP 客户端对 目标网页 发起一个 GET 请求。下图是您将得到的结果:
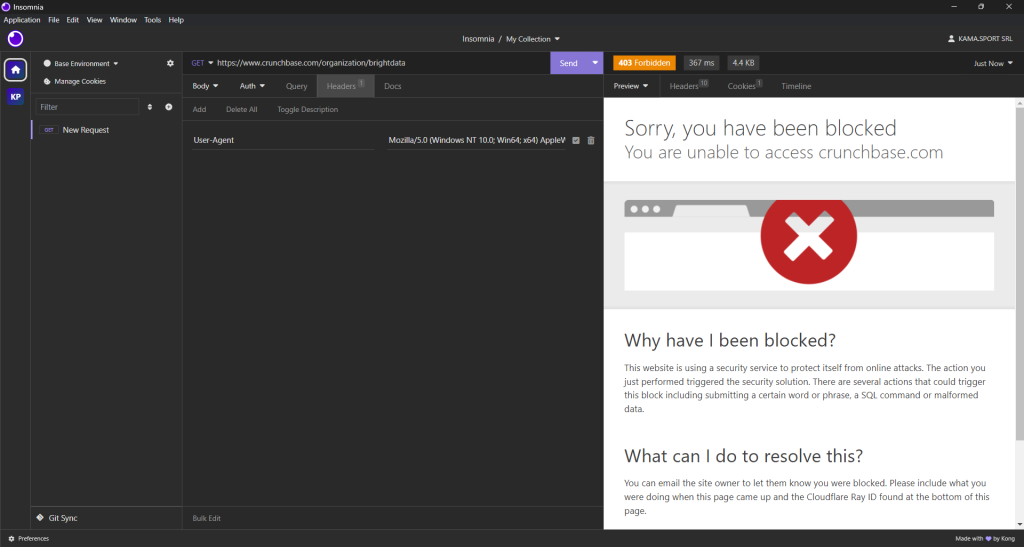
可以看到,即使设置了模拟真实浏览器的请求头,Crunchbase 仍然会阻止您的请求。这意味着您需要使用浏览器自动化工具来有效地抓取 Crunchbase。可参考我们关于 最佳无头浏览器 的文章,了解更多信息。
对于 Python 而言,Selenium 是最常用的无头浏览器自动化工具之一。它可以让您指挥浏览器去执行特定动作,并从 动态网页中抓取数据。
要安装 Selenium,请使用 selenium 的 pip 包。在激活的 Python 虚拟环境中运行以下命令:
pip install -U selenium然后,在 scraper.py 文件中通过以下语句导入 Selenium:
from selenium import webdriver很好!您现在拥有了一切所需来对 Crunchbase 进行网页抓取。
步骤 #3:访问目标页面
初始化一个 Chrome WebDriver 实例,并使用 get() 方法让浏览器访问想要抓取的目标页面:
driver = webdriver.Chrome()

url = "https://www.crunchbase.com/organization/brightdata"

driver.get(url)
最后,别忘了用下面的命令来关闭 WebDriver 并释放浏览器资源:
driver.quit()现在,您的 Crunchbase 抓取脚本就包含以下内容:
from selenium import webdriver

# initialize the driver to control a Chrome instance

# in headed mode

driver = webdriver.Chrome()

# navigate to the desired Crunchbase page

url = "https://www.crunchbase.com/organization/brightdata"

driver.get(url)

# scraping logic...

# close the driver and release the browser resources

driver.quit()
如果您现在运行它,脚本结束前您会短暂地看到网页:

“Chrome 正在受自动化测试软件控制”的提示表示 Selenium 成功接管了 Chrome。
在实际的抓取脚本中,通常会使用无头模式来节省资源。但由于 Crunchbase 拥有先进的检测系统,会阻止无头浏览器。因此,您需要保持浏览器的有头模式。或者,您可以尝试使用 Playwright Stealth 来绕过这些检测机制。
步骤 #4:处理 Cookie 弹窗
如果您在欧洲地区访问,网页加载几秒后会出现如下 Cookie 弹窗:
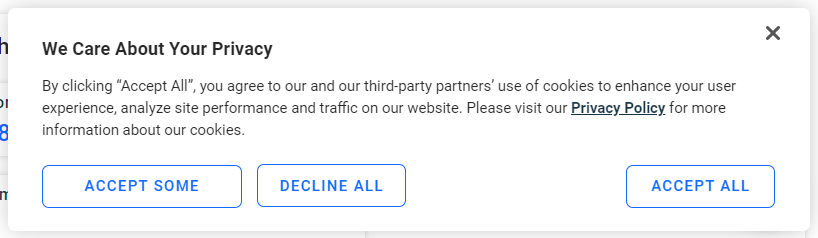
如果不点击“Accept All”按钮,就无法与页面进行交互。检查该按钮:
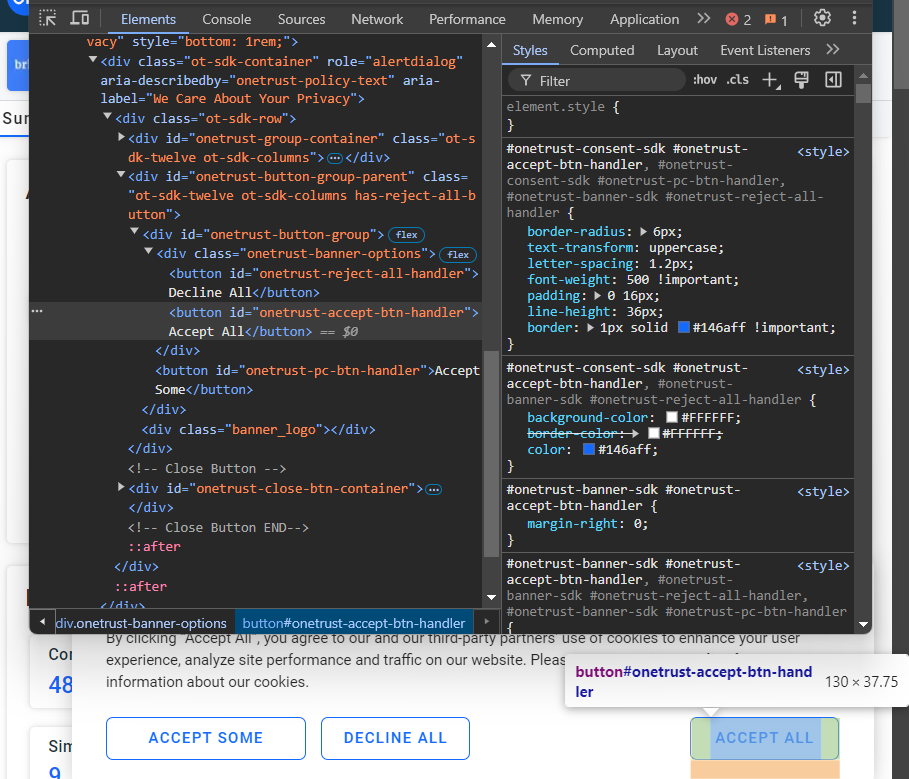
您可以使用 CSS 选择器 #onetrust-accept-btn-handler 选择它。
现在,编写一个函数,让其等待最多 60 秒,直到“Accept All”按钮出现在页面上并可被点击,然后对其进行点击:
def handle_cookie_banner(driver, seconds=60):

  try:

    # wait for the given number of seconds for the "Accept All"

    # button of the cookie banner to appear on the page

    accept_button = WebDriverWait(driver, seconds).until(

      EC.element_to_be_clickable((By.CSS_SELECTOR, "#onetrust-accept-btn-handler"))

    )

    # click the banner via JavaScript to avoid

    # ElementClickInterceptedException errors

    driver.execute_script("arguments[0].click();", accept_button)

    print("'Accept All' button clicked")

  except:

    print("'Accept All' button not found within {seconds} seconds")
注意:
try ... except块是必要的,因为有时页面上不会出现 Cookie 弹窗,这种情况下WebDriverWait会抛出NoSuchElementException,会被except捕获。- 通过 JavaScript 单击“Accept All”,而不是使用
click()方法。因为该按钮会有一个淡入动画,如果通过click()来点击,可能会出现ElementClickInterceptedException。
要使上述函数正常工作,您需要以下导入:
from selenium.webdriver.support.ui import WebDriverWait

from selenium.webdriver.support import expected_conditions as EC

from selenium.webdriver.common.by import By
然后即可通过调用:
handle_cookie_banner(driver)来处理 Cookie 弹窗。很好!接下来可以开始抓取页面上的数据了。
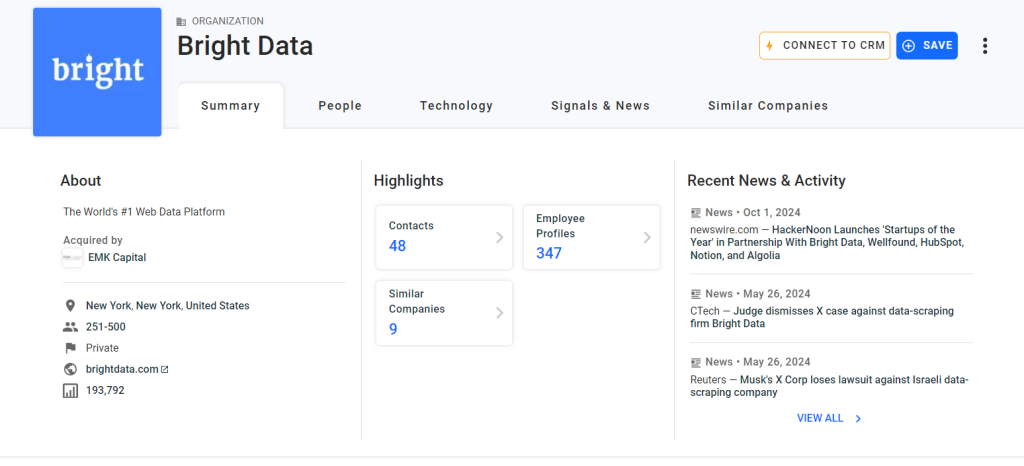
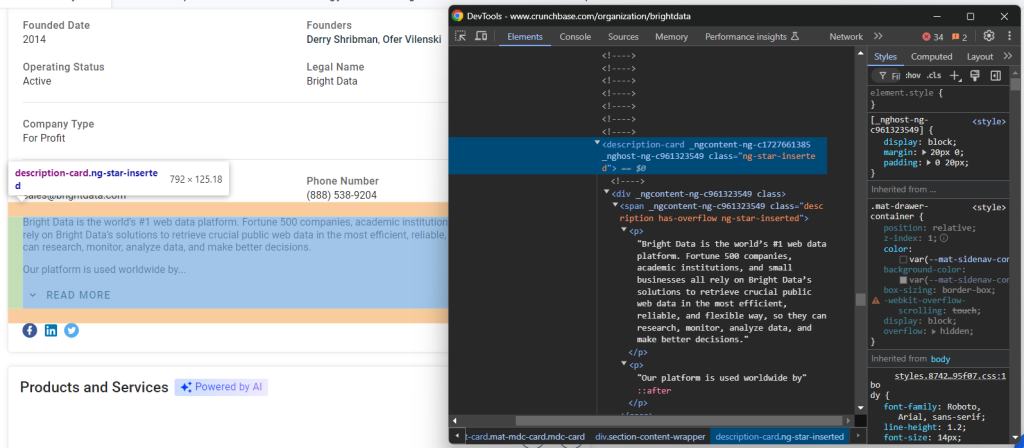
步骤 #5:抓取关于(About)信息
要抓取的第一条信息是“Summary”卡片中的“About”描述:
检查“About”元素的 HTML:
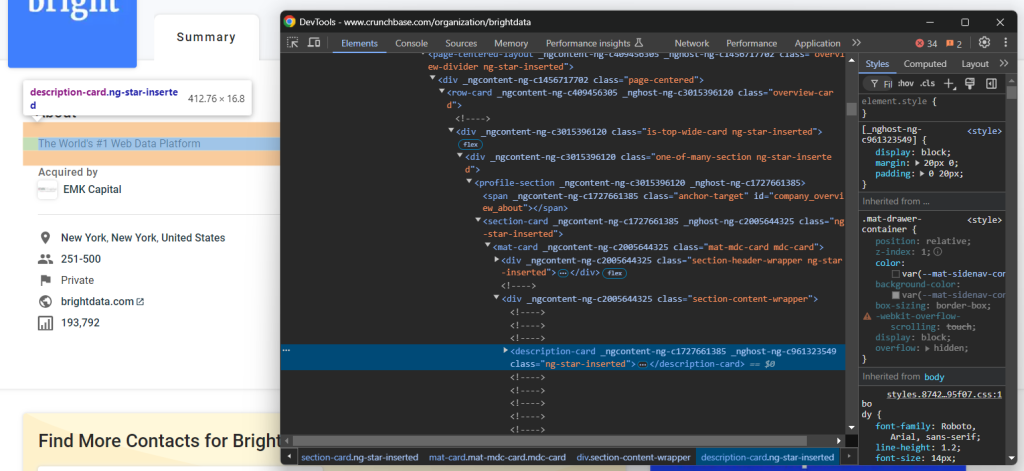
您可以使用下面的 CSS 选择器选中它:
profile-section description-card借助 find_element() 方法和 text 属性,就可以提取该节点内的文本:
about_node = driver.find_element(By.CSS_SELECTOR, "profile-section description-card")

about = about_node.text
此时 about 变量将包含:
'The World's #1 Web Data Platform'就是这样!
步骤 #6:查看页面结构
接下来,关注一下页面中“Details”卡片里的信息:
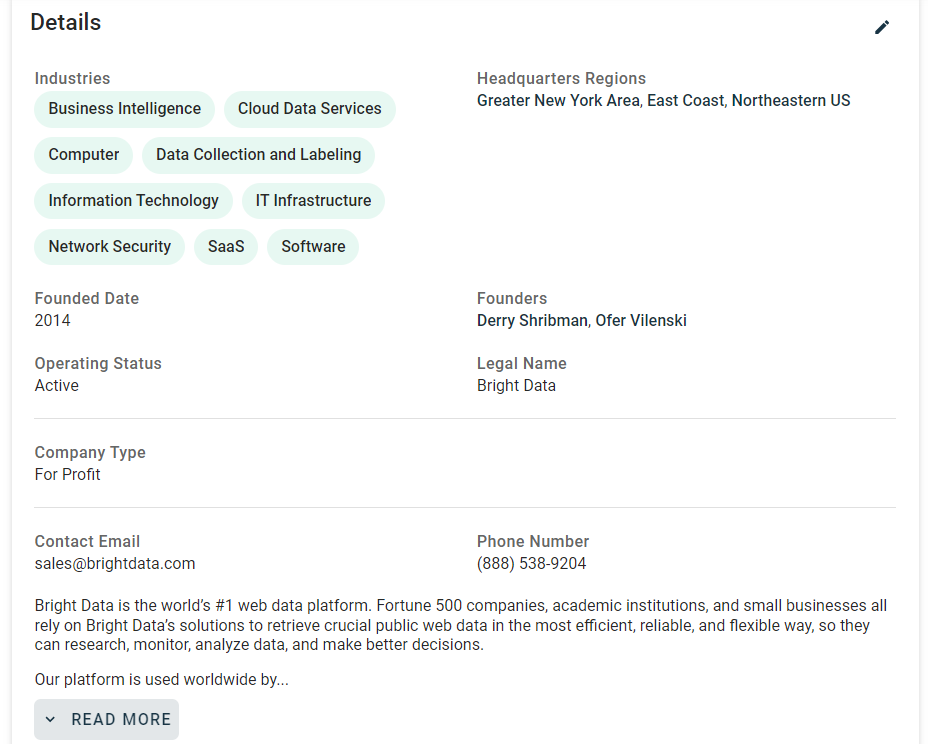
如果您去检查该部分,会发现并没有一个简便的方法来选择想要抓取的 HTML 元素:
这些节点大多具有随机的 HTML 属性,可能在编译构建时产生,并且每次部署后都会更改。此外,许多元素并没有唯一的 class 或 id 标记。
一种行之有效的方式是根据它们的标签来选择感兴趣的元素。例如,可以通过判断当前 fields-card 是否包含 label-with-info 节点且其文本内容为 “Industries” 来找到公司“Industries”的父节点。
在抓取这个部分时,需要反复使用这种方法。所以,可以把它写成一个函数来集中管理:
def find_parent_node_based_on_child_node_text(parent_nodes_selector, child_node_selector, text):

  # select all parent nodes

  parent_nodes = driver.find_elements(By.CSS_SELECTOR, parent_nodes_selector)

  # iterate through the parent nodes to find the one

  # whose specific child node contains the desired text

  for parent_node in parent_nodes:

    try:

      # get the specific child node within the current parent node

      child_node = parent_node.find_element(By.CSS_SELECTOR, child_node_selector)

      # check if it contains the desired text

      if text.upper() in child_node.text.upper():

          return parent_node

    except:

      continue

  return None
这样,就可以用下面的代码来选中包含“Industries”文本的 fields-card:
industries_parent_node = find_parent_node_based_on_child_node_text("fields-card li", "label-with-info", "Industries")很棒!这样一来,抓取 Crunchbase 数据就更方便了。
步骤 #7:抓取公司详情
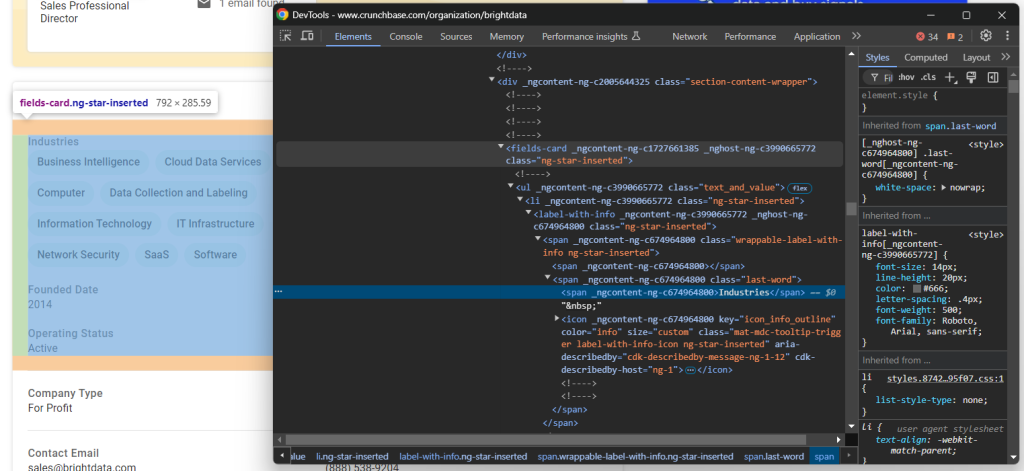
先来查看“Industries”对应的节点:
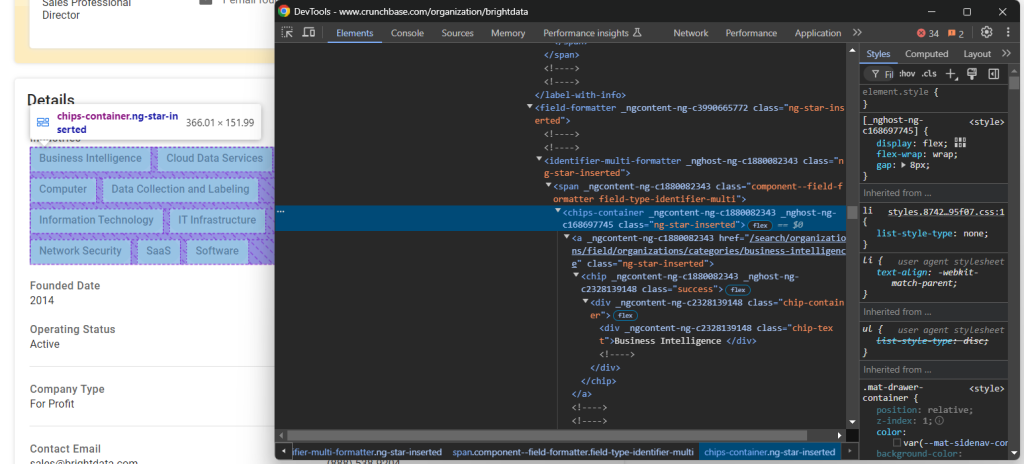
存放公司行业信息的节点是 chips-container a。只需选中这些节点,遍历并获取其文本:
industries_parent_node = find_parent_node_based_on_child_node_text("fields-card li", "label-with-info", "Industries")

industries_nodes = industries_parent_node.find_elements(By.CSS_SELECTOR, "chips-container a")

industries = []

for industry_node in industries_nodes:

  industries.append(industry_node.text)
然后,看看“Founded Date”元素:
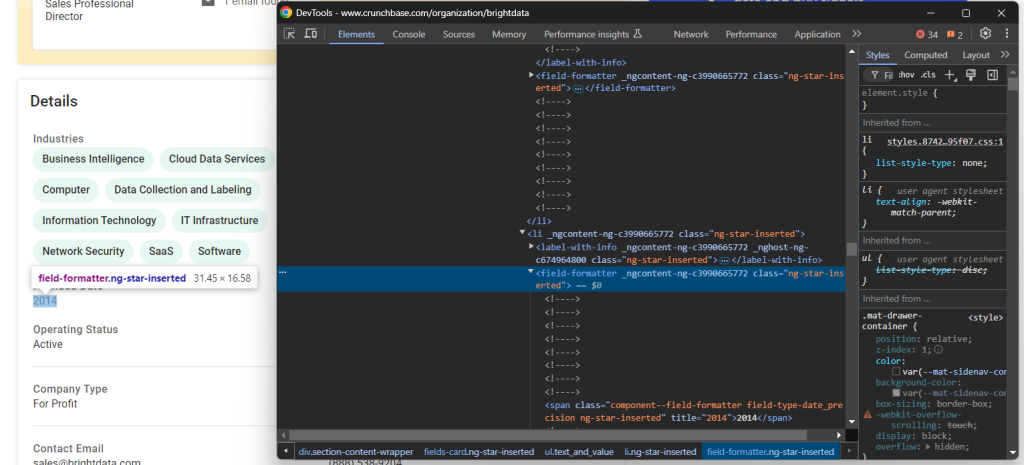
对于这个元素,只需从父节点 fields-card li 里的 field-formatter 中提取文本即可:
founded_date_parent_node = find_parent_node_based_on_child_node_text("fields-card li", "label-with-info", "Founded Date")

founded_date_node = founded_date_parent_node.find_element(By.CSS_SELECTOR, "field-formatter")

founded_date = founded_date_node.text
其他类似信息的抓取逻辑也相同:
company_type_parent_node = find_parent_node_based_on_child_node_text("fields-card li", "label-with-info", "Company Type")

company_type_node = company_type_parent_node.find_element(By.CSS_SELECTOR, "field-formatter")

company_type = company_type_node.text

operating_status_parent_node = find_parent_node_based_on_child_node_text("fields-card li", "label-with-info", "Operating Status")

operating_status_node = operating_status_parent_node.find_element(By.CSS_SELECTOR, "field-formatter")

operating_status = operating_status_node.text

headquarters_parent_node = find_parent_node_based_on_child_node_text("fields-card li", "label-with-info", "Headquarters Regions")

headquarters_node = headquarters_parent_node.find_element(By.CSS_SELECTOR, "field-formatter")

headquarters = headquarters_node.text

legal_name_parent_node = find_parent_node_based_on_child_node_text("fields-card li", "label-with-info", "Legal Name")

legal_name_node = legal_name_parent_node.find_element(By.CSS_SELECTOR, "field-formatter")

legal_name = legal_name_node.text

contact_email_parent_node = find_parent_node_based_on_child_node_text("fields-card li", "label-with-info", "Contact Email")

contact_email_node = contact_email_parent_node.find_element(By.CSS_SELECTOR, "field-formatter")

contact_email = contact_email_node.text

phone_number_parent_node = find_parent_node_based_on_child_node_text("fields-card li", "label-with-info", "Phone Number")

phone_number_node = phone_number_parent_node.find_element(By.CSS_SELECTOR, "field-formatter")

phone_number = phone_number_node.text
“Founders”元素需要稍微特殊一些:
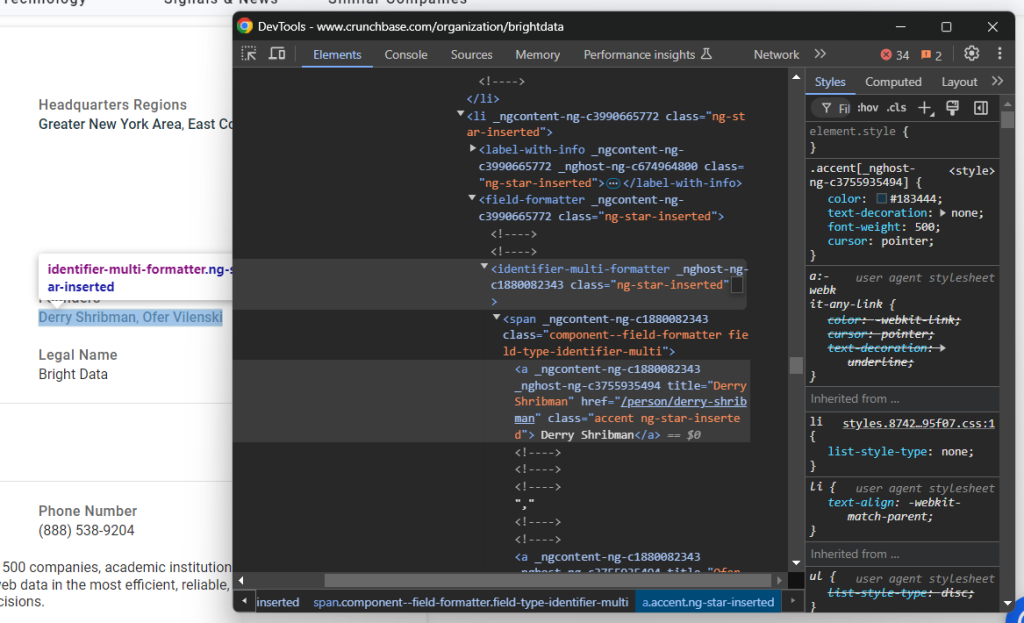
这里需要遍历 identifier-multi-formatter 里的 a 标签,逐一获取文本:
founders_parent_node = find_parent_node_based_on_child_node_text("fields-card li", "label-with-info", "Founders")

founders_nodes = founders_parent_node.find_elements(By.CSS_SELECTOR, "identifier-multi-formatter a")

founders = []

for founders_node in founders_nodes:

  founders.append(founders_node.text)
最后,Detail 区域底部还有一个描述性节点:
可以这样获取到:
description_node = driver.find_element(By.CSS_SELECTOR, "section-card description-card")

description = description_node.text
太好了!到这里,Crunchbase 的基础抓取逻辑已经完成大半。
步骤 #8:抓取“Products and Services”表格
公司提供的产品和服务也是值得收集的信息:
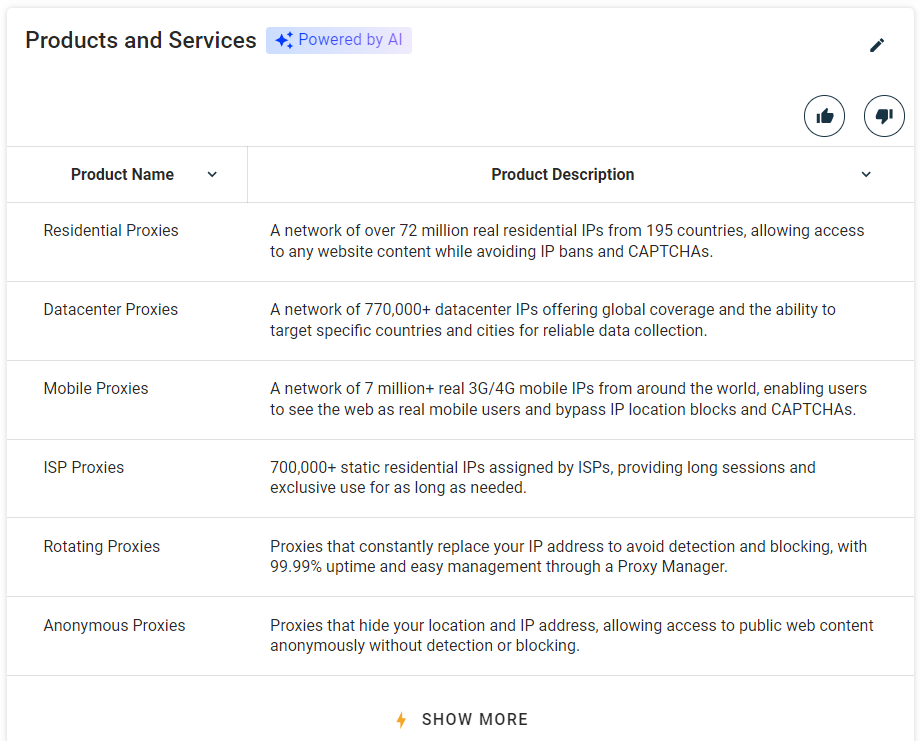
先用之前的函数找到“Products and Services”所在的 profile-section:
products_parent_node = find_parent_node_based_on_child_node_text("profile-section", ".section-title", "Products and Services")然后从表格中抓取数据:
products = []

for row in products_table_rows:

  # extract the name and description from each row's columns

  name = row.find_element(By.CSS_SELECTOR, "td:nth-child(1)").text

  description = row.find_element(By.CSS_SELECTOR, "td:nth-child(2)").text

  product = {

    "name": name,

    "description": description

  }

  products.append(product)
棒极了!Crunchbase 抓取逻辑就差最后的数据输出了。
步骤 #9:导出抓取到的数据
先将获取到的数据放进一个名为 company 的字典中:
company = {

  "about": about,

  "industries": industries,

  "founded_date": founded_date,

  "company_type": company_type,

  "operating_status": operating_status,

  "headquarters": headquarters,

  "founders": founders,

  "email": contact_email,

  "phone": phone_number,

  "description": description,

  "products": products

}
接下来,将其输出到一个名为 company.json 的文件中:
with open("company.json", "w") as json_file:

json.dump(company, json_file, indent=4)其中,open() 会在项目文件夹下新建一个 company.json 文件,而 json.dump() 会把 company 转化成 JSON 并写入到该文件里。
别忘了导入 Python 的 json 库:
import json步骤 #10:整合所有代码
以下是完整的 scraper.py 文件:
from selenium import webdriver

from selenium.webdriver.support.ui import WebDriverWait

from selenium.webdriver.support import expected_conditions as EC

from selenium.webdriver.common.by import By

import json

def find_parent_node_based_on_child_node_text(parent_nodes_selector, child_node_selector, text):

  # select all parent nodes

  parent_nodes = driver.find_elements(By.CSS_SELECTOR, parent_nodes_selector)

  # iterate through the parent nodes to find the one

  # whose specific child node contains the desired text

  for parent_node in parent_nodes:

    try:

      # get the specific child node within the current parent node

      child_node = parent_node.find_element(By.CSS_SELECTOR, child_node_selector)

      # check if it contains the desired text

      if text.upper() in child_node.text.upper():

          return parent_node

    except:

      continue

  return None

def handle_cookie_popup(driver, seconds=60):

  try:

    # wait for the given number of seconds for the "Accept All"

    # button of the cookie popup to appear on the page

    accept_button = WebDriverWait(driver, seconds).until(

      EC.element_to_be_clickable((By.CSS_SELECTOR, "#onetrust-accept-btn-handler"))

    )

    # click the popup via JavaScript to avoid

    # ElementClickInterceptedException errors

    driver.execute_script("arguments[0].click();", accept_button)

    print("'Accept All' button clicked")

  except:

    print("'Accept All' button not found within {seconds} seconds")

# initialize the driver to control a Chrome instance

# in headed mode

driver = webdriver.Chrome()

# navigate to the desired Crunchbase page

url = "https://www.crunchbase.com/organization/brightdata"

driver.get(url)

# handle the cookie popup, if present

handle_cookie_popup(driver)

# scraping logic

about_node = driver.find_element(By.CSS_SELECTOR, "profile-section description-card")

about = about_node.text

industries_parent_node = find_parent_node_based_on_child_node_text("fields-card li", "label-with-info", "Industries")

industries_nodes = industries_parent_node.find_elements(By.CSS_SELECTOR, "chips-container a")

industries = []

for industry_node in industries_nodes:

  industries.append(industry_node.text)

founded_date_parent_node = find_parent_node_based_on_child_node_text("fields-card li", "label-with-info", "Founded Date")

founded_date_node = founded_date_parent_node.find_element(By.CSS_SELECTOR, "field-formatter")

founded_date = founded_date_node.text

company_type_parent_node = find_parent_node_based_on_child_node_text("fields-card li", "label-with-info", "Company Type")

company_type_node = company_type_parent_node.find_element(By.CSS_SELECTOR, "field-formatter")

company_type = company_type_node.text

operating_status_parent_node = find_parent_node_based_on_child_node_text("fields-card li", "label-with-info", "Operating Status")

operating_status_node = operating_status_parent_node.find_element(By.CSS_SELECTOR, "field-formatter")

operating_status = operating_status_node.text

headquarters_parent_node = find_parent_node_based_on_child_node_text("fields-card li", "label-with-info", "Headquarters Regions")

headquarters_node = headquarters_parent_node.find_element(By.CSS_SELECTOR, "field-formatter")

headquarters = headquarters_node.text

founders_parent_node = find_parent_node_based_on_child_node_text("fields-card li", "label-with-info", "Founders")

founders_nodes = founders_parent_node.find_elements(By.CSS_SELECTOR, "identifier-multi-formatter a")

founders = []

for founders_node in founders_nodes:

  founders.append(founders_node.text)

legal_name_parent_node = find_parent_node_based_on_child_node_text("fields-card li", "label-with-info", "Legal Name")

legal_name_node = legal_name_parent_node.find_element(By.CSS_SELECTOR, "field-formatter")

legal_name = legal_name_node.text

contact_email_parent_node = find_parent_node_based_on_child_node_text("fields-card li", "label-with-info", "Contact Email")

contact_email_node = contact_email_parent_node.find_element(By.CSS_SELECTOR, "field-formatter")

contact_email = contact_email_node.text

phone_number_parent_node = find_parent_node_based_on_child_node_text("fields-card li", "label-with-info", "Phone Number")

phone_number_node = phone_number_parent_node.find_element(By.CSS_SELECTOR, "field-formatter")

phone_number = phone_number_node.text

description_node = driver.find_element(By.CSS_SELECTOR, "section-card description-card")

description = description_node.text

products_parent_node = find_parent_node_based_on_child_node_text("profile-section", ".section-title", "Products and Services")

products_table_rows = products_parent_node.find_elements(By.CSS_SELECTOR, "table tbody tr")

# scrape the product table

products = []

for row in products_table_rows:

  # extract the name and description from each row's columns

  name = row.find_element(By.CSS_SELECTOR, "td:nth-child(1)").text

  description = row.find_element(By.CSS_SELECTOR, "td:nth-child(2)").text

  product = {

    "name": name,

    "description": description

  }

  products.append(product)

# populate a dictionary with the scraped data

company = {

  "about": about,

  "industries": industries,

  "founded_date": founded_date,

  "company_type": company_type,

  "operating_status": operating_status,

  "headquarters": headquarters,

  "founders": founders,

  "email": contact_email,

  "phone": phone_number,

  "description": description,

  "products": products

}

# export the scraped data to a JSON file

with open("company.json", "w") as json_file:

  json.dump(company, json_file, indent=4)

# close the driver and release the browser resources

driver.quit()
在短短 100 多行代码里,您已经编写了一个可以抓取 Crunchbase 的 Python 抓取器!
使用以下命令来运行脚本:
python3 script.py在 Windows 上:
python script.py项目文件夹下会出现一个 company.json 文件。打开它,您会看到如下内容:
{

    "about": "The World's #1 Web Data Platform",

    "industries": [

        "Business Intelligence",

        "Cloud Data Services",

        "Computer",

        "Data Collection and Labeling",

        "Information Technology",

        "IT Infrastructure",

        "Network Security",

        "SaaS",

        "Software"

    ],

    "founded_date": "2014",

    "company_type": "For Profit",

    "operating_status": "Active",

    "headquarters": "Greater New York Area, East Coast, Northeastern US",

    "founders": [

        "Derry Shribman",

        "Ofer Vilenski"

    ],

    "email": "[email protected]",

    "phone": "(888) 538-9204",

    "description": "Proxies that hide your location and IP address, allowing access to public web content anonymously without detection or blocking.",

    "products": [

        {

            "name": "Residential Proxies",

            "description": "A network of over 72 million real residential IPs from 195 countries, allowing access to any website content while avoiding IP bans and CAPTCHAs."

        },

        {

            "name": "Datacenter Proxies",

            "description": "A network of 770,000+ datacenter IPs offering global coverage and the ability to target specific countries and cities for reliable data collection."

        },

        {

            "name": "Mobile Proxies",

            "description": "A network of 7 million+ real 3G/4G mobile IPs from around the world, enabling users to see the web as real mobile users and bypass IP location blocks and CAPTCHAs."

        },

        {

            "name": "ISP Proxies",

            "description": "700,000+ static residential IPs assigned by ISPs, providing long sessions and exclusive use for as long as needed."

        },

        {

            "name": "Rotating Proxies",

            "description": "Proxies that constantly replace your IP address to avoid detection and blocking, with 99.99% uptime and easy management through a Proxy Manager."

        },

        {

            "name": "Anonymous Proxies",

            "description": "Proxies that hide your location and IP address, allowing access to public web content anonymously without detection or blocking."

        }

    ]

}
这就是在 Crunchbase 上 Bright Data 公司页面所显示的数据。
非常好!您已经学会了如何使用 Python 对 Crunchbase 进行网页抓取。
轻松获取 Crunchbase 数据
Crunchbase 提供了大量有价值的信息,但同时也采取了严格的反抓取和反机器人措施。在使用无头浏览器或页面上执行某些操作时,您可能会遇到 403 Forbidden 错误页面或者验证码(CAPTCHA)。
首先,您可以参考我们的文章 如何在 Python 中绕过验证码。但要注意,Crunchbase 也采用了一些更高级的防抓取手段,您依旧可能会被网站屏蔽。
如果没有合适的工具,抓取 Crunchbase 可能会很费时且令人沮丧。而最好的解决方案就是 Bright Data 专门的 Crunchbase Scraper API。在不被阻拦的情况下获取您需要的数据!
总结
在这个分步教程中,您了解了什么是 Crunchbase 抓取器以及它能抓取到哪些类型的信息。并且学习了如何用大约 150 行左右的 Python 代码来搭建一个抓取 Crunchbase 公司概览数据的脚本。
然而,Crunchbase 采用了严格的反机器人和防自动化脚本保护措施,如验证码、浏览器指纹检测以及 IP 封禁等手段,给抓取带来了不小的挑战。如果您希望跳过所有这些障碍,Bright Data 的 Crunchbase Scraper API 可以为您提供一站式的解决方案。
如果您不想自己动手做抓取,却仍然需要 Crunchbase 的数据,也可以了解我们的 Crunchbase 数据集!
欢迎咨询我们的专家,了解哪一种 Bright Data 的方案最适合您的需求。


